Model Serving with GitOps
In this section, we’ll deploy the model and the game application using Argo CD, a declarative GitOps continuous delivery tool for Kubernetes. Argo CD follows the GitOps principles, where the desired state of the application is declaratively defined in a Git repository, and Argo CD ensures that the actual state of the deployed application matches the desired state. Argo CD continuously monitors the desired state of the application in the Git repository and automatically applies the changes to the Kubernetes cluster.
An Argo CD instance has been already preinstalled and configured in your argocd-{user}. This Argo CD instance comes from the OpenShift GitOps Operator.
Go to the OpenShift Web Console, select argocd-{user} project.
You can access the Argo CD web interface by clicking on the Argo CD route URL. The URL is displayed in the Topology view, and named argocd-server.
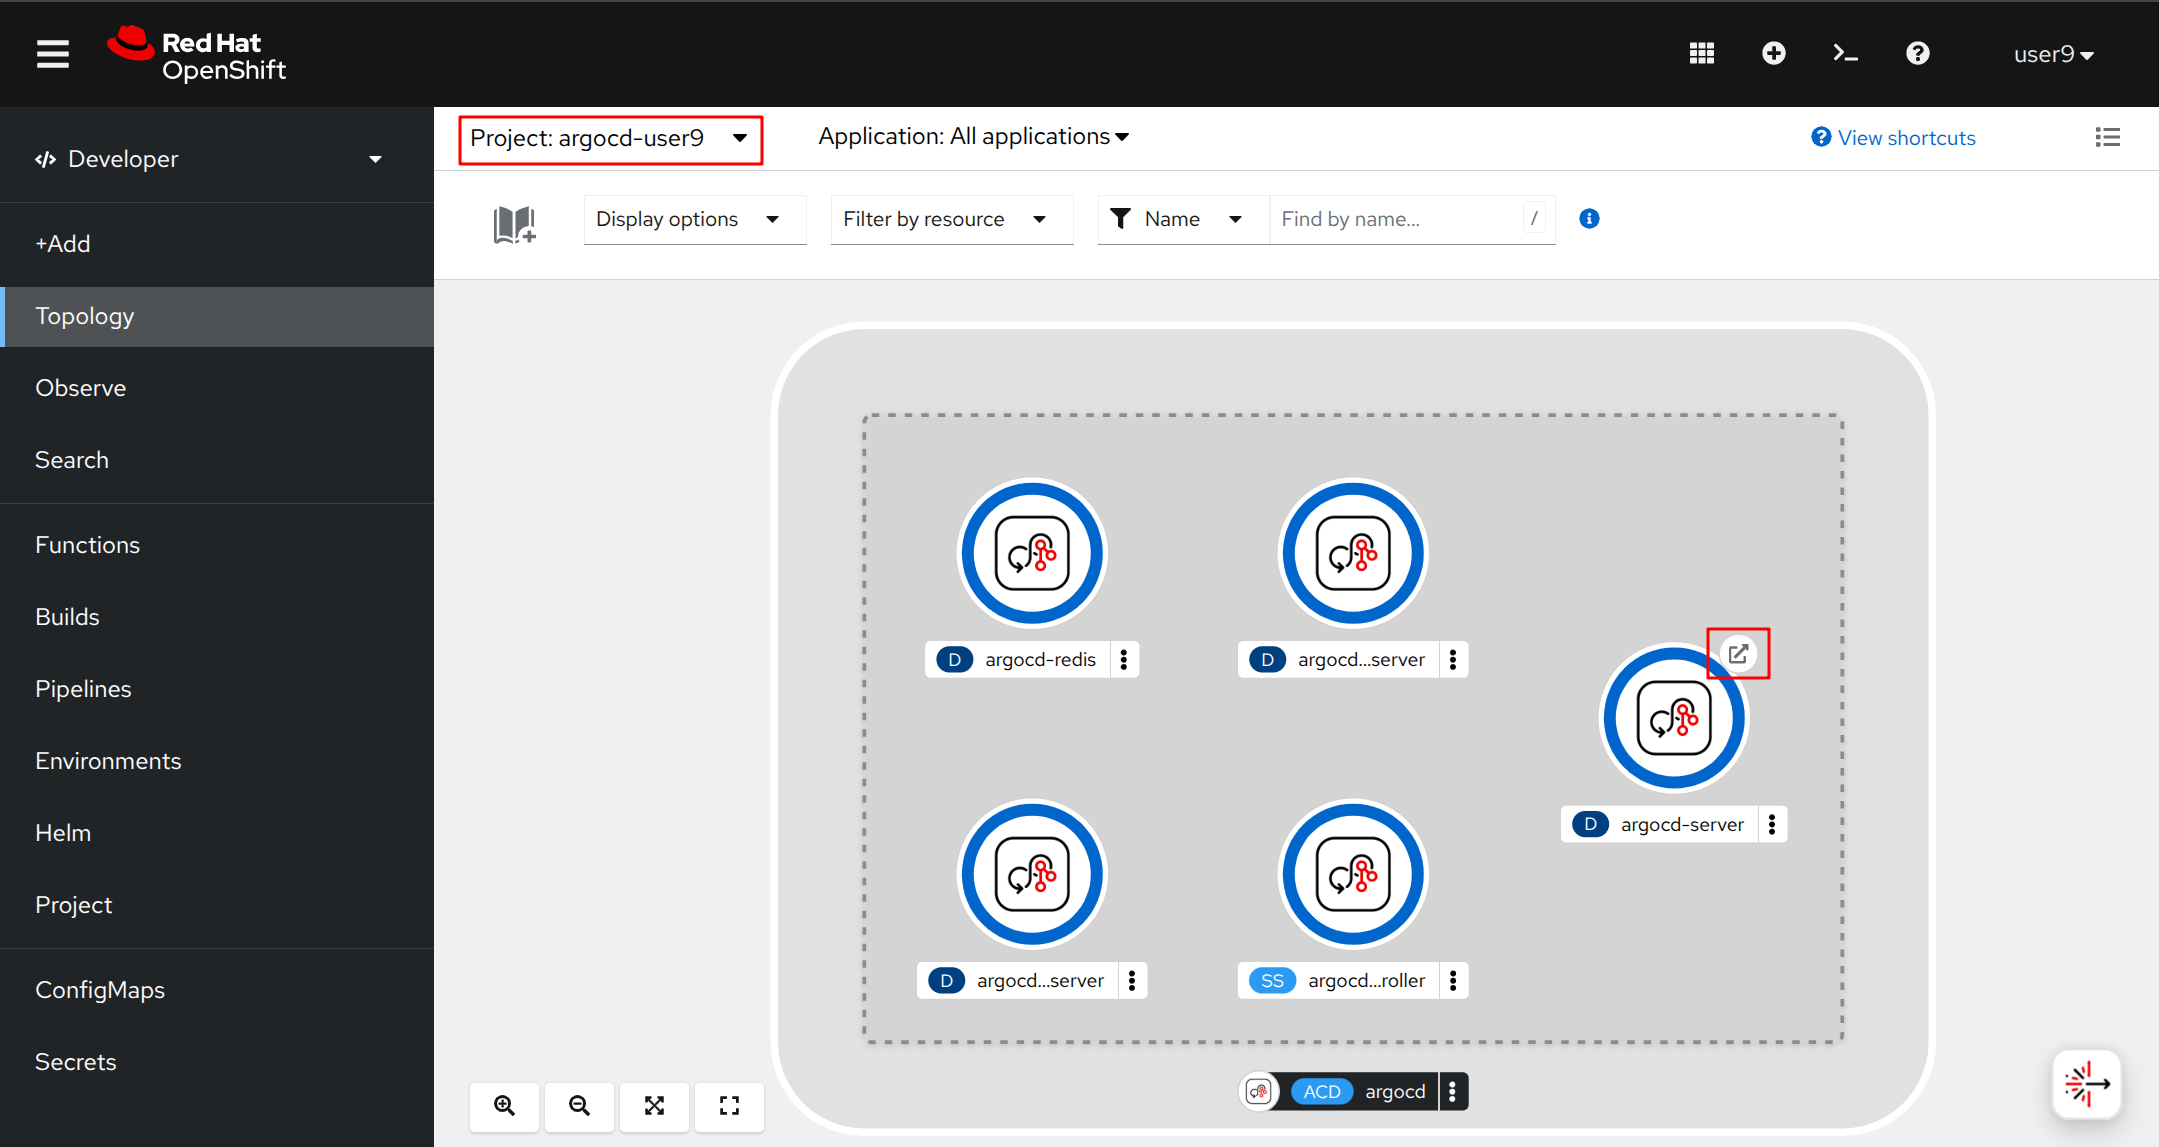
Make sure you access ArgoCD through the argocd-server route URL, and not the Cluster Argo CD route. This is to ensure your permissions are correctly set up.
|
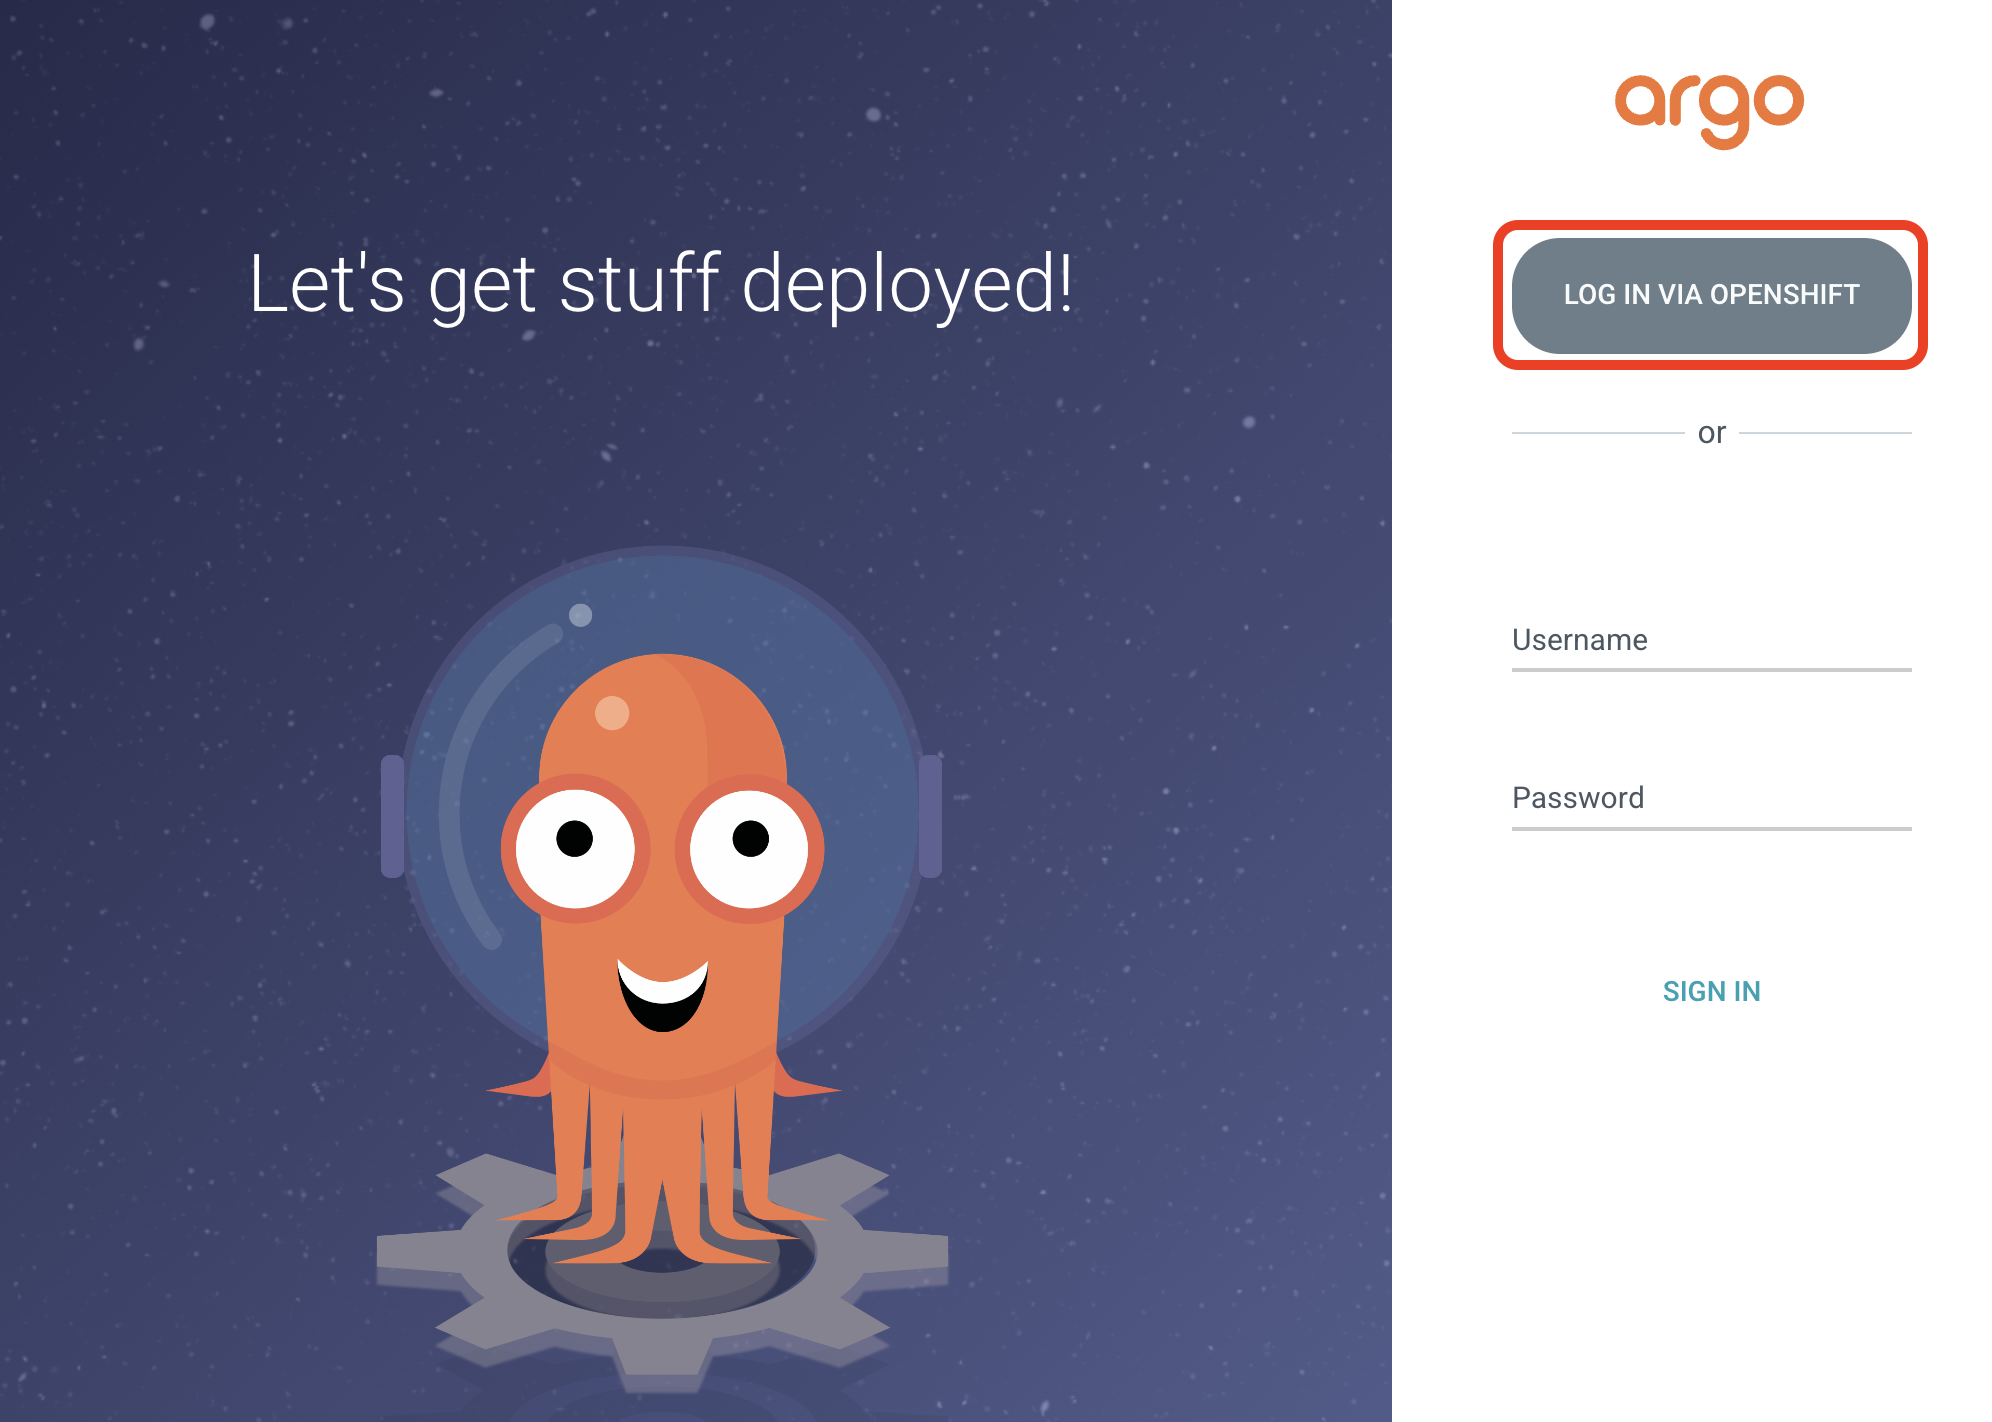
The Argo CD web interface is protected by OAuth, and you can log in using your cluster credentials:
{user}{password}Then authorize the Argo CD application to access the OpenShift API. Now, you can access the Argo CD web interface and manage the applications.
| Argo CD provides a web interface and a command-line interface (CLI) for managing applications. You can view the status of the deployed applications, perform manual synchronization, rollback to previous versions, and manage application configurations. |
1. Deploying the model as an Argo CD Application
Next, we’ll create an Argo CD Application to deploy the AI model with KServe and OpenVINO Model Server.
For this purpose, we created an Helm chart to deploy the model with two KServe objects: ServingRuntime and InferenceService
Those will point to the v2 model trained and pushed to the Model Registry by the Kubeflow pipeline as we discussed in the previous chapter.
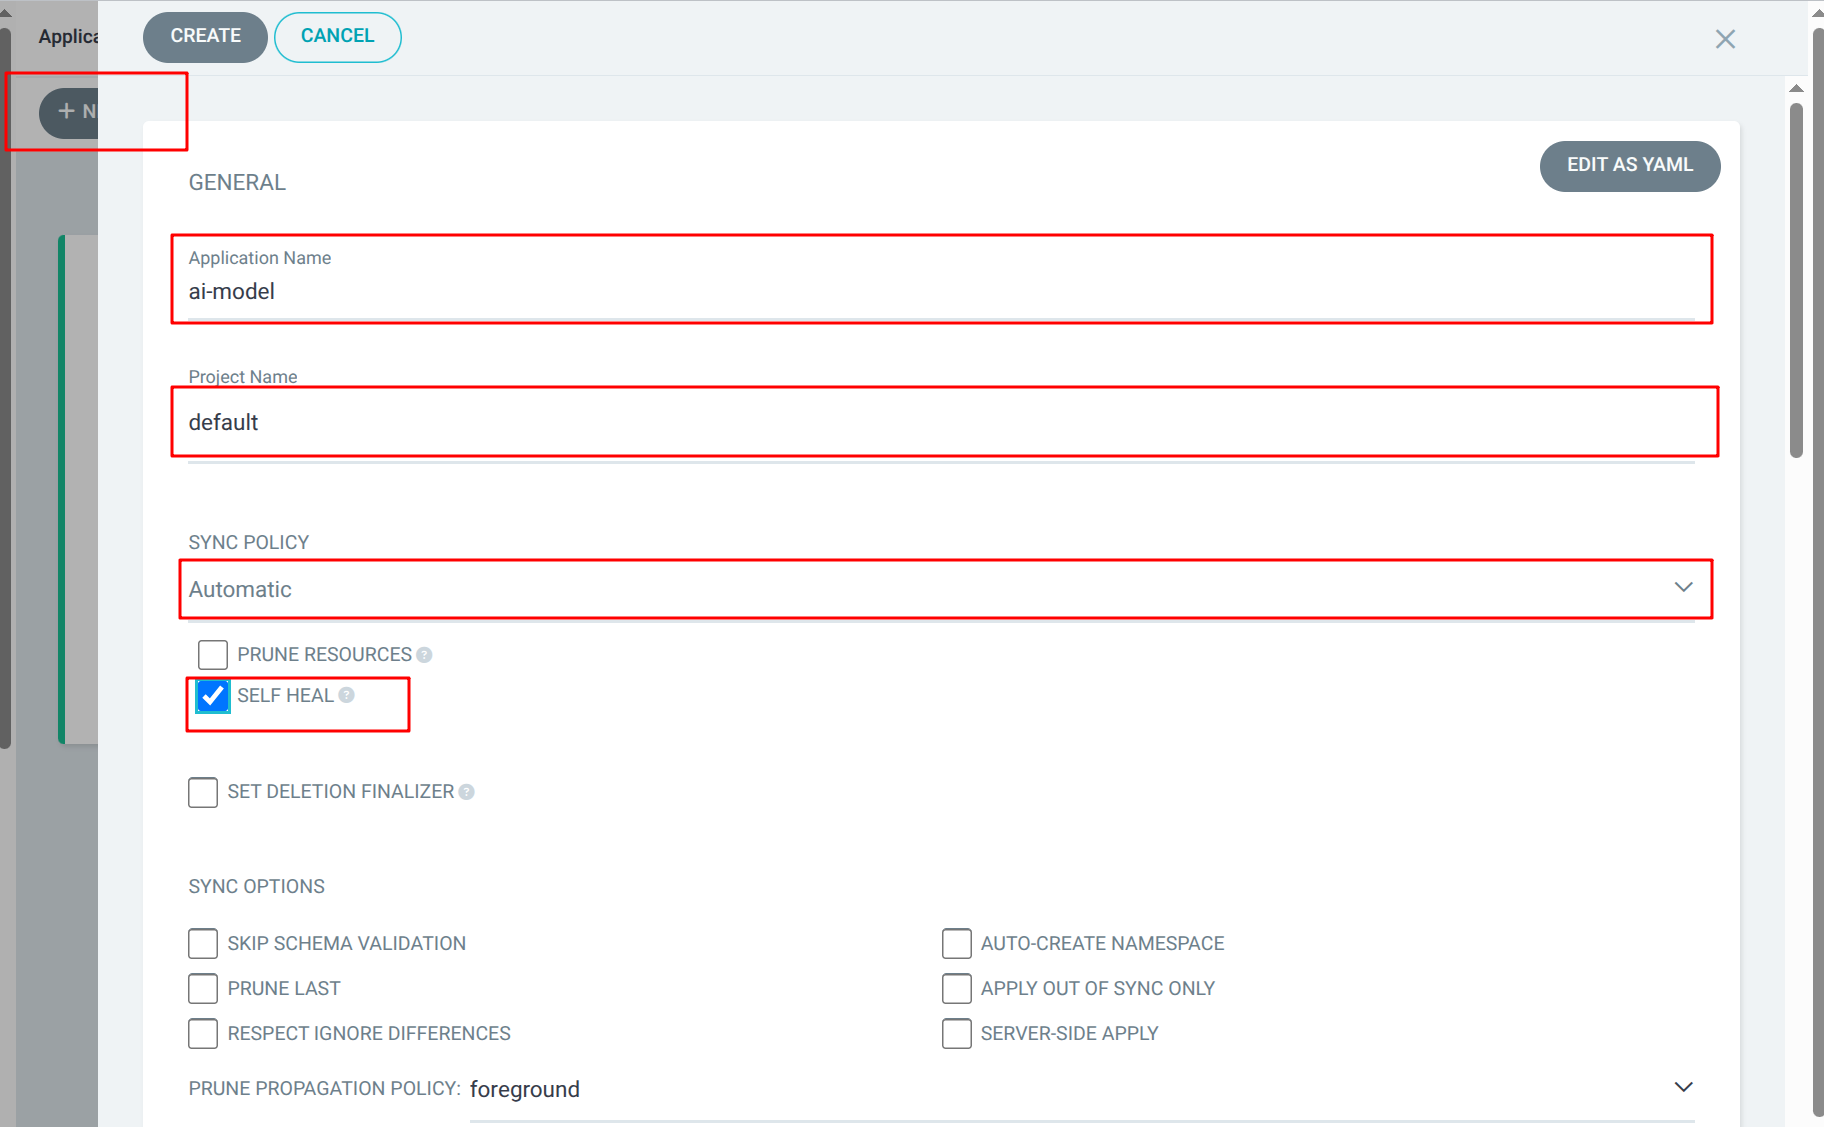
Select + NEW APP from the Argo CD web interface, and fill in the following details:
Application Name |
ai-model |
Project Name |
default |
Sync Policy |
Automatic |
Self Heal |
Enabled |
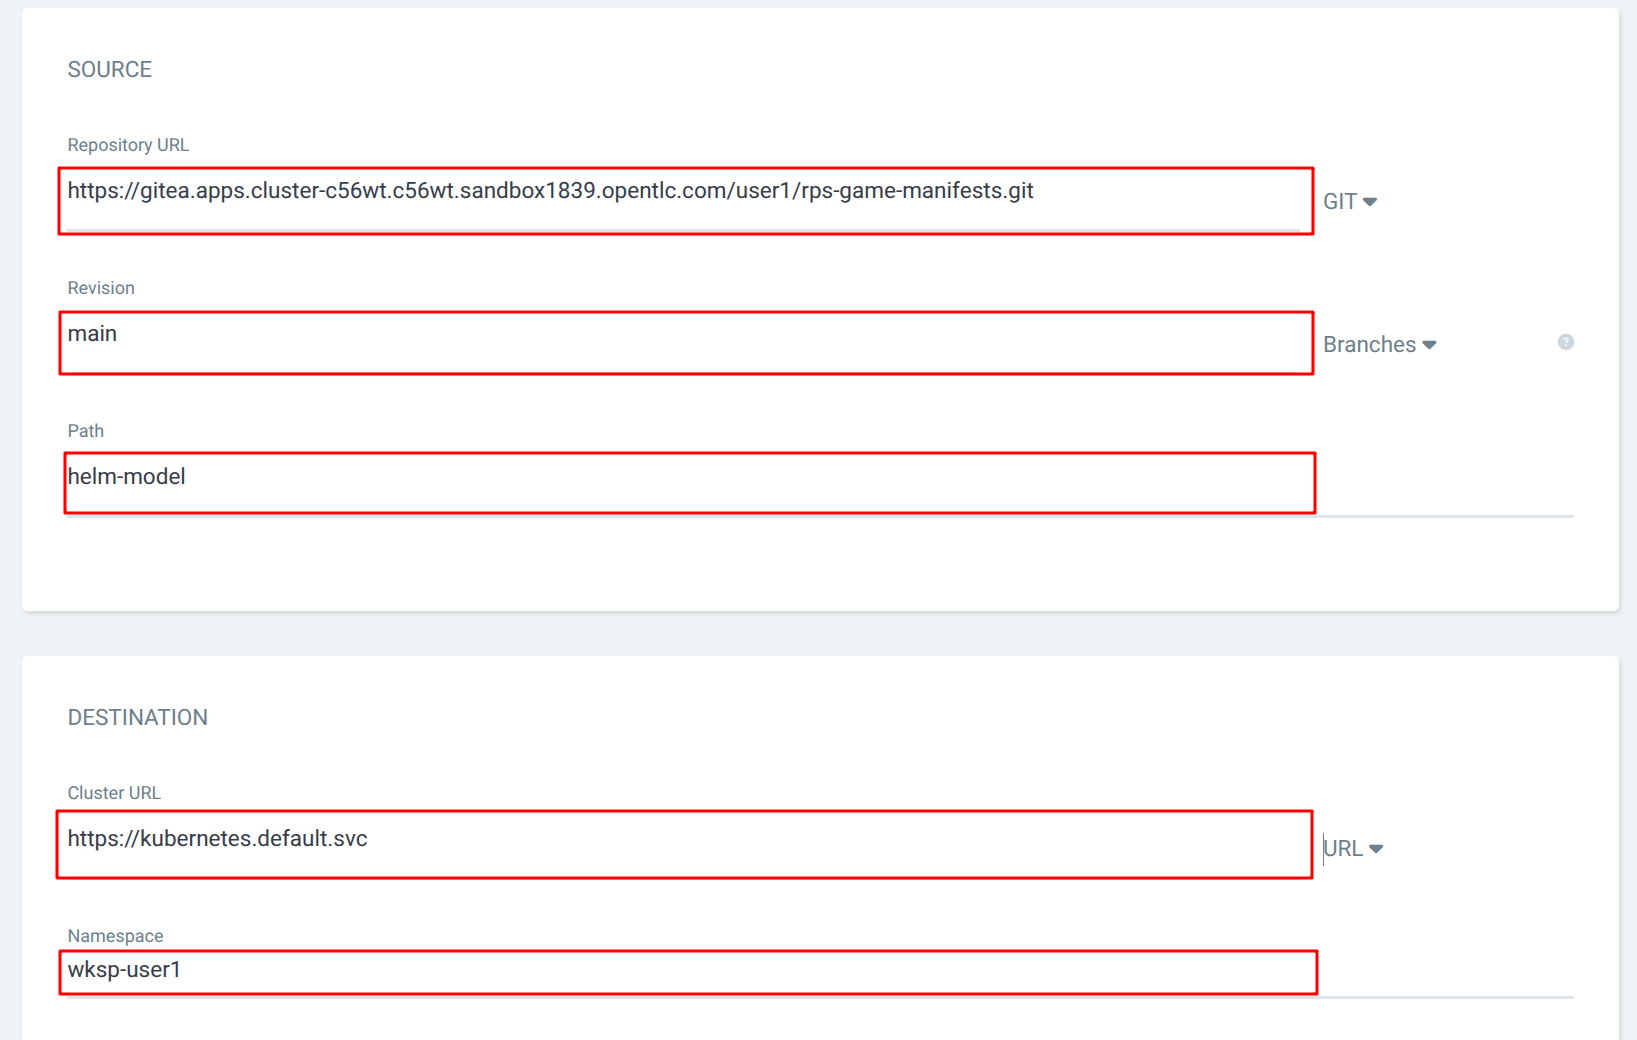
Repository URL |
{gitea_console_url}/{user}/rps-game-manifests.git |
Revision |
main |
Path |
helm-model |
Cluster URL |
|
Namespace |
wksp-{user} |
Helm Parameters: model.path |
models/{user}-yolo-rps-v2 |
Helm Parameters: model.name |
yolo-rps |
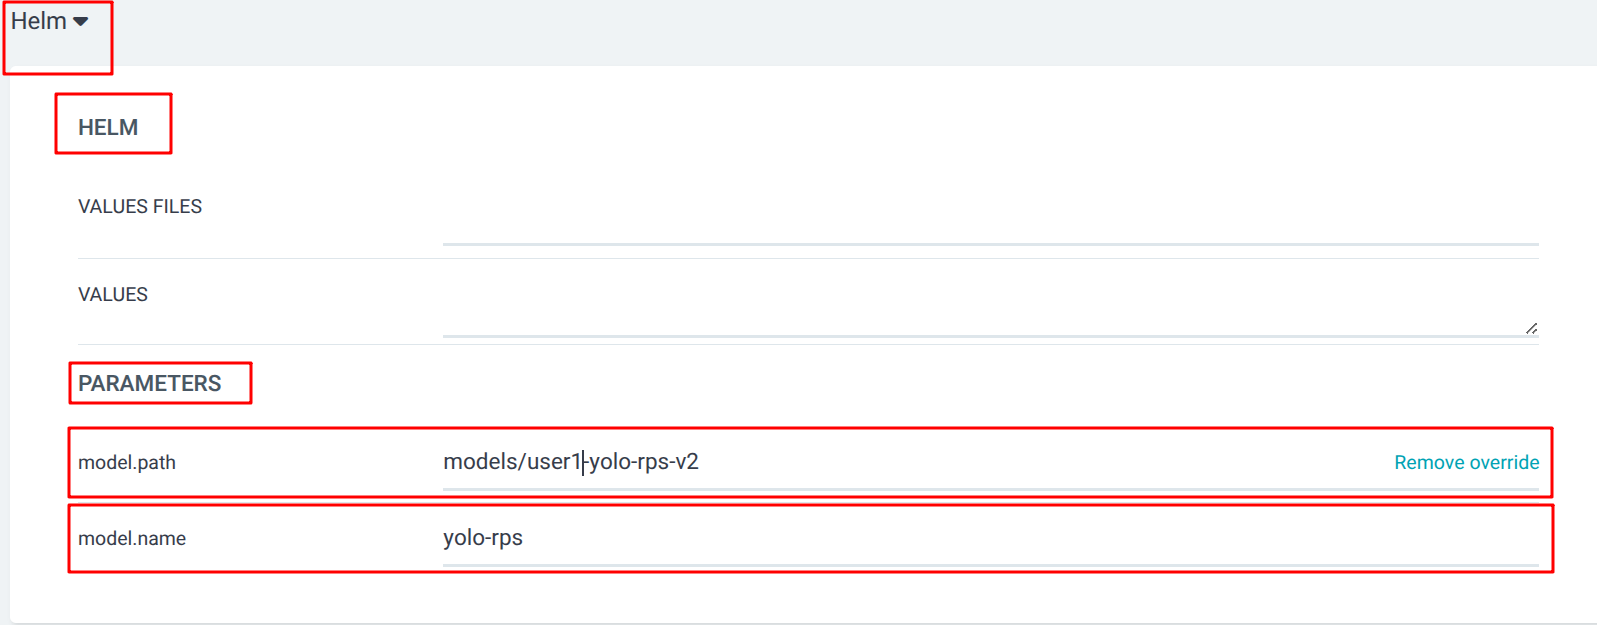
| Helm is a package manager for Kubernetes that allows you to define, install, and manage applications as packages called charts. A Helm chart contains the necessary templates and configuration files to deploy an application in a Kubernetes cluster. |
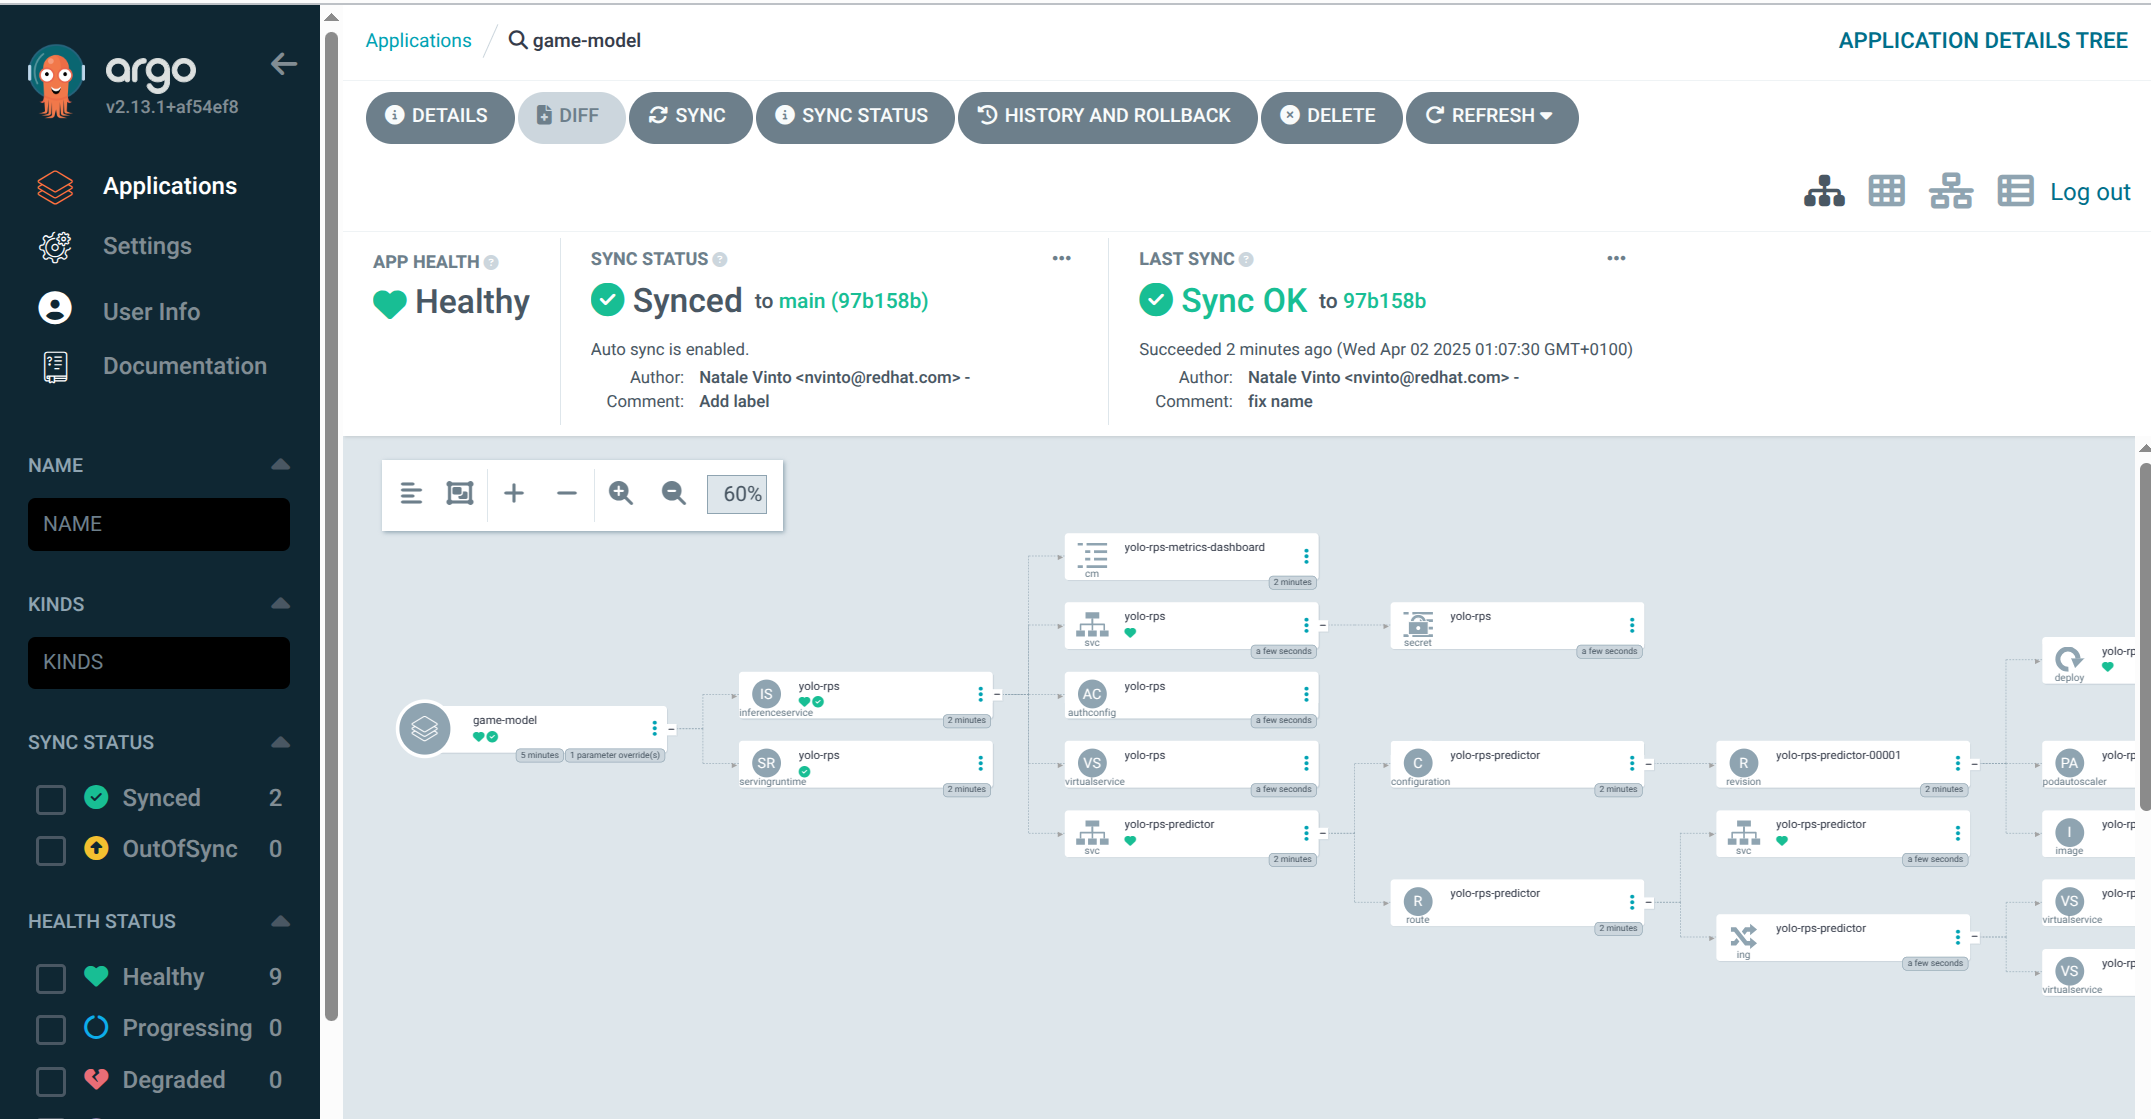
Hit CREATE when finished. After creating the application, Argo CD will automatically synchronize the application and deploy the AI model in the Data Science namespace controlled by Argo CD. You can view the status of the application, the resources deployed, and the synchronization status in the Argo CD web interface.
| It might take a few minutes to have the model fully deployed. |
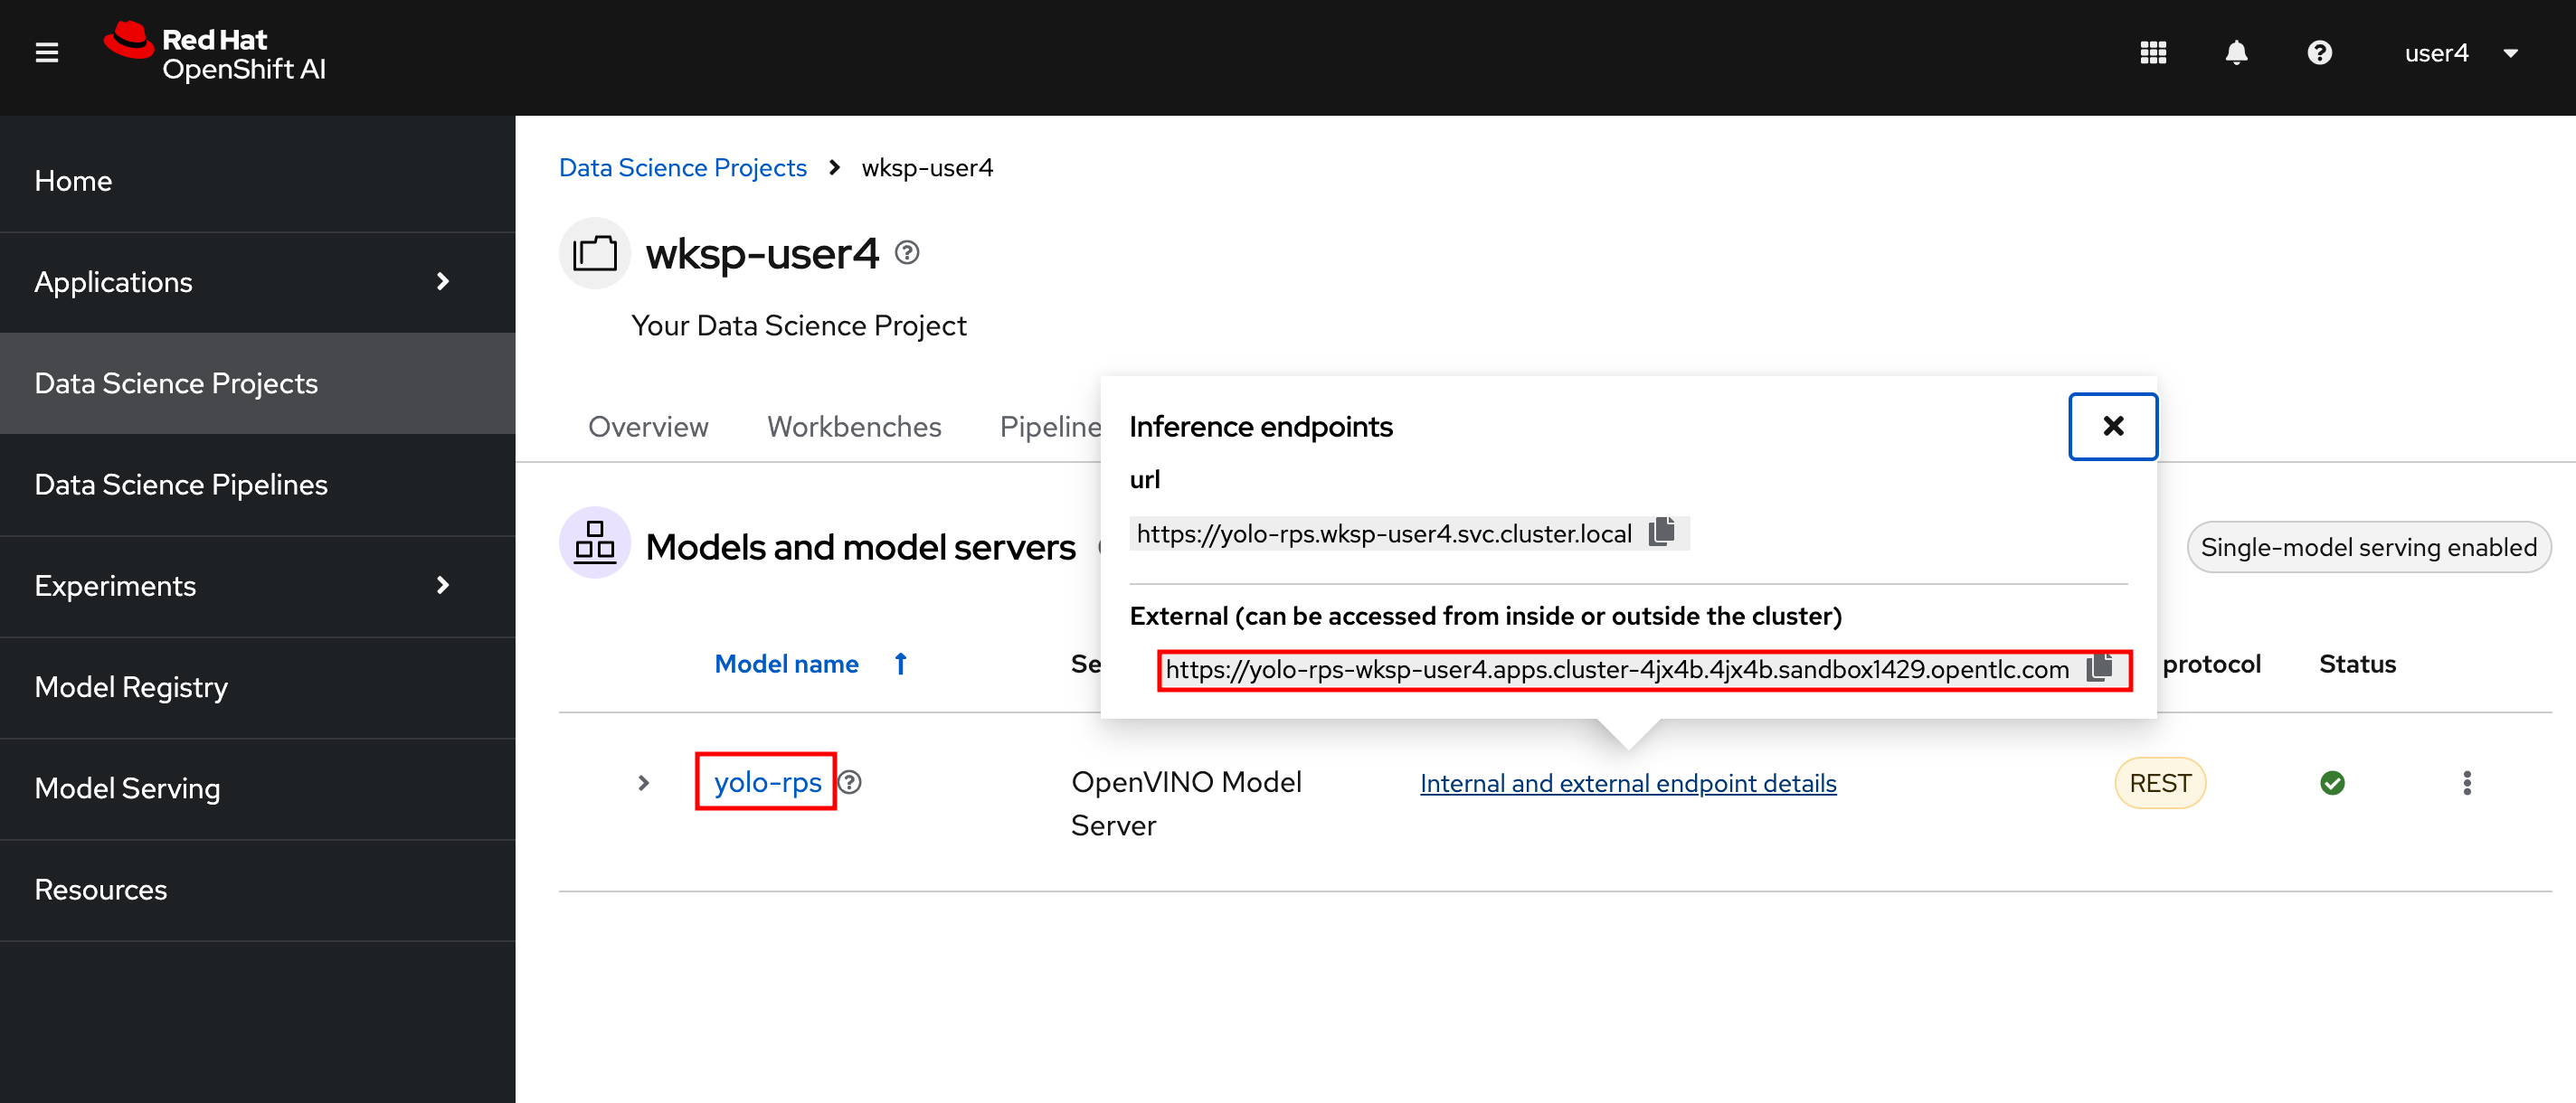
From the link: OpenShift AI Dashboard you should see now the current status with model deployment with Inference API up and running and status green.
If you click on the Internal and External endpoints details you’ll see the URLs to access the inferenced model either from the cluster or from outside the cluster:
2. KServe and InferenceService
You can also review the deployment with KServe on the cluster.
Go to the OpenShift Web Console.
Select your AI project so wskp-{user}.
Find a KNative Service named yolo-rps-predictor.
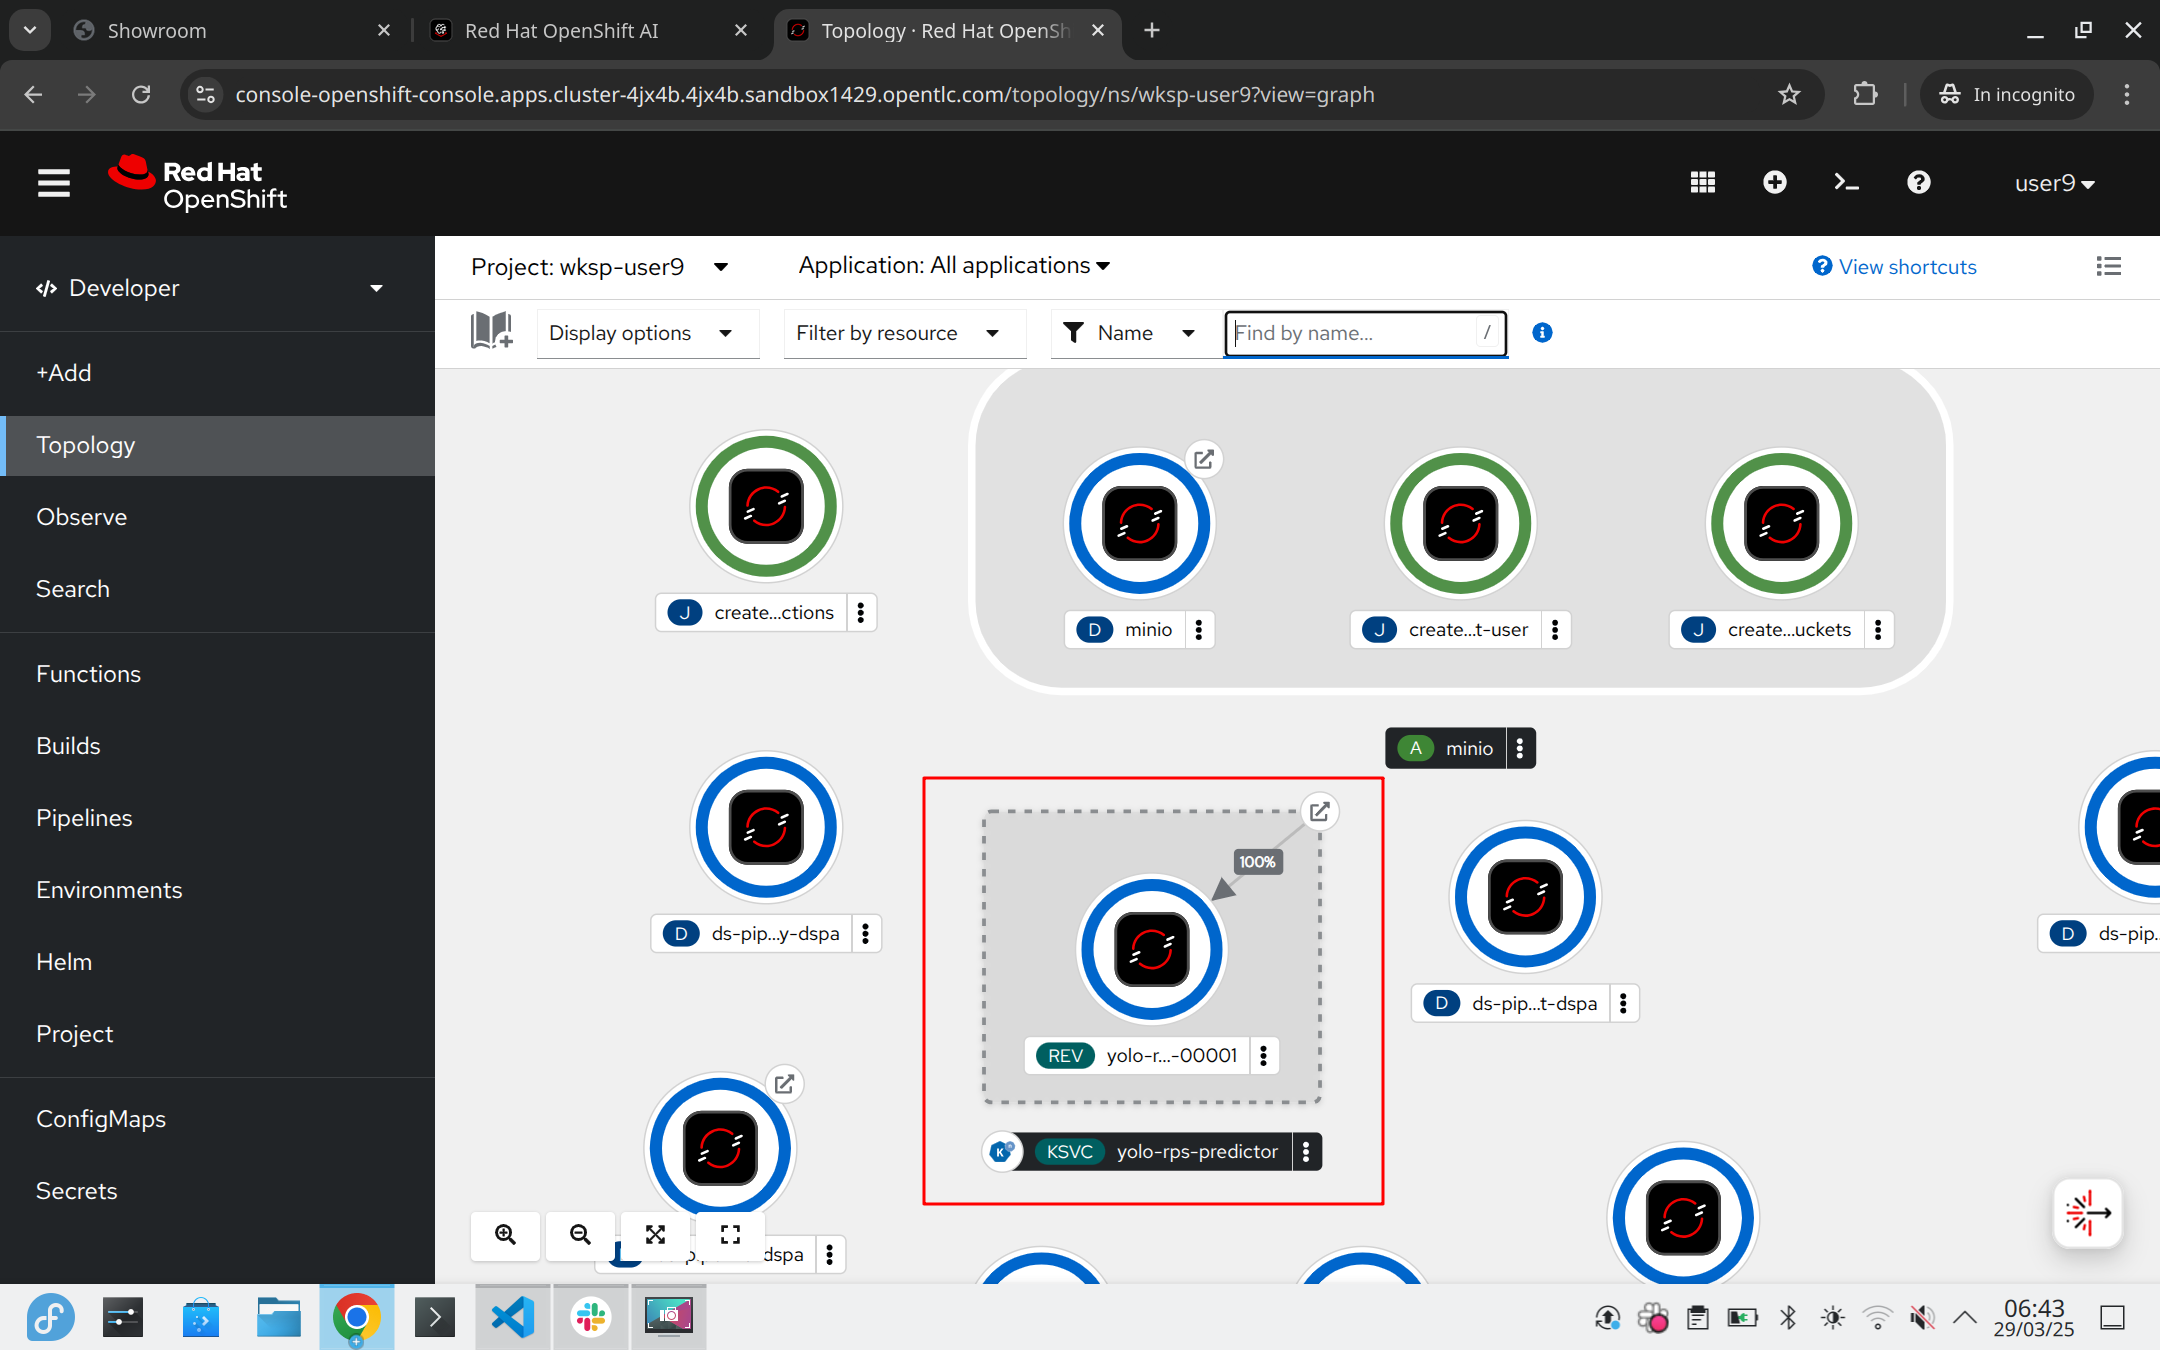
You can review the newly created InferenceService
apiVersion: serving.kserve.io/v1beta1
kind: InferenceService
metadata:
  annotations:
    openshift.io/display-name: yolo-rps
    serving.knative.openshift.io/enablePassthrough: 'true'
    sidecar.istio.io/inject: 'true'
    sidecar.istio.io/rewriteAppHTTPProbers: 'true'
  name: yolo-rps
  namespace: wksp-{user}
  finalizers:
    - inferenceservice.finalizers
  labels:
    opendatahub.io/dashboard: 'true'
spec:
  predictor:
    maxReplicas: 1
    minReplicas: 1
    model:
      modelFormat:
        name: onnx
        version: '1'
      name: ''
      resources:
        limits:
          cpu: '2'
          memory: 3Gi
        requests:
          cpu: '1'
          memory: 1Gi
      runtime: yolo-rps
      storage:
        key: aws-connection-my-storage
        path: models/user9-yolo-rps-v2
and ServingRuntime
apiVersion: serving.kserve.io/v1alpha1
kind: ServingRuntime
metadata:
  annotations:
    opendatahub.io/accelerator-name: ''
    opendatahub.io/apiProtocol: REST
    opendatahub.io/template-display-name: OpenVINO Model Server
    opendatahub.io/template-name: kserve-ovms
    openshift.io/display-name: yolo-rps
  name: yolo-rps
  namespace: wksp-{user}
  labels:
    opendatahub.io/dashboard: 'true'
spec:
  annotations:
    prometheus.io/path: /metrics
    prometheus.io/port: '8888'
  containers:
    - args:
        - '--model_name={{.Name}}'
        - '--port=8001'
        - '--rest_port=8888'
        - '--model_path=/mnt/models'
        - '--file_system_poll_wait_seconds=0'
        - '--grpc_bind_address=0.0.0.0'
        - '--rest_bind_address=0.0.0.0'
        - '--target_device=AUTO'
        - '--metrics_enable'
      image: 'quay.io/modh/openvino_model_server@sha256:e4ece481b8dd866163da7ffcd3e95389ef7fb3d32a9a0dbb056b07839652a4f7'
      name: kserve-container
      ports:
        - containerPort: 8888
          protocol: TCP
      volumeMounts:
        - mountPath: /dev/shm
          name: shm
  multiModel: false
  protocolVersions:
    - v2
    - grpc-v2
  supportedModelFormats:
    - autoSelect: true
      name: openvino_ir
      version: opset13
    - name: onnx
      version: '1'
    - autoSelect: true
      name: tensorflow
      version: '1'
    - autoSelect: true
      name: tensorflow
      version: '2'
    - autoSelect: true
      name: paddle
      version: '2'
    - autoSelect: true
      name: pytorch
      version: '2'
  volumes:
    - emptyDir:
        medium: Memory
        sizeLimit: 2Gi
      name: shm
3. Next Steps
Now that we have deployed the v2 RoShambo game model using the Model Server in OpenShift AI with Argo CD, we can integrate it with the game application to enable AI-powered gameplay. In the next section, we’ll test in the Jupyter notebook the inferencing endpoint by querying the model with sample input data and verifying the predictions.