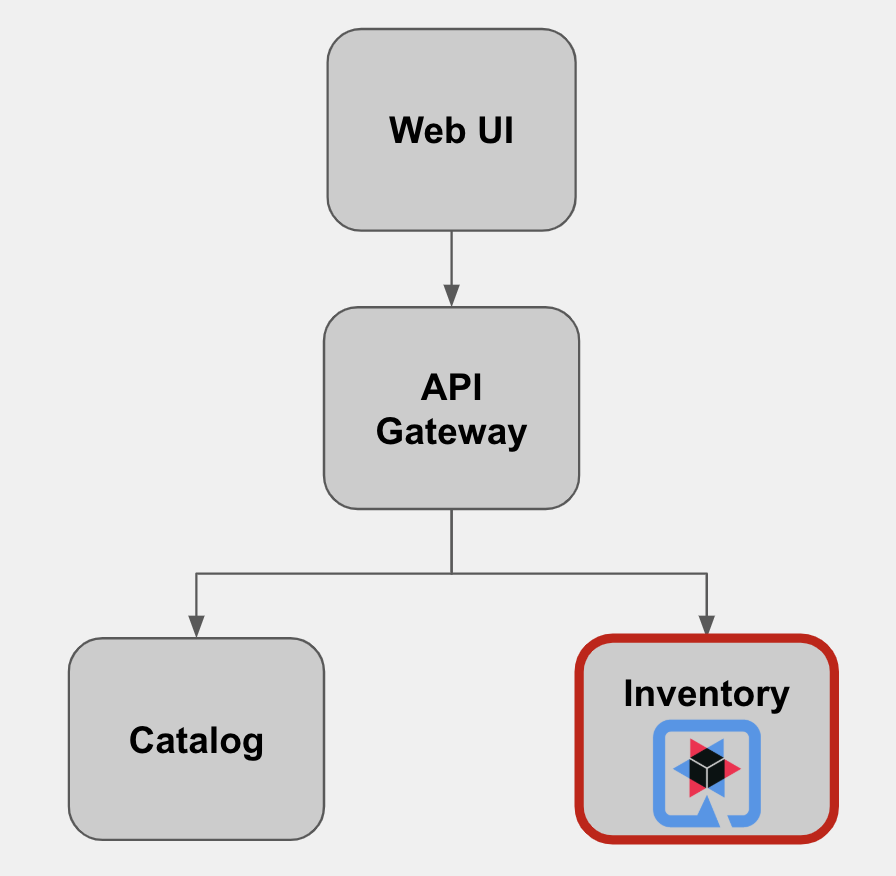
Create Inventory Service with Quarkus
40 MINUTE EXERCISE
In this lab you will learn about building microservices using Quarkus.
What is Quarkus?
Quarkus is a Kubernetes Native Java stack tailored for GraalVM & OpenJDK HotSpot, crafted from the best of breed Java libraries and standards.
Container First: Quarkus tailors your application for GraalVM and HotSpot. Amazingly fast boot time, incredibly low RSS memory (not just heap size!) offering near instant scale up and high density memory utilization in container orchestration platforms like Kubernetes. We use a technique we call compile time boot.
Unifies Imperative and Reactive: Combine both the familiar imperative code and the non-blocking reactive style when developing applications
Developer Joy: A cohesive platform for optimized developer joy:
-
Unified configuration
-
Zero config, live reload in the blink of an eye
-
Streamlined code for the 80% common usages, flexible for the 20%
-
No hassle native executable generation
Best of Breed Libraries and Standards: Quarkus brings a cohesive, fun to use full-stack framework by leveraging best of breed libraries you love and use wired on a standard backbone.
Quarkus Maven Project
The inventory-quarkus project has the following structure which shows the components of the Quarkus project laid out in different subdirectories according to Maven best practices:
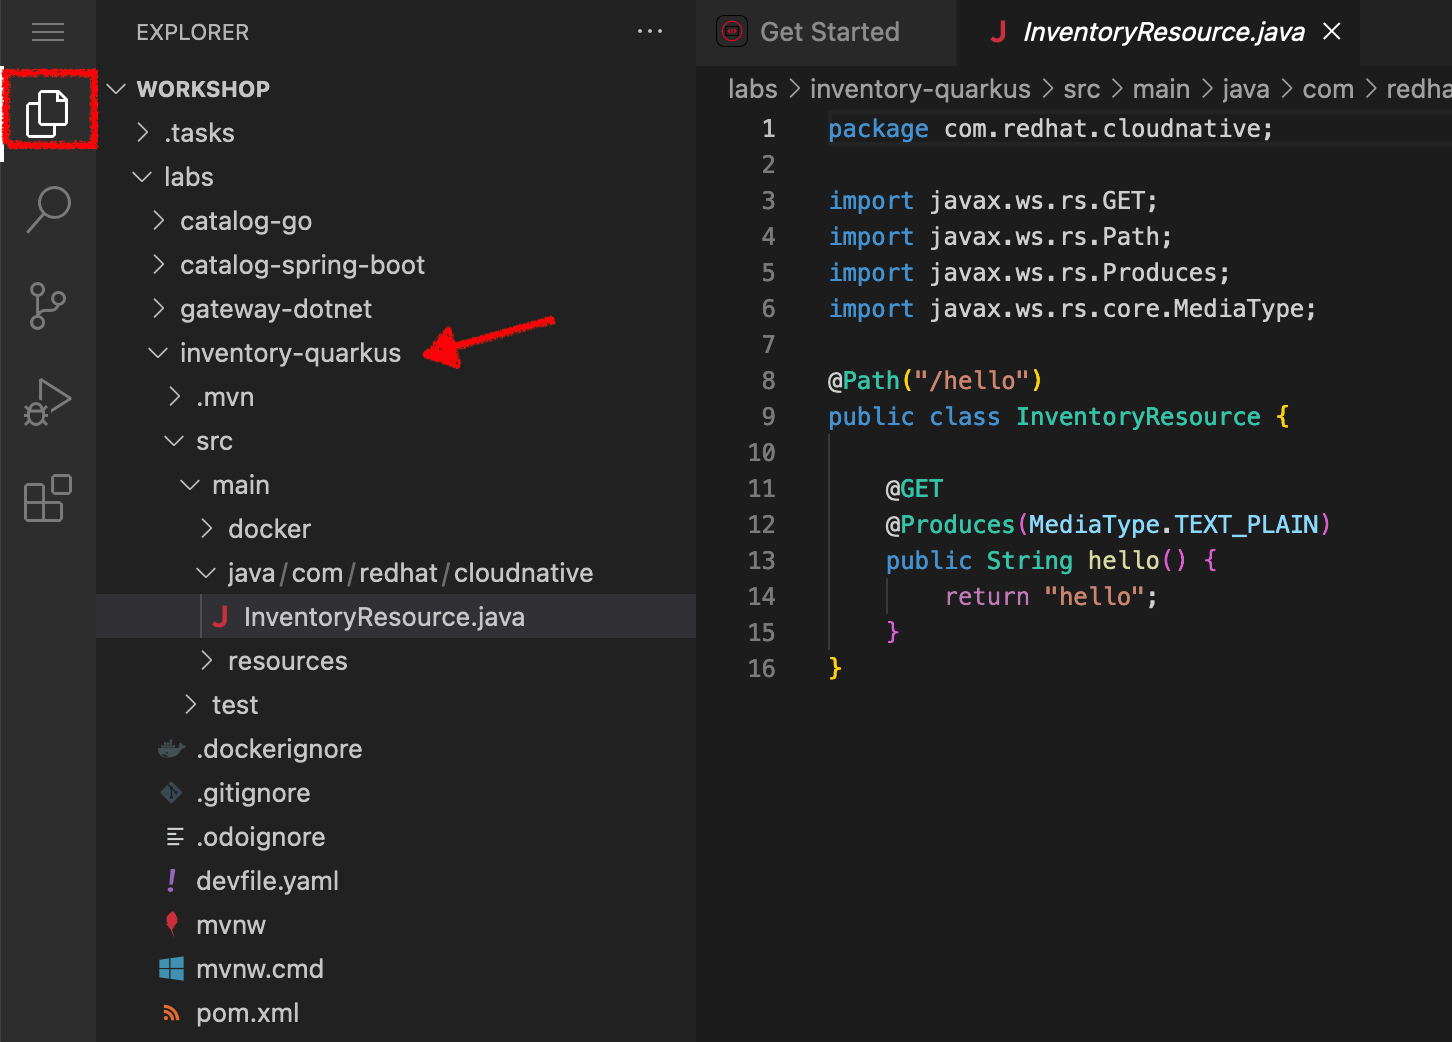
The '/projects/workshop/labs/inventory-quarkus' folder contents:
-
the Maven structure
-
a com.redhat.cloudnative.InventoryResource resource exposed on /hello
-
an associated unit test
-
a landing page that is accessible on http://localhost:8080 after starting the application
-
example Dockerfile files for both native and jvm modes in src/main/docker
-
the application configuration file
Look at the pom.xml. You will find the import of the Quarkus BOM, allowing you to omit the version
on the different Quarkus dependencies. In addition, you can see the quarkus-maven-plugin responsible of the packaging
of the application and also providing the development mode.
<dependencyManagement>
    <dependencies>
        <dependency>
            <groupId>io.quarkus</groupId>
            <artifactId>quarkus-bom</artifactId>
            <version>${quarkus.version}</version>
            <type>pom</type>
            <scope>import</scope>
        </dependency>
    </dependencies>
</dependencyManagement>

<build>
    <plugins>
        <plugin>
            <groupId>io.quarkus</groupId>
            <artifactId>quarkus-maven-plugin</artifactId>
            <version>${quarkus.version}</version>
            <executions>
                <execution>
                    <goals>
                        <goal>build</goal>
                    </goals>
                </execution>
            </executions>
        </plugin>
    </plugins>
</build>
If we focus on the dependencies section, you can see the following extensions:
    <dependency>
        <groupId>io.quarkus</groupId>
        <artifactId>quarkus-resteasy-jsonb</artifactId>
    </dependency>
    <dependency>
        <groupId>io.quarkus</groupId>
        <artifactId>quarkus-hibernate-orm</artifactId>
    </dependency>
    <dependency>
        <groupId>io.quarkus</groupId>
        <artifactId>quarkus-jdbc-h2</artifactId>
</dependency>| Name | Description |
|---|---|
It allows you to develop REST services to consume and produce JSON payloads |
|
The de facto JPA implementation and offers you the full breath of an Object Relational Mapper. |
|
Using datasources is the main way of obtaining connections to a database. |
Examine 'src/main/java/com/redhat/cloudnative/InventoryResource.java' file:
package com.redhat.cloudnative;

import javax.ws.rs.GET;
import javax.ws.rs.Path;
import javax.ws.rs.Produces;
import javax.ws.rs.core.MediaType;

@Path("/hello")
public class InventoryResource {

    @GET
    @Produces(MediaType.TEXT_PLAIN)
    public String hello() {
        return "hello";
    }
}
It’s a very simple REST endpoint, returning "hello" to requests on "/hello".
|
With Quarkus, there is no need to create an Application class. It’s supported, but not required. In addition, only one instance of the resource is created and not one per request. You can configure this using the different Scoped annotations (ApplicationScoped, RequestScoped, etc). |
Enable the Development Mode
quarkus:dev runs Quarkus in development mode. This enables hot deployment with background compilation, which means that when you modify your Java files and/or your resource files and refresh your browser, these changes will automatically take effect. This works too for resource files like the configuration property file. Refreshing the browser triggers a scan of the workspace, and if any changes are detected, the Java files are recompiled and the application is redeployed; your request is then serviced by the redeployed application. If there are any issues with compilation or deployment an error page will let you know.
First, in your Workspace,
Click on 'Terminal' → 'Run Task…' → 'devfile: Inventory - Compile (Dev Mode)'
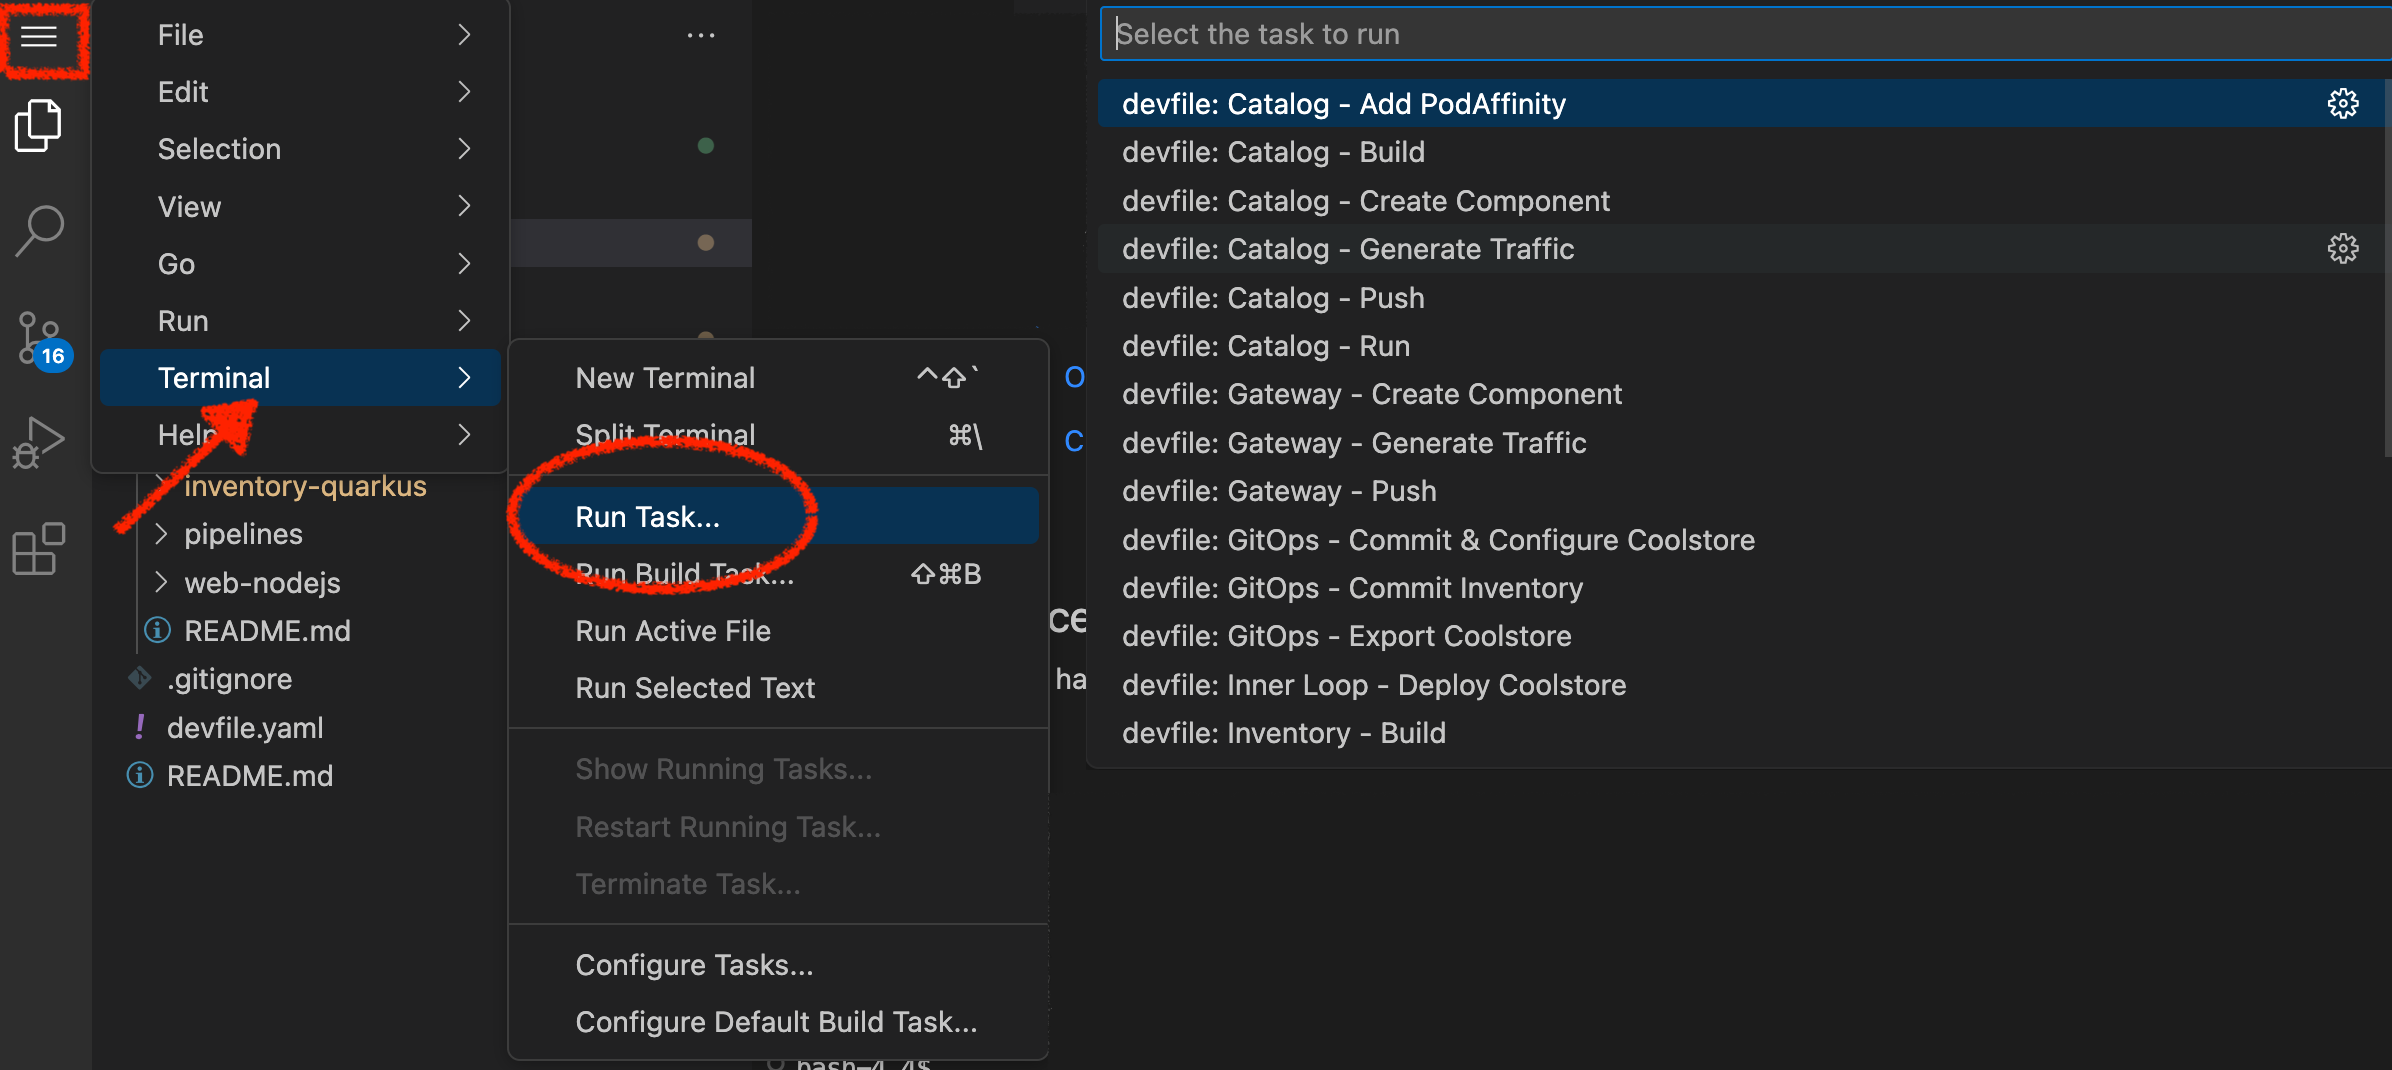
Execute the following commands in the terminal window
cd /projects/workshop/labs/inventory-quarkus
mvn compile quarkus:dev -Ddebug=false
To open a terminal window, click on 'Terminal' → 'New Terminal'
|
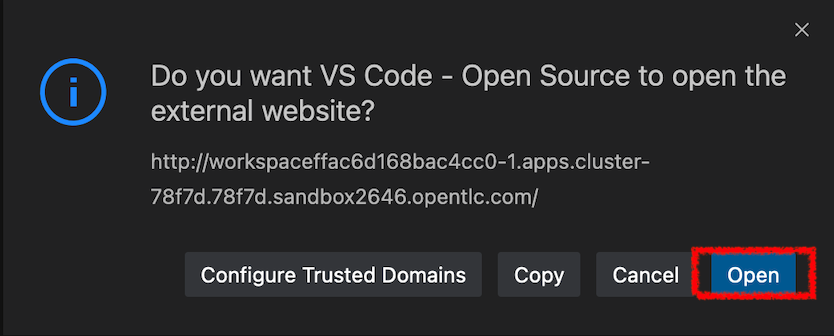
When pop-ups appear, confirm you want to expose the 8080 port by clicking on 'Open in New Tab'.

You then have to confirm the access to external web sites:
Your browser will be directed to your Inventory Service running inside your Workspace.
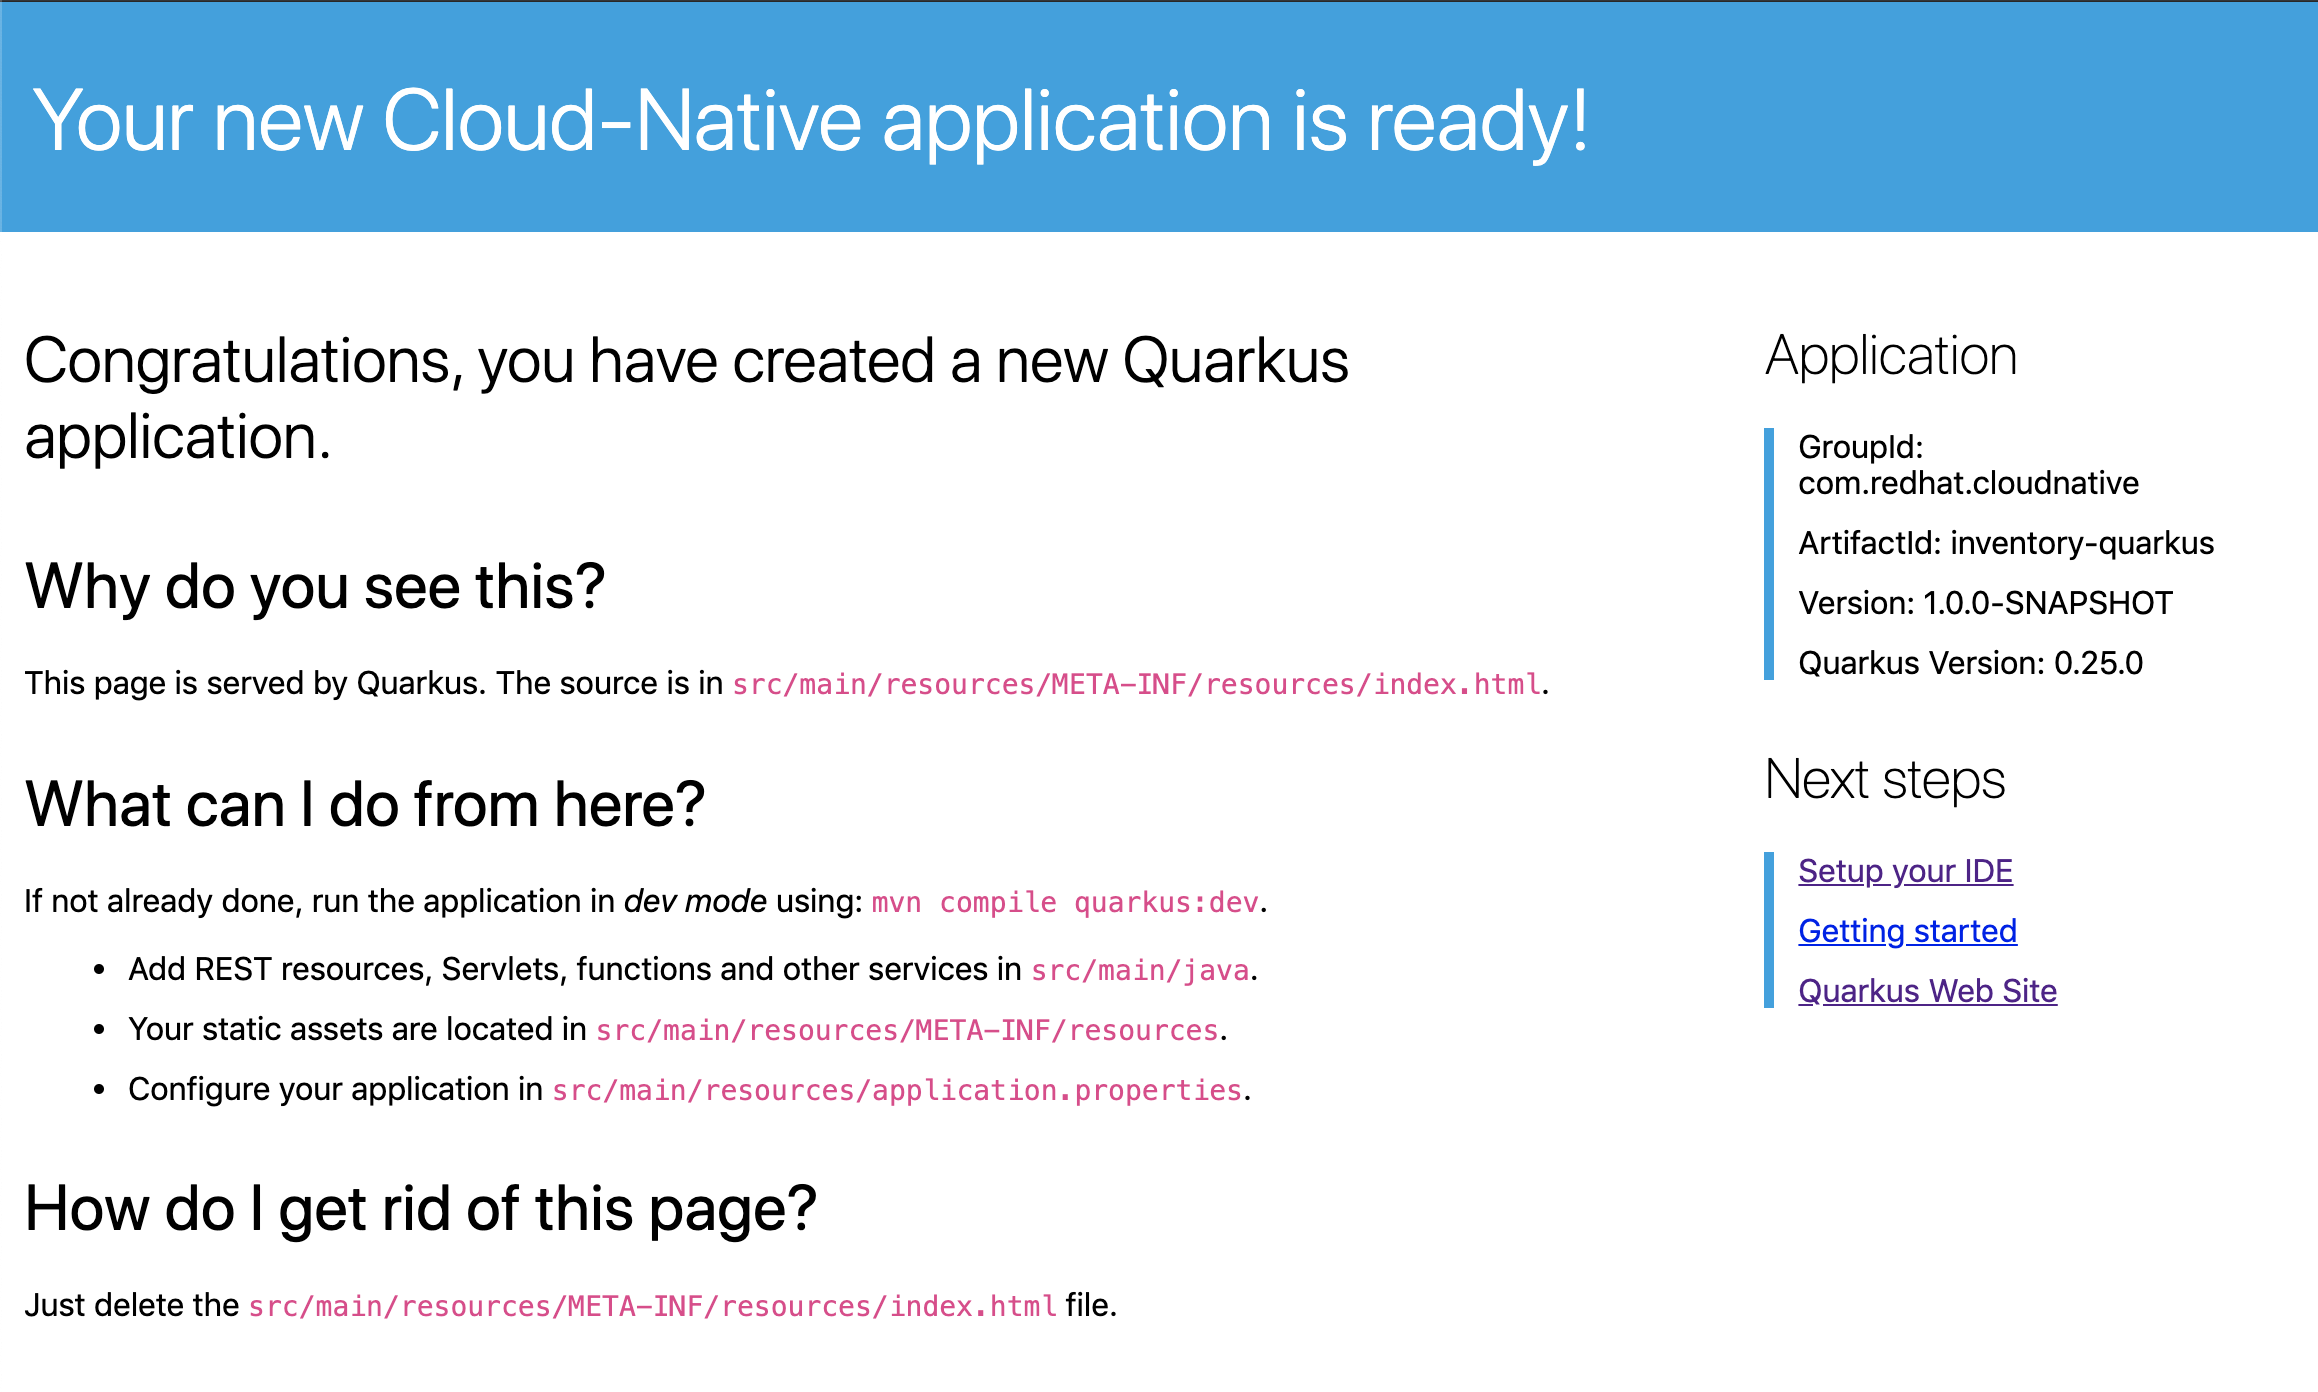
|
If you have the following result in the browser window, please 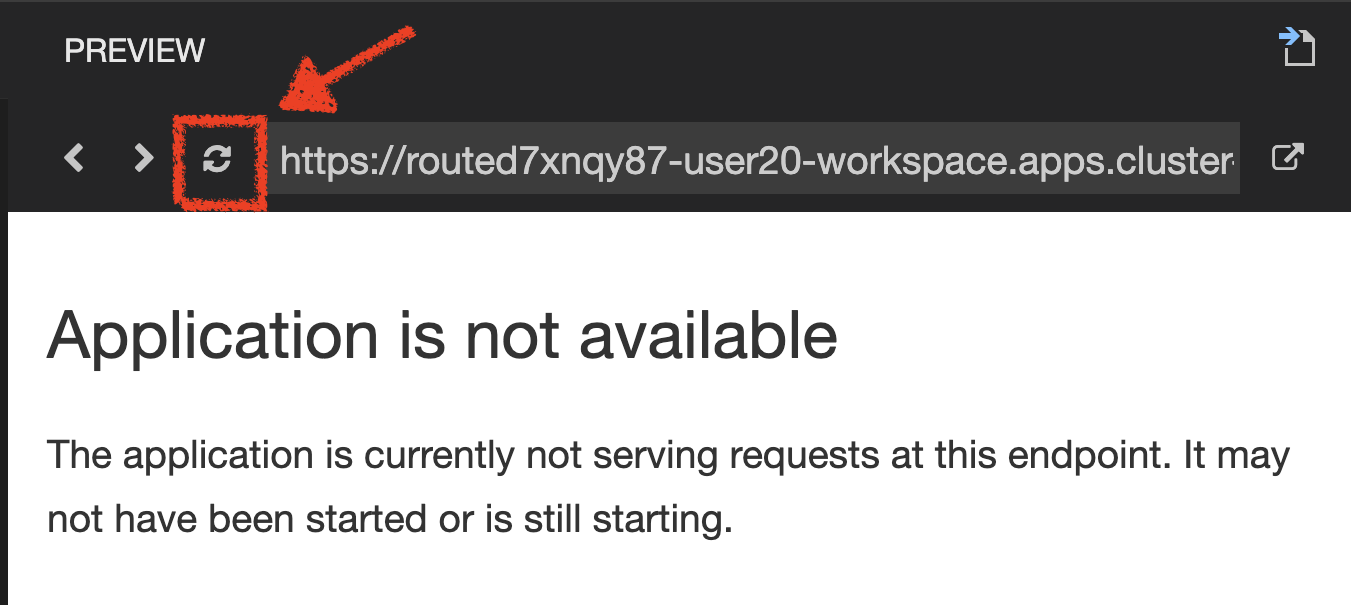
|
|
Please don’t close that Inventory output browser tab, you will need it for the next few steps of this lab. If by accident you close that browser tab then you should be able to reopen it from your browser history. It will likely be called Inventory Service |
Modify the 'src/main/resources/META-INF/resources/index.html' file as follows
<!DOCTYPE html>
<html lang="en">
<head>
<meta charset="UTF-8">
<title>Inventory Service</title>
<link rel="stylesheet" href="https://maxcdn.bootstrapcdn.com/bootstrap/4.0.0-beta/css/bootstrap.min.css"
integrity="sha384-/Y6pD6FV/Vv2HJnA6t+vslU6fwYXjCFtcEpHbNJ0lyAFsXTsjBbfaDjzALeQsN6M" crossorigin="anonymous">
<link rel="stylesheet" type="text/css"
href="https://cdnjs.cloudflare.com/ajax/libs/patternfly/3.24.0/css/patternfly.min.css">
<link rel="stylesheet" type="text/css"
href="https://cdnjs.cloudflare.com/ajax/libs/patternfly/3.24.0/css/patternfly-additions.min.css">
</head>
<body>
<div class="jumbotron">
<div class="container">
<h1 class="display-3"><img src="https://camo.githubusercontent.com/be1e4ea465298c7e05b1378ff38d463cfef120a3/68747470733a2f2f64657369676e2e6a626f73732e6f72672f717561726b75732f6c6f676f2f66696e616c2f504e472f717561726b75735f6c6f676f5f686f72697a6f6e74616c5f7267625f3132383070785f64656661756c742e706e67" alt="Quarkus" width="400"> Inventory Service</h1>
<p>This is a Quarkus Microservice for the CoolStore Demo. (<a href="/api/inventory/329299">Test it</a>)
</p>
</div>
</div>
<div class="container">
<footer>
<p>© Red Hat 2020</p>
</footer>
</div>
</body>
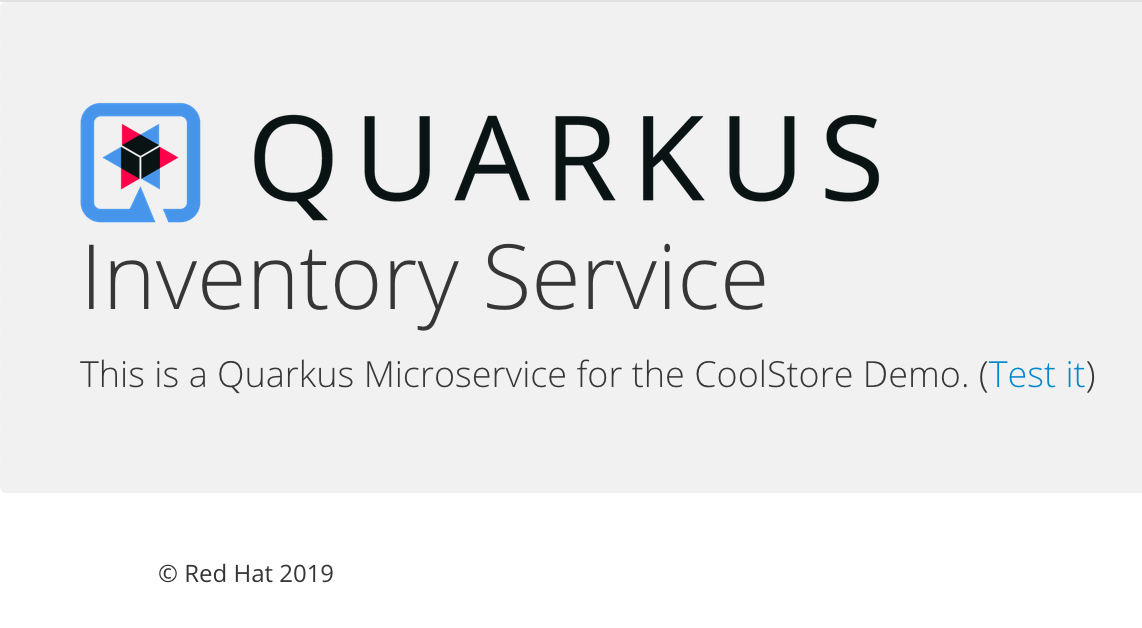
</html>Refresh your browser and you should have the following content without rebuilding your JAR file
Now let’s write some code and create a domain model and a RESTful endpoint to create the Inventory service
Create a Domain Model
Create the 'src/main/java/com/redhat/cloudnative/Inventory.java' file as follows:
package com.redhat.cloudnative;

import javax.persistence.Entity;
import javax.persistence.Id;
import javax.persistence.Table;
import javax.persistence.Column;
import java.io.Serializable;

@Entity (1)
@Table(name = "INVENTORY") (2)
public class Inventory implements Serializable {

    private static final long serialVersionUID = 1L;

    @Id (3)
    private String itemId;

    @Column
    private int quantity;

    public Inventory() {
    }

    public String getItemId() {
        return itemId;
    }

    public void setItemId(String itemId) {
        this.itemId = itemId;
    }

    public int getQuantity() {
        return quantity;
    }

    public void setQuantity(int quantity) {
        this.quantity = quantity;
    }

    @Override
    public String toString() {
        return "Inventory [itemId='" + itemId + '\'' + ", quantity=" + quantity + ']';
    }
}| 1 | @Entity marks the class as a JPA entity |
| 2 | @Table customizes the table creation process by defining a table name and database constraint |
| 3 | @Id marks the primary key for the table |
|
You don’t need to press a save button! Che automatically saves the changes made to the files. |
Update the 'src/main/resources/application.properties' file to match with the following content:
quarkus.datasource.db-kind=h2
quarkus.datasource.jdbc.url=jdbc:h2:mem:inventory;DB_CLOSE_ON_EXIT=FALSE;DB_CLOSE_DELAY=-1
quarkus.datasource.username=sa
quarkus.datasource.password=sa
quarkus.hibernate-orm.database.generation=drop-and-create
quarkus.hibernate-orm.log.sql=true
quarkus.hibernate-orm.sql-load-script=import.sql
quarkus.http.host=0.0.0.0

%prod.quarkus.package.type=uber-jar(1)| 1 | An uber-jar contains all the dependencies required packaged in the jar to enable running the application with java -jar. By default, in Quarkus, the generation of the uber-jar is disabled. With the %prod prefix, this option is only activated when building the jar intended for deployments. |
Update the 'src/main/resources/import.sql' file as follows:
INSERT INTO INVENTORY(itemId, quantity) VALUES (100000, 0);
INSERT INTO INVENTORY(itemId, quantity) VALUES (329299, 35);
INSERT INTO INVENTORY(itemId, quantity) VALUES (329199, 12);
INSERT INTO INVENTORY(itemId, quantity) VALUES (165613, 45);
INSERT INTO INVENTORY(itemId, quantity) VALUES (165614, 87);
INSERT INTO INVENTORY(itemId, quantity) VALUES (165954, 43);
INSERT INTO INVENTORY(itemId, quantity) VALUES (444434, 32);
INSERT INTO INVENTORY(itemId, quantity) VALUES (444435, 53);
Create a RESTful Service
Quarkus uses JAX-RS standard for building REST services.
Modify the 'src/main/java/com/redhat/cloudnative/InventoryResource.java' file to match with:
package com.redhat.cloudnative;

import javax.enterprise.context.ApplicationScoped;
import javax.inject.Inject;
import javax.persistence.EntityManager;
import javax.ws.rs.GET;
import javax.ws.rs.Path;
import javax.ws.rs.PathParam;
import javax.ws.rs.Produces;
import javax.ws.rs.core.MediaType;

@Path("/api/inventory")
@ApplicationScoped
public class InventoryResource {

    @Inject
    EntityManager em;

    @GET
    @Path("/{itemId}")
    @Produces(MediaType.APPLICATION_JSON)
    public Inventory getAvailability(@PathParam("itemId") String itemId) {
        Inventory inventory = em.find(Inventory.class, itemId);
        return inventory;
    }
}
The above REST service defines an endpoint that is accessible via HTTP GET at for example /api/inventory/329299 with the last path param being the product id which we want to check its inventory status.
Refresh your Inventory output browser and click on 'Test it'. You should have the following output:
{"itemId":"329299","quantity":35}The REST API returned a JSON object representing the inventory count for this product. Congratulations!
Stop the Development Mode
In your Workspace, stop the service as follows:
Deploy on OpenShift using Odo
In this section you will locally build a .jar file, then create the odo component and finally push it to OpenShift. The details of what and how this is deployed is defined below in the devfile. This can be found in the Inventory project /projects/workshop/labs/inventory-quarkus/devfile.yaml.
The big benefit of using odo is the ease of defining what to deploy and the speed it can get your application running in OpenShift. The devfile is stored in source control alongside the code, so ready for all of the team to use.
schemaVersion: 2.0.0
metadata:
  description: Quarkus with Java
  displayName: Quarkus Java
  icon: https://design.jboss.org/quarkus/logo/final/SVG/quarkus_icon_rgb_default.svg
  language: java (1)
  name: inventory (2)
  projectType: quarkus
  tags:
  - Java
  - Quarkus
  version: 1.1.0
  website: https://quarkus.io
commands:
- exec:
    commandLine: java -jar target/*.jar
    component: application
    group:
      isDefault: true
      kind: run (3)
    workingDir: /projects
  id: dev-run
components:
- container:
    endpoints: (4)
    - exposure: public
      name: inventory
      path: /
      protocol: http
      targetPort: 8080
    image: registry.redhat.io/openjdk/openjdk-11-rhel7:latest (5)
    memoryLimit: 1024Mi
name: application| 1 | This is a Java component |
| 2 | Its called inventory |
| 3 | The odo push command copies all the Inventory project files to OpenShift and then executes any jar file it finds in the /projects/target directory there |
| 4 | The service port 8080 will be used for HTTP and there will be public access |
| 5 | This is the base container image used to run the application |
| You might have noticed that both OpenShift Dev Spaces and odo use yaml devfiles. One describes the attributes of IDE environment and tools while the other describes the build and deployment attributes of an individual component. |
In your Workspace, build your jar file.
Click on 'Terminal' → 'Run Task…' → 'devfile: Inventory - Build'
Execute the following commands in the terminal window
cd /projects/workshop/labs/inventory-quarkus
mvn clean package -DskipTests
To open a terminal window, click on 'Terminal' → 'New Terminal'
|
Once this completes, prepare your application code/binary for OpenShift.
Click on 'Terminal' → 'Run Task…' → 'devfile: Inventory - Create Component'
Execute the following commands in the terminal window
cd /projects/workshop/labs/inventory-quarkus
odo create --app coolstore --project my-project%USER_ID% (1)| 1 | Create a new component for the coolstore application in the my-project%USER_ID% project based on the configuration stored in the 'devfile.yaml' file |
To open a terminal window, click on 'Terminal' → 'New Terminal'
|
The output should be as follows:
Devfile Object Validation
 ✓  Creating a devfile component from devfile path: /projects/workshop/labs/inventory-quarkus/devfile.yaml [62322ns]
Validation
 ✓  Validating if devfile name is correct [41841ns]

Please use `odo push` command to create the component with source deployed|
You have just provided the OpenShift destination project and application name. These are stored locally in the configuration file 'env.yaml' which can be found here (/projects/workshop/labs/inventory-quarkus/.odo/env) |
Now, push the component to the OpenShift cluster:
Click on 'Terminal' → 'Run Task…' → 'devfile: Inventory - Push'
Execute the following commands in the terminal window
cd /projects/workshop/labs/inventory-quarkus
odo push
To open a terminal window, click on 'Terminal' → 'New Terminal'
|
You should get as output:
Validation
 ✓  Validating the devfile [89483ns]

Creating Services for component inventory
 ✓  Services are in sync with the cluster, no changes are required

Creating Kubernetes resources for component inventory
 ✓  Waiting for component to start [28s]
 ✓  Links are in sync with the cluster, no changes are required
 ✓  Waiting for component to start [3ms]

Applying URL changes
 ✓  URL inventory: http://inventory-coolstore-my-project%USER_ID%.%APPS_HOSTNAME_SUFFIX%/ created

Syncing to component inventory
 ✓  Checking files for pushing [7ms]
 ✓  Syncing files to the component [682ms]

Executing devfile commands for component inventory
 ✓  Executing dev-run command "java -jar target/*.jar" [1s]

Pushing devfile component "inventory"
 ✓  Changes successfully pushed to component
Once this completes, your application should be up and running.
OpenShift runs the different components of the application in one or more pods. A pod is the unit of runtime deployment and consists of the running containers for the project.
Test your Service
In the OpenShift Web Console, from the Developer view,
click on the 'Open URL' icon of the Inventory Service
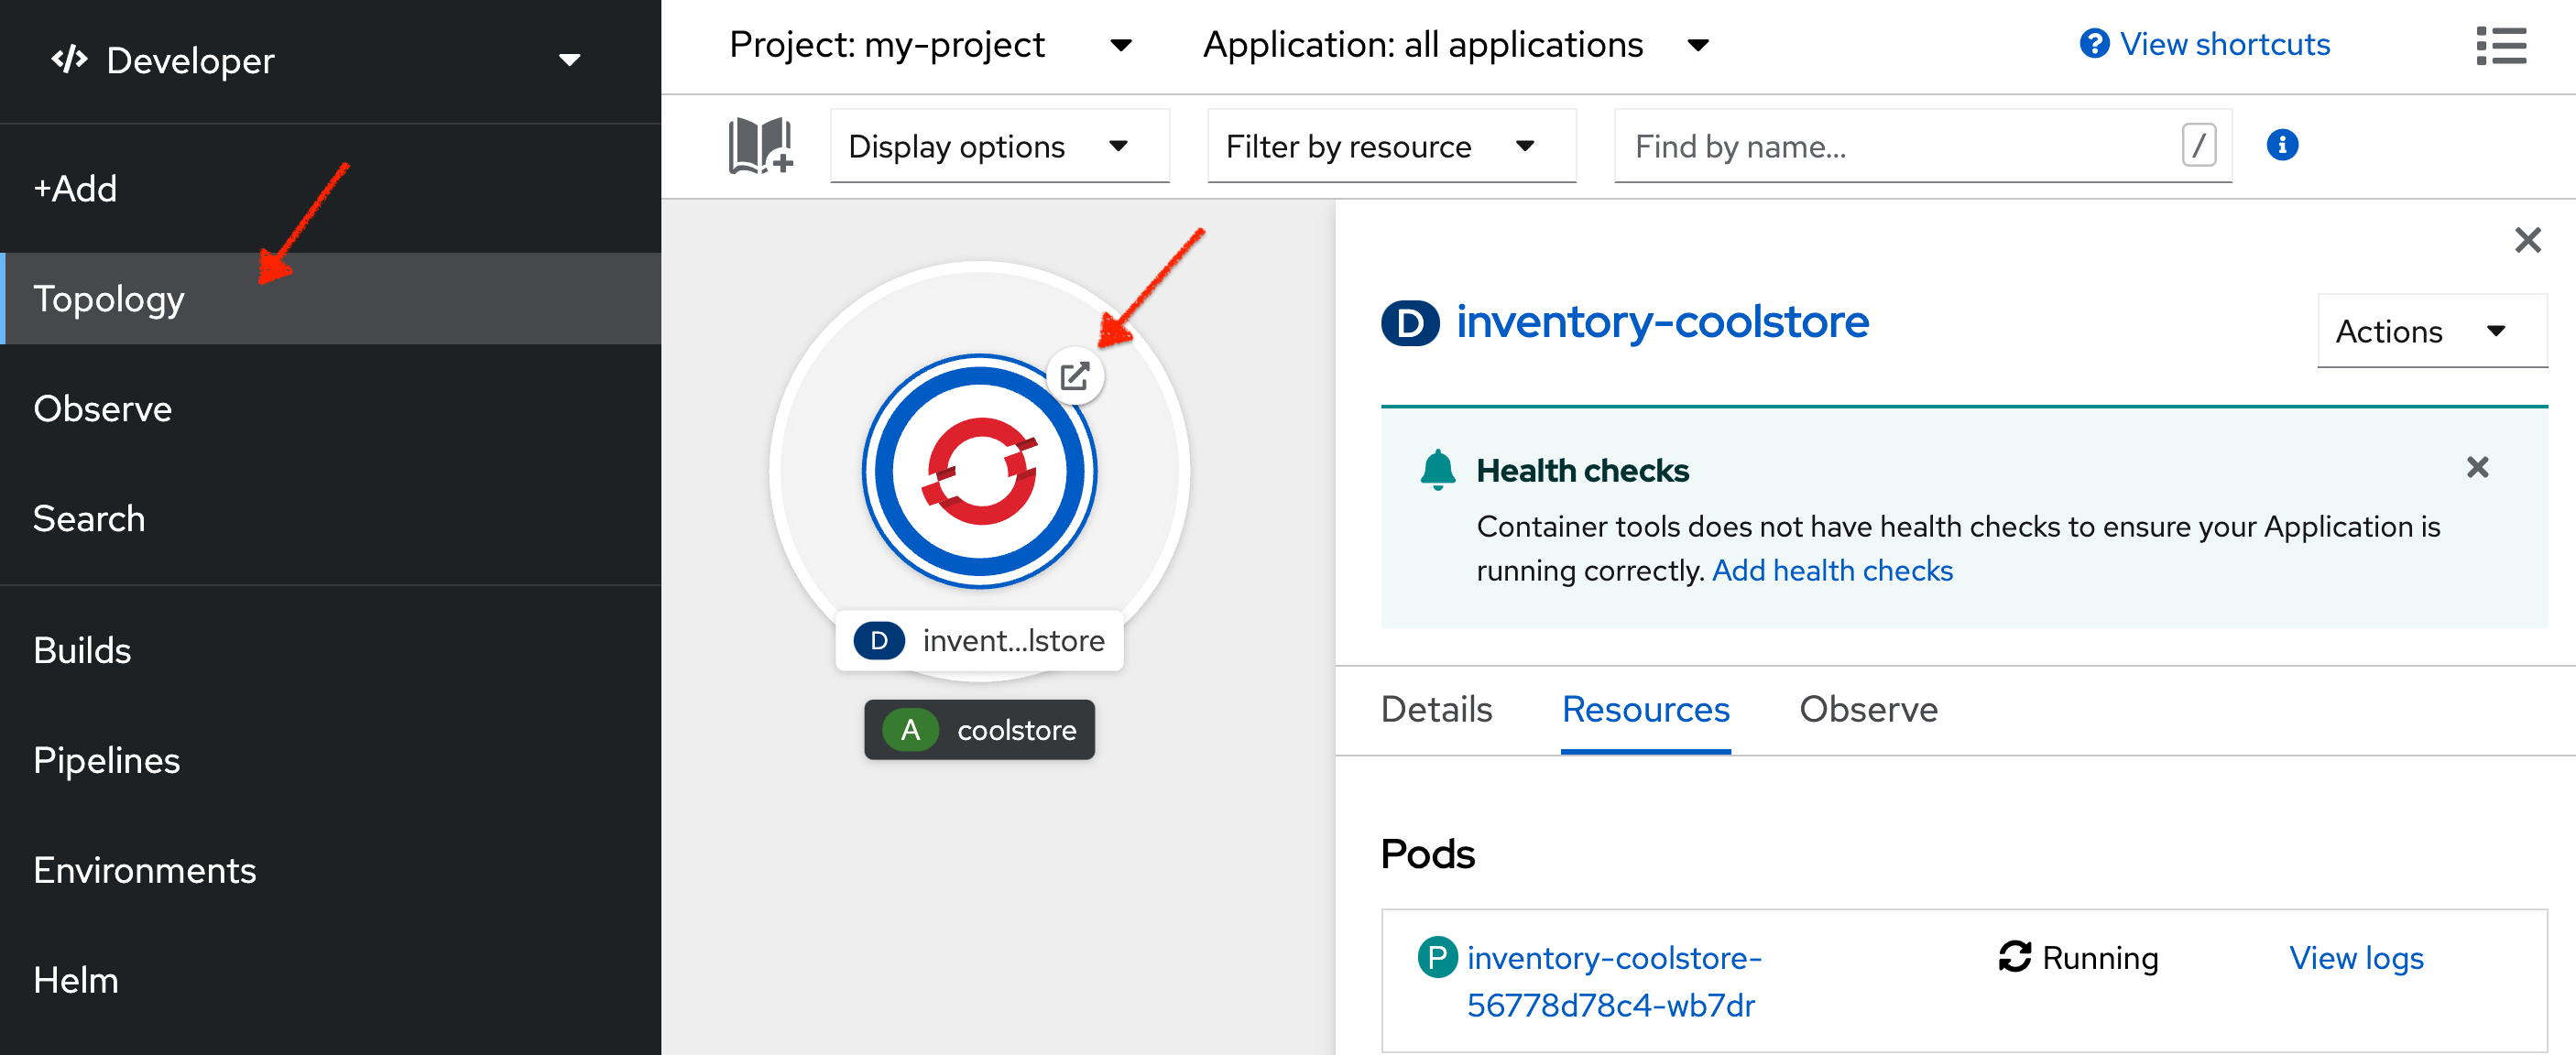
Your browser will be redirect on your Inventory Service running on OpenShift.
Then click on 'Test it'. You should have the following output:
{"itemId":"329299","quantity":35}Well done! You are ready to move on to the next lab, but before you go, you probably should close those Inventory Service output browser tabs.