Bootstrap a Quarkus project with REST API
Creating a Quarkus Application
There are several ways to create a Quarkus project and all of them are valid:
For the sake of simplicity, we are going to use the later one. Open a browser and navigate to https://code.quarkus.io/.
There you can set the name of the artifact (todo-app) and select the RESTEasy JAX-RS endpoint to create a REST API service.
In the following capture, you see page with all the modifications described above:
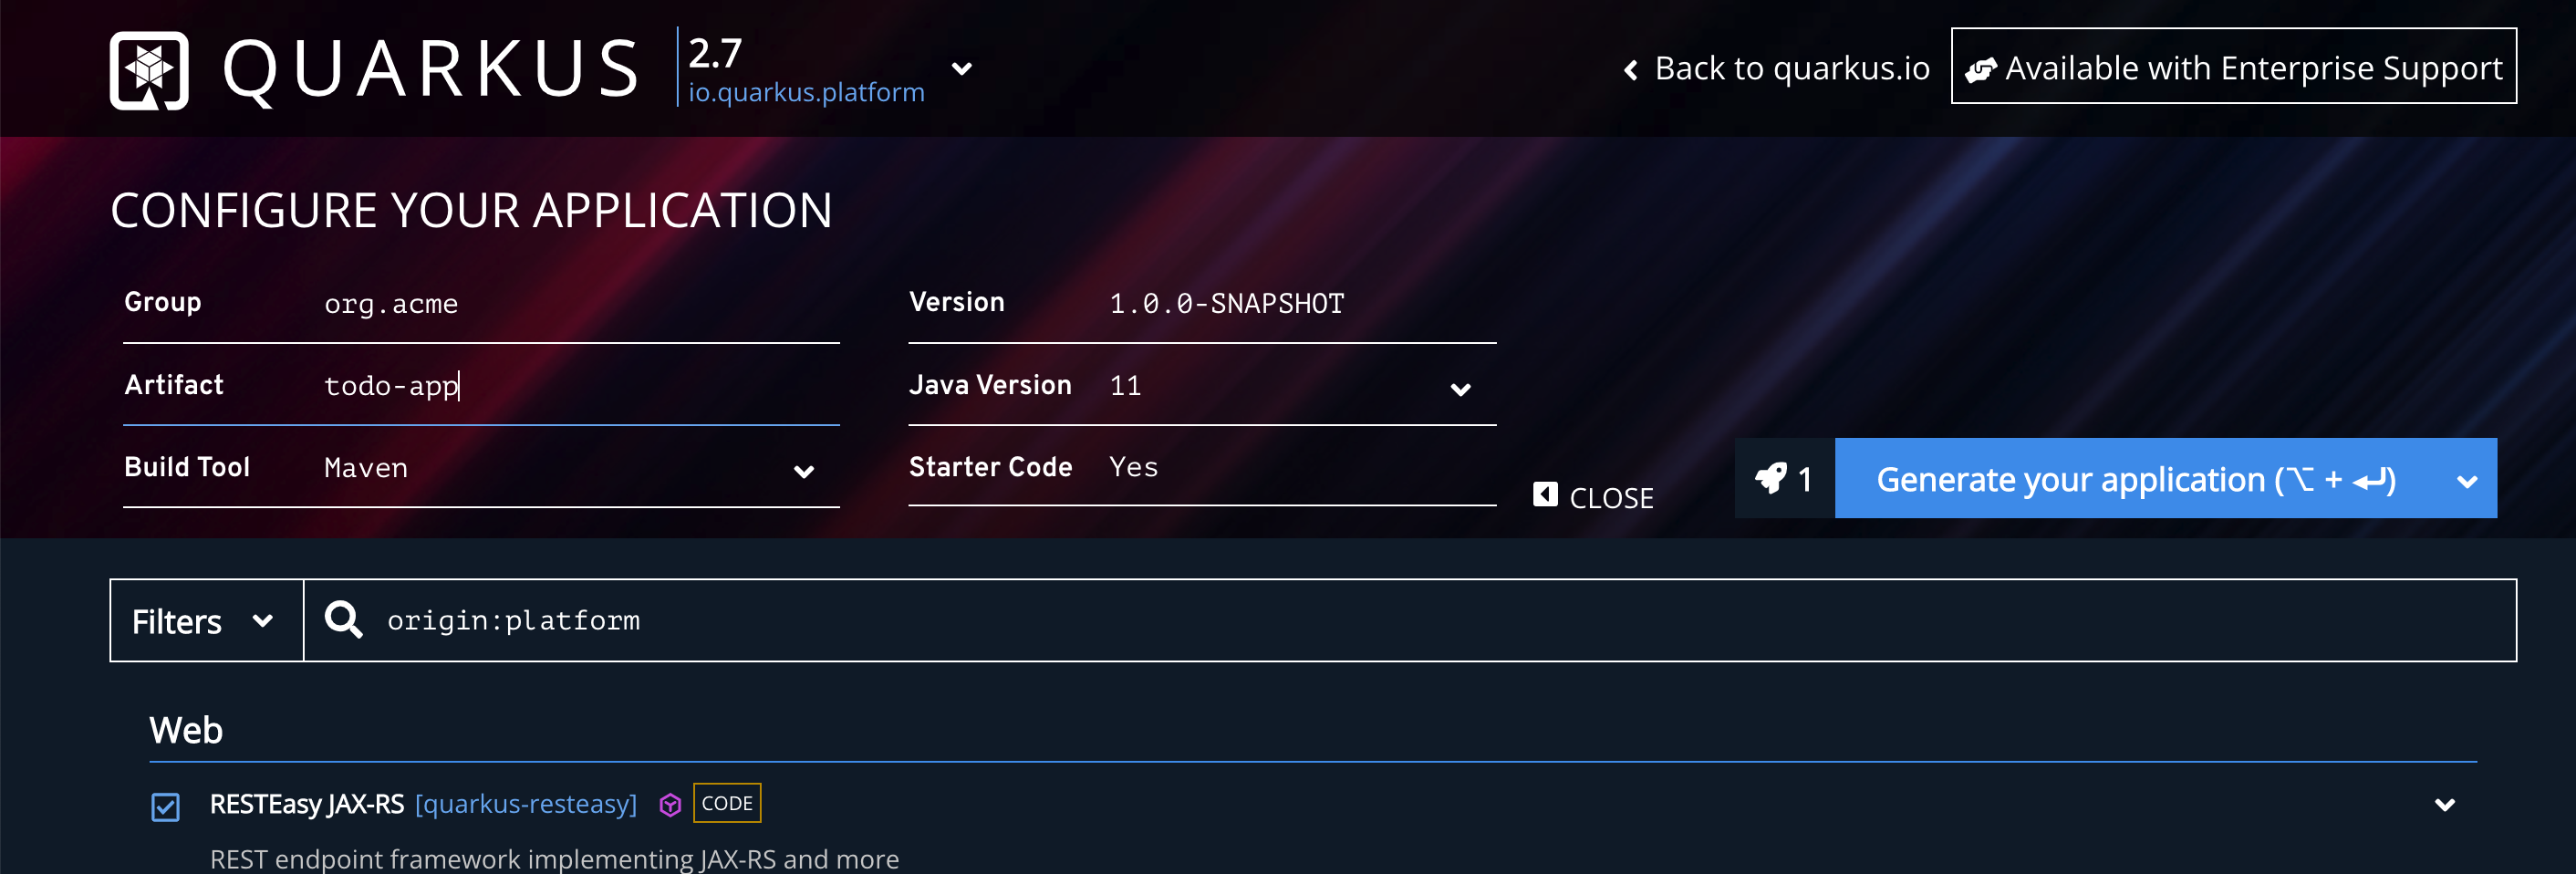
The push Generate your application button, download the zip file into a folder, and unzip it.
unzip todo-app.zip
cd todo-app
Open the project in your favourite IDE, and open the file src/main/java/org/acme/GreetingResource.java to see how to define a REST endpoint in Quarkus:
package org.acme;

import javax.ws.rs.GET; (1)
import javax.ws.rs.Path;
import javax.ws.rs.Produces;
import javax.ws.rs.core.MediaType;

@Path("/hello") (2)
public class GreetingResource {

    @GET (3)
    @Produces(MediaType.TEXT_PLAIN) (4)
    public String hello() {
        return "Hello RESTEasy"; (5)
    }
}| 1 | Imports from JAX-RS spec |
| 2 | @Path to set the endpoint for this resource |
| 3 | HTTP method to use. |
| 4 | Mime-Type of produced message |
| 5 | A simple text message |
Let’s query this REST API endpoint.
Quarkus dev mode
Live Coding or Development mode enables hot deployment with background compilation, which means that when you modify your Java files and/or your resource files and refresh your browser, these changes will automatically take effect.
This is probably one of the best features of Quarkus: enabling a very fast and productive iterative feedback loop.
Let’s start the Live Coding mode by invoking mvnw from the project directory.
Open a terminal window and run the following command:
./mvnw compile quarkus:devAfter a second or so, you’ll have the application started in dev mode.
[INFO] Scanning for projects...
....
__  ____  __  _____   ___  __ ____  ______
 --/ __ \/ / / / _ | / _ \/ //_/ / / / __/
 -/ /_/ / /_/ / __ |/ , _/ ,< / /_/ /\ \
--\___\_\____/_/ |_/_/|_/_/|_|\____/___/
2022-03-22 10:46:44,424 INFO  [io.quarkus] (Quarkus Main Thread) todo-app 1.0.0-SNAPSHOT on JVM (powered by Quarkus 2.7.5.Final) started in 1.743s. Listening on: http://localhost:8080

2022-03-22 10:46:44,440 INFO  [io.quarkus] (Quarkus Main Thread) Profile dev activated. Live Coding activated.
2022-03-22 10:46:44,441 INFO  [io.quarkus] (Quarkus Main Thread) Installed features: [cdi, resteasy, smallrye-context-propagation, vertx]
In a new terminal window send a request to http://localhost:8080/hello and you’ll get the result:
http localhost:8080/helloHTTP/1.1 200 OK
Content-Type: text/plain;charset=UTF-8
content-length: 14
Hello RESTEasyGet back to your IDE without stopping the service and change the return message from Hello RESTEasy to Hello World.
@GET
@Produces(MediaType.TEXT_PLAIN)
public String hello() {
    return "Hello World";
}
And in the terminal window send again a request to http://localhost:8080/hello
http localhost:8080/helloHTTP/1.1 200 OK
Content-Type: text/plain;charset=UTF-8
content-length: 11
Hello WorldNotice that without having to stop the service, nor recompiling, the service is updated and the requests returns the modification we’ve done in the code.
Quarkus Continuous Testing
So far, we’ve developed a simple REST endpoint, but how about testing it?
Open the following file src/test/java/org/acme/GreetingResourceTest.java to see an example of a Quarkus test:
package org.acme;

import io.quarkus.test.junit.QuarkusTest;
import org.junit.jupiter.api.Test;

import static io.restassured.RestAssured.given; (1)
import static org.hamcrest.CoreMatchers.is;

@QuarkusTest (2)
public class GreetingResourceTest {

    @Test
    public void testHelloEndpoint() {
        given() (3)
          .when().get("/hello") (4)
          .then()
             .statusCode(200)
             .body(is("Hello RESTEasy")); (5)
    }

}| 1 | Although not mandatory, Quarkus uses RestAssured to test Rest APIs |
| 2 | This annotations boots up the application before executing the tests |
| 3 | The location of the service (host:port) is automatically configured |
| 4 | Creates a GET HTTP request to /hello |
| 5 | Asserts that the message is Hello RESTEasy |
Go back to terminal window (navigate to todo-app directory if not already there) and run the test executing the test command:
./mvnw testAnd the output is similar to:
[INFO] Running org.acme.GreetingResourceTest
2022-03-22 11:53:25,466 INFO  [org.jbo.threads] (main) JBoss Threads version 3.4.2.Final
2022-03-22 11:53:26,420 INFO  [io.quarkus] (main) Quarkus 2.7.5.Final on JVM started in 1.363s. Listening on: http://localhost:8081 (1)
2022-03-22 11:53:26,420 INFO  [io.quarkus] (main) Profile test activated.
2022-03-22 11:53:26,421 INFO  [io.quarkus] (main) Installed features: [cdi, resteasy, smallrye-context-propagation, vertx]
[ERROR] Tests run: 1, Failures: 1, Errors: 0, Skipped: 0, Time elapsed: 4.219 s <<< FAILURE! - in org.acme.GreetingResourceTest
[ERROR] org.acme.GreetingResourceTest.testHelloEndpoint  Time elapsed: 1.118 s  <<< FAILURE! (2)
java.lang.AssertionError:
1 expectation failed.
Response body doesn t match expectation.
Expected: is "Hello RESTEasy"
  Actual: Hello World
at org.acme.GreetingResourceTest.testHelloEndpoint(GreetingResourceTest.java:18)| 1 | Tests are started to port 8081 by default, so no worries on the previous running instance in dev mode |
| 2 | Obviously test is failing as the we changed the message |
Let’s fix the test by changing the expected message to Hello World.
@Test
public void testHelloEndpoint() {
    given()
    .when().get("/hello")
    .then()
    .statusCode(200)
    .body(is("Hello World"));
}
Run again the test goal to validate that we’ve fixed the test.
./mvnw testAnd the output is similar to:
[INFO] Tests run: 1, Failures: 0, Errors: 0, Skipped: 0, Time elapsed: 3.231 s - in org.acme.GreetingResourceTest
2022-03-22 11:59:37,279 INFO  [io.quarkus] (main) Quarkus stopped in 0.041s
[INFO]
[INFO] Results:
[INFO]
[INFO] Tests run: 1, Failures: 0, Errors: 0, Skipped: 0
This is the normal way we’ve used for years in Java for executing tests, but Quarkus comes with one thing called Continuous Testing, meaning that your tests will run immediately after code changes were saved.
Go back to the terminal window where you started the application in dev mode at the beginning of this section, and down the bottom of the screen you should see the following:
Tests paused
Press [r] to resume testing, [o] Toggle test output, [:] for the terminal, [h] for more options>
Press r and the tests will start running.
You should see the status change down the bottom of the screen as they are running, and it should finish similar to this:
All 1 test is passing (0 skipped), 1 test was run in 239ms. Tests completed at 12:03:37 due to changes to GreetingResource.class.So all tests have run and they are passing. But now, we’re in continuous testing mode which means that any change we do in the code, Quarkus will detect tests affected by the change, and re-run them automatically.
Go to your IDE without stopping the service, open GreetingResource.java, and change the return message from Hello World to Hi World.
Then save the file and go back to the terminal window where the application wa started in dev mode. Automatically, you’ll see the following message in the console indicating that there is one test failure:
2022-03-22 11:24:47,216 INFO  [io.qua.dep.dev.RuntimeUpdatesProcessor] (vert.x-worker-thread-0) Live reload total time: 0.742s
2022-03-22 12:14:06,118 ERROR [io.qua.test] (Test runner thread) ==================== TEST REPORT #3 ====================
2022-03-22 12:14:06,118 ERROR [io.qua.test] (Test runner thread) Test GreetingResourceTest#testHelloEndpoint() failed
: java.lang.AssertionError: 1 expectation failed.
Response body doesnt match expectation.
Expected: is "Hello World"
  Actual: Hi World
Now open GreetingResourceTest and update the expecting message to be Hi World, and inspect again the console
2022-03-22 12:16:50,783 INFO  [io.qua.test] (Test runner thread) All tests are now passing
--
All 1 test is passing (0 skipped), 1 test was run in 316ms. Tests completed at 12:16:50 due to changes to GreetingResourceTest.class.
Tests are back to normal.
Configuration
In Quarkus, there is a central place where you can configure the application.
Let’s make the greeting message configurable.
Open the src/main/resources/application.properties file and add the following property:
greeting.message=Hi WorldThen modify GreetingResource.java class to inject this property value:
@ConfigProperty(name = "greeting.message") (1) (2)
String msg;

@GET
@Produces(MediaType.TEXT_PLAIN)
public String hello() {
    return msg; (3)
}| 1 | Import org.eclipse.microprofile.config.inject.ConfigProperty class |
| 2 | Injects the value set in the greeting.message property |
| 3 | Returns the message value |
Before jumping to the following section, stop the application running instance by pressing q char.
This is a really simple example, let’s move things forward and create a TODO application.
RestEasy Jackson/OpenAPI
The first thing before starting developing the TODO app is registering two new extensions, one for adding the Jackson support so marshalling/unmarshalling operations from/to Java objects from/to JSON documents, happens automatically.
Moreover, we’re going to add the OpenAPI extension so a Swagger UI interface is deployed automatically to test the API.
Run the following command in the project directory:
./mvnw quarkus:add-extension -Dextensions="io.quarkus:quarkus-resteasy-jackson,quarkus-smallrye-openapi"And both extensions are added:
[INFO] [SUCCESS] ✅  Extension io.quarkus:quarkus-resteasy-jackson has been installed
[INFO] [SUCCESS] ✅  Extension io.quarkus:quarkus-smallrye-openapi has been installed
Create a new class named Todo.java representing the todo data.
package org.acme;

public class Todo {
    public Long id;
    public String title;
    public boolean completed;
    public int order;
    public String url;
}
Then create a new REST API resource named TodoResource.java to implement all required operations for a TODO application:
package org.acme;

import java.util.ArrayList;
import java.util.HashMap;
import java.util.List;
import java.util.Map;

import javax.ws.rs.DELETE;
import javax.ws.rs.GET;
import javax.ws.rs.OPTIONS;
import javax.ws.rs.PATCH;
import javax.ws.rs.POST;
import javax.ws.rs.Path;
import javax.ws.rs.PathParam;
import javax.ws.rs.WebApplicationException;
import javax.ws.rs.core.Response;
import javax.ws.rs.core.Response.Status;

@Path("/api")
public class TodoResource {

    private Map<Long, Todo> todos = new HashMap<>(); (1)

    (2)

    @OPTIONS
    public Response opt() {
        return Response.ok().build();
    }

    @GET (3) (4)
    public List<Todo> getAll() {
        return new ArrayList<>(todos.values());
    }

    @GET
    @Path("/{id}")
    public Todo getOne(@PathParam("id") Long id) {
        Todo entity = todos.get(id);
        if (entity == null) {
            throw new WebApplicationException("Todo with id of " + id + " does not exist.", Status.NOT_FOUND);
        }
        return entity;
    }

    @POST
    public Response create(Todo item) { (5)
        todos.put(item.id, item);
        return Response.status(Status.CREATED).entity(item).build();
    }

    @PATCH
    @Path("/{id}")
    public Response update(Todo todo, @PathParam("id") Long id) {
        Todo entity = todos.get(id);
        entity.id = id;
        entity.completed = todo.completed;
        entity.order = todo.order;
        entity.title = todo.title;
        entity.url = todo.url;
        return Response.ok(entity).build();
    }

    @DELETE
    public Response deleteCompleted() {
        todos.entrySet().removeIf(e -> e.getValue().completed);
        return Response.noContent().build();
    }

    @DELETE
    @Path("/{id}")
    public Response deleteOne(@PathParam("id") Long id) {
        Todo entity = todos.get(id);
        if (entity == null) {
            throw new WebApplicationException("Todo with id of " + id + " does not exist.", Status.NOT_FOUND);
        }
        todos.remove(id);
        return Response.noContent().build();
    }
}| 1 | Stores list of Todos in memory |
| 2 | List of operations |
| 3 | Marshalling from Java object to JSON is automatically done |
| 4 | Content Type is automatically set to JSON |
| 5 | Unmarshalling from JSON to object is automatically done |
Start the application again in dev mode running the following command:
./mvnw compile quarkus:devWhen the application is running, open a browser and navigate to http://localhost:8080/q/swagger-ui/.
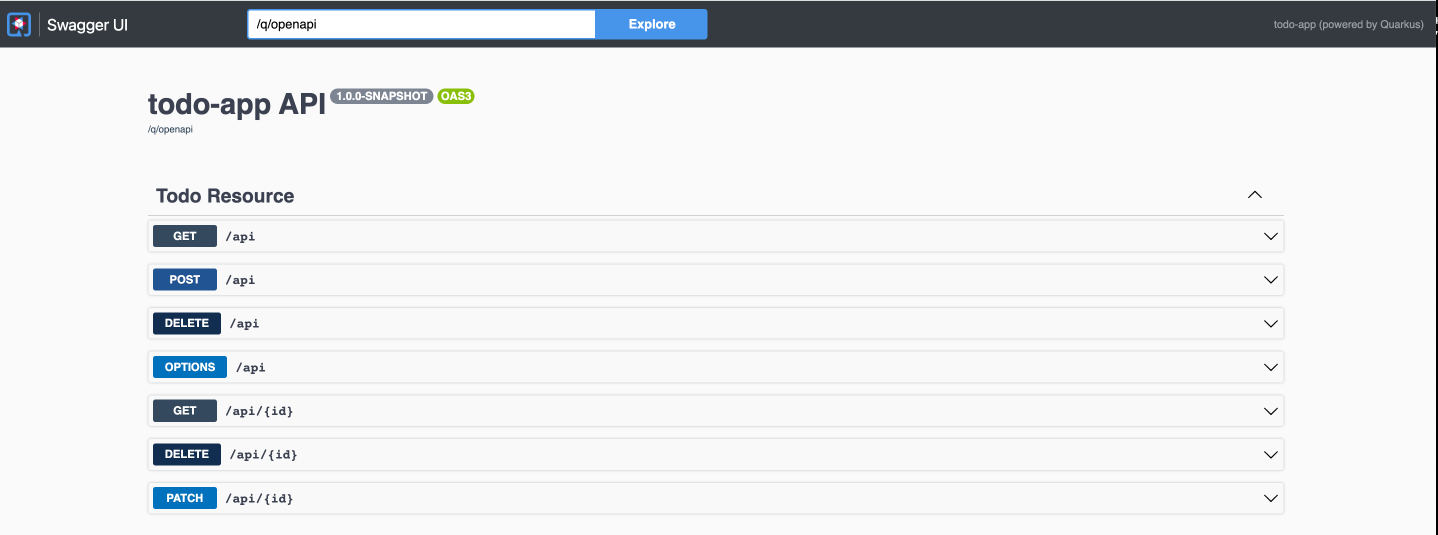
Then open the POST /api section and push the Try It Out button. And use the Swagger UI to insert a new TODO:
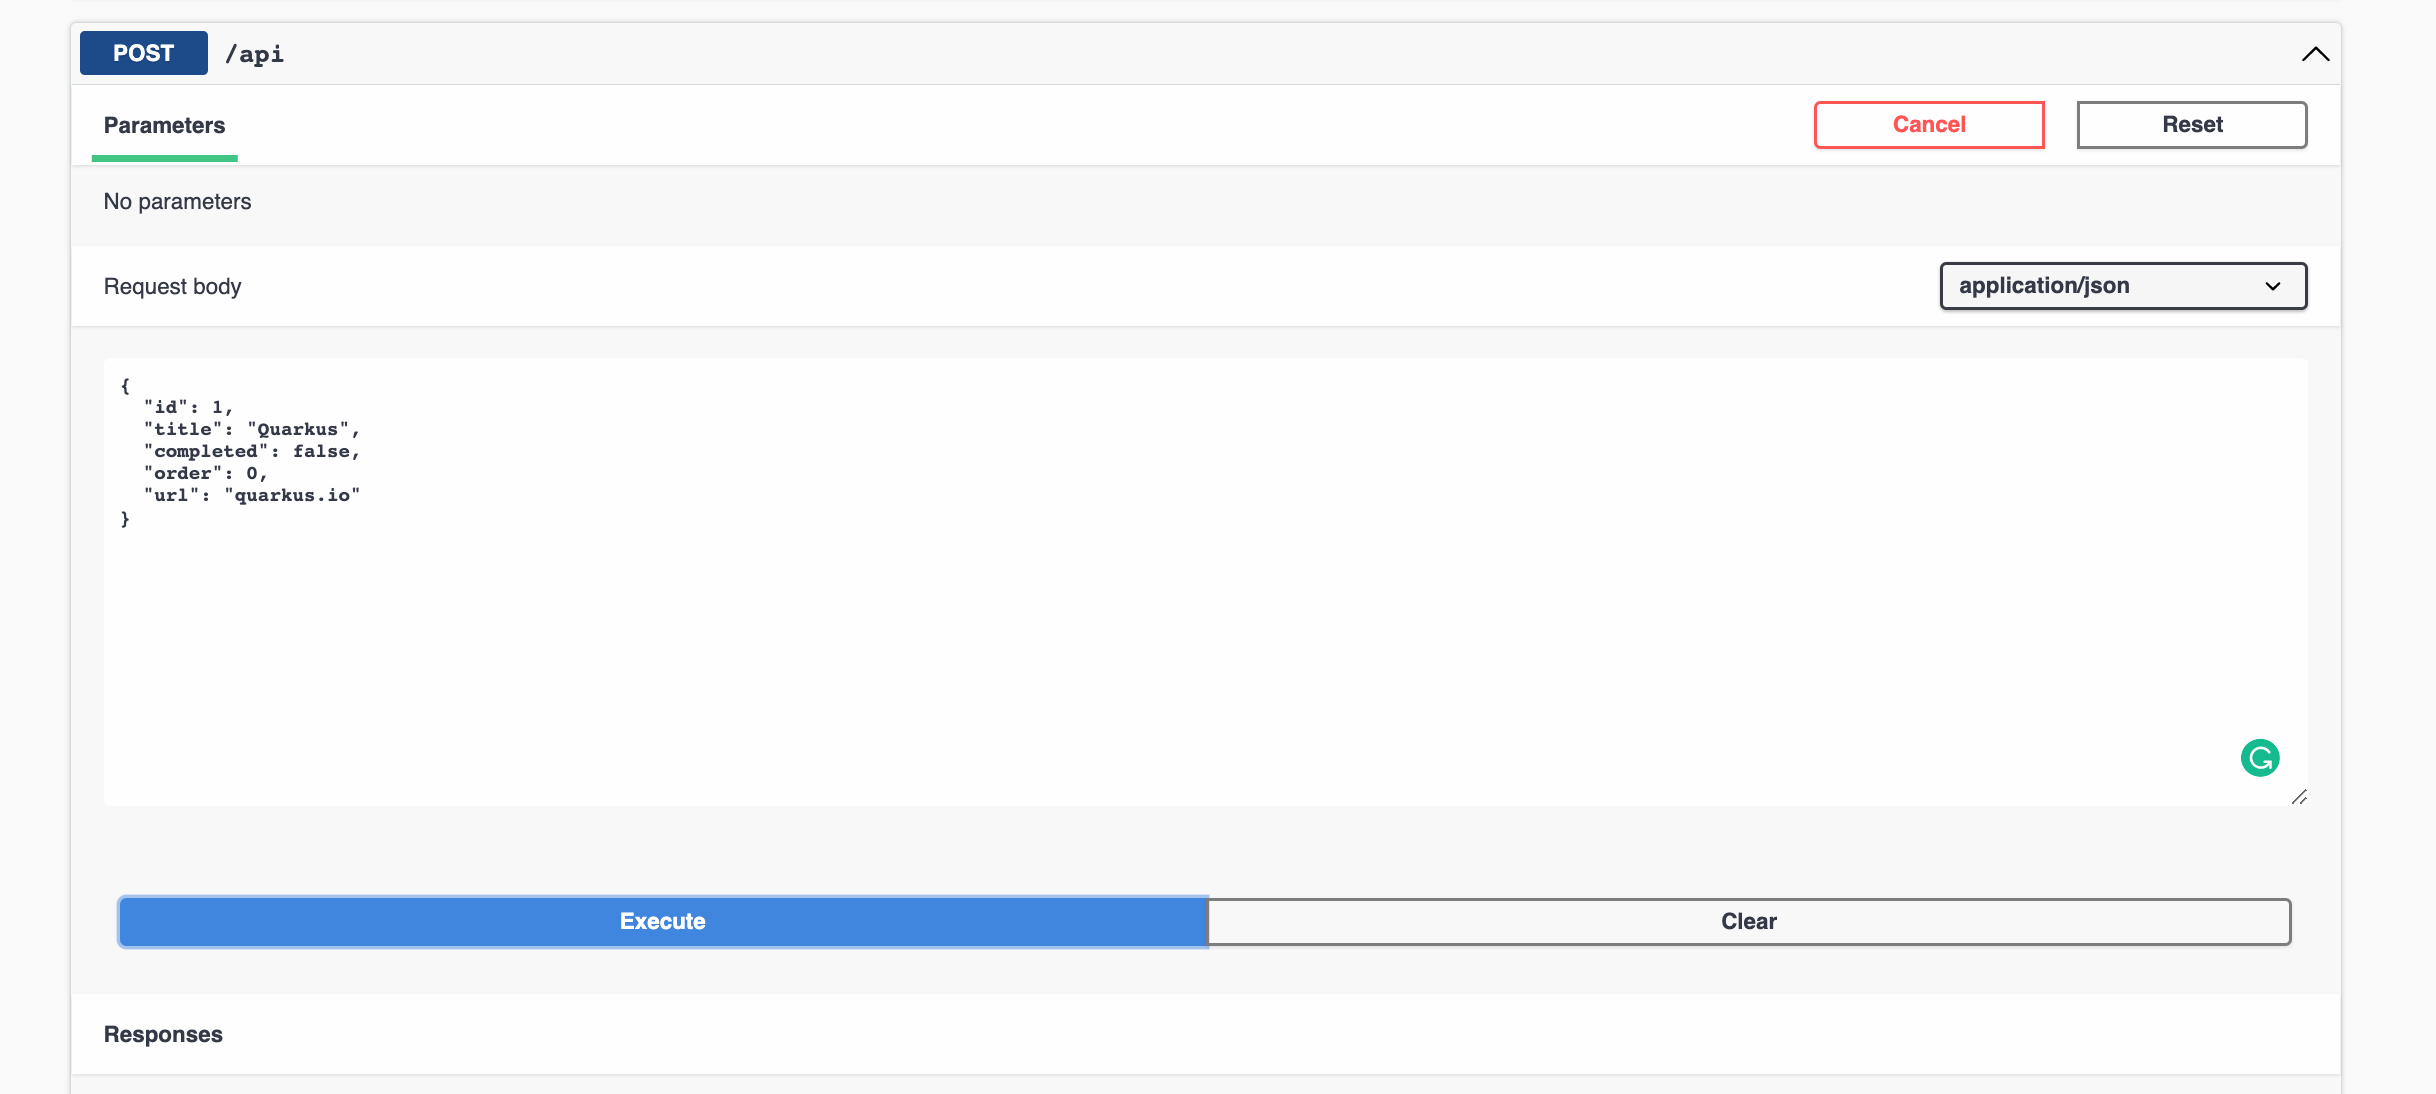
Or you can use curl for the same thing:
curl -X 'POST' \
  'http://localhost:8080/api' \
  -H 'accept: */*' \
  -H 'Content-Type: application/json' \
  -d '{
  "id": 1,
  "title": "Quarkus",
  "completed": false,
  "order": 0,
  "url": "quarkus.io"
}'
Also, the same can be used to get the list of TODOs.

Or use curl:
curl localhost:8080/apiAt this point, we’ve seen how to test the application backend using Swagger UI.
But there is no frontend yet for the application.
Quarkus lets you copy HTML resources to src/main/resources/META-INF/resources directory and serving them as static resources.
We’ve developed a UI for the TODO application, download the zip file containing the UI from GitHub.
In a terminal window, go to src/main/resources/META-INF directory, copy the resources.zip file there, and unzip it.
cd src/main/resources/META-INF

unzip resources.zip
Without restarting the application, open a browser and navigate to http://localhost:8080/todo.html
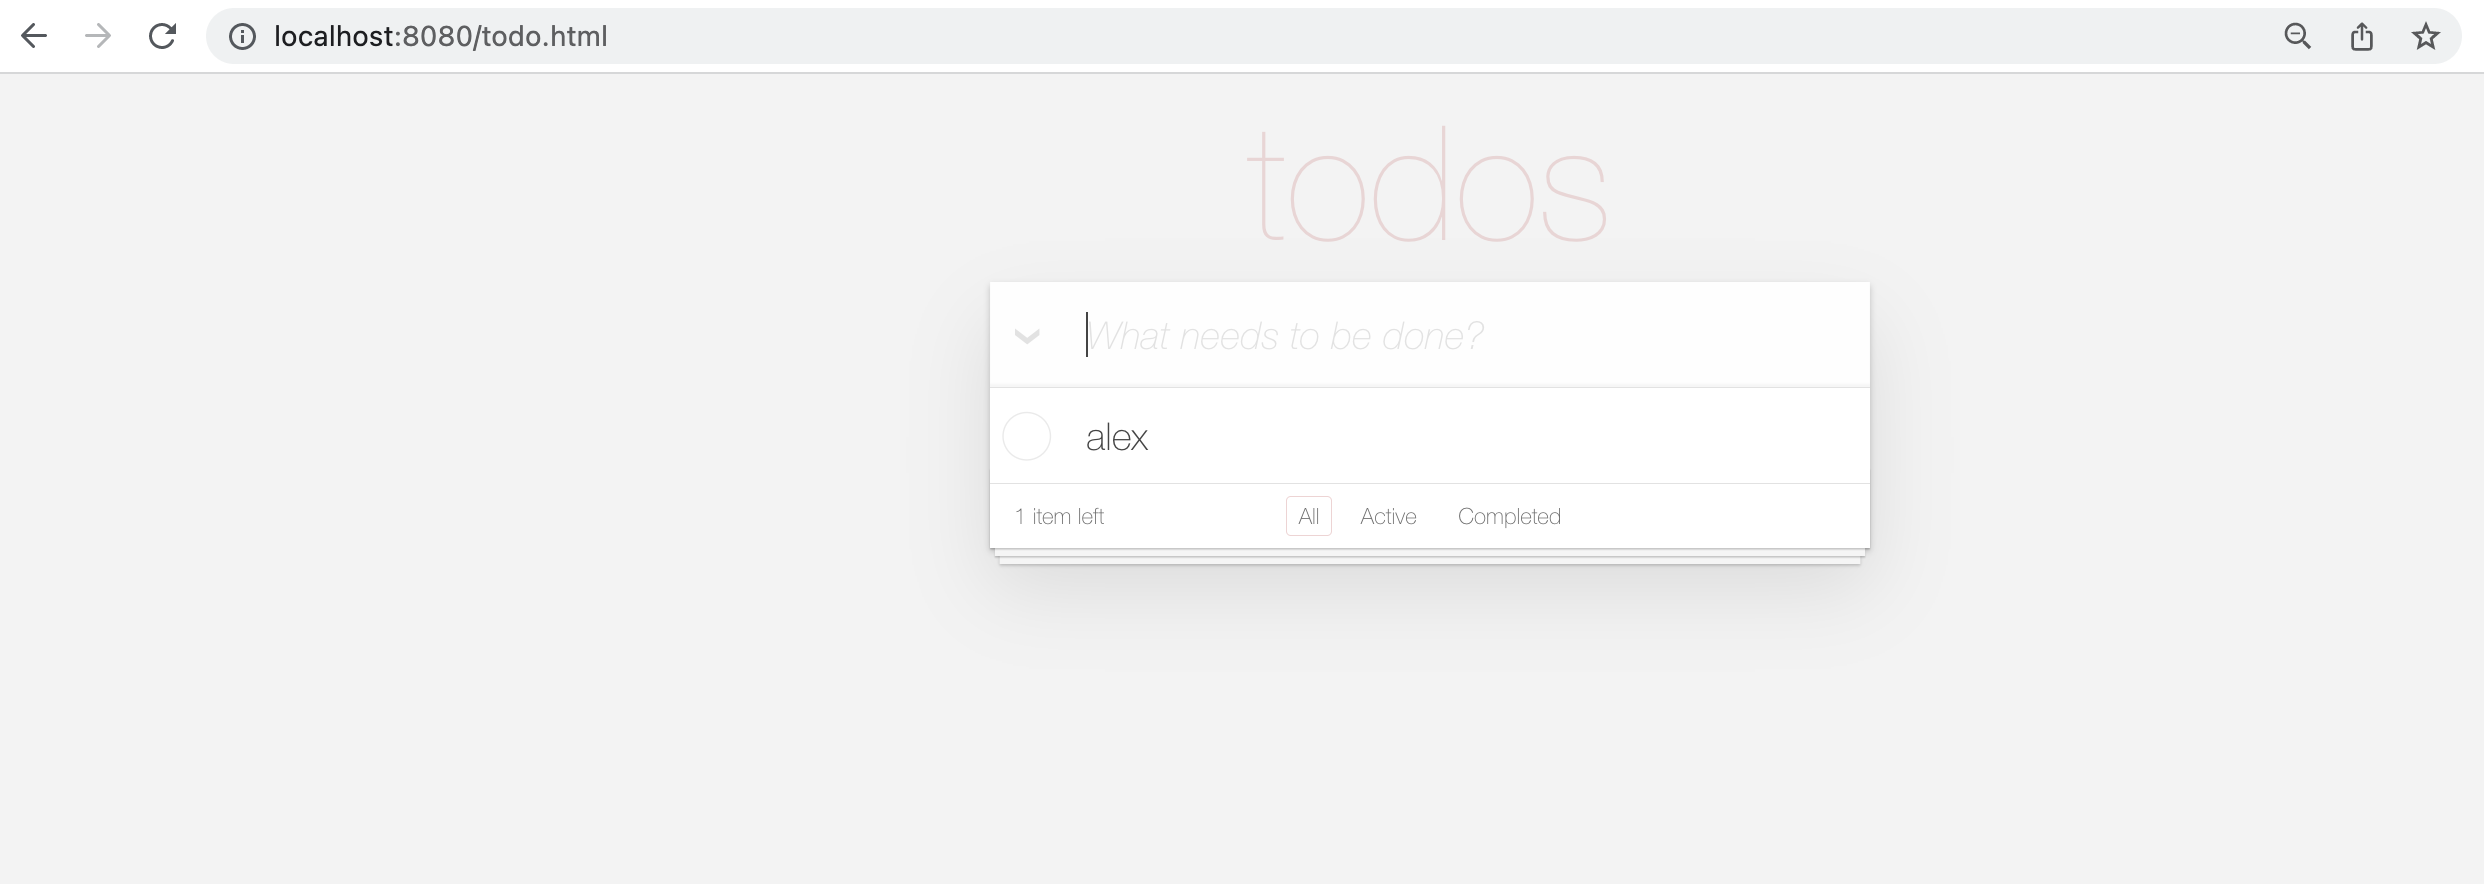
And you can start interacting with the UI adding TODOs, completing them, …
Oh you are coming from Spring Boot, no worries
In this example, we used JAX-RS annotations and MicroProfile Config annotations for defining the endpoint, but if you are coming from Spring stack, you might find a barrier to learn new annotations.
Quarkus offers an integration to Spring annotations, so they are used in the code, and at compilation time they are transformed to "Quarkus" annotations.
Go back to the terminal where you started the appication (./mvnw compile quarkus:dev) and stop it.
Then run the following command to add the integration with Spring stack:
./mvnw quarkus:add-extension -Dextensions="io.quarkus:quarkus-spring-web,io.quarkus:quarkus-spring-di"After this addition, we can start using Spring DI and Spring Web MVC annotations.
Substitue the GreetingResource.java class with the following content.
It’s exactly the same resource but using Spring annotations:
package org.acme;

import org.springframework.beans.factory.annotation.Value;
import org.springframework.web.bind.annotation.GetMapping;
import org.springframework.web.bind.annotation.RestController;

@RestController
public class GreetingResource {

    @Value("greeting.message")
    String msg;

    @GetMapping(path = "/hello")
    public String hello() {
        return msg;
    }
}
See that only Spring Framework imports are present. Start again the application in dev mode and make a request:
./mvnw compile quarkus:devcurl localhost:8080/helloHi World