Compliance Operator and Compliance in ACS
The OpenShift Compliance Operator allows OpenShift Container Platform administrators to define the desired compliance state of a cluster and provides an overview of gaps and ways to remediate any non-compliant policy.
The OpenShift Compliance Operator assesses both Kubernetes API resources and OpenShift Container Platform resources, as well as the nodes running the cluster. The Compliance Operator uses OpenSCAP, a NIST-certified tool, to scan and enforce security policies provided by the content.
Red Hat Advanced Cluster Security for Kubernetes supports OpenShift Container Platform configuration compliance standards through an integration with the OpenShift Container Platform Compliance Operator. In addition, it allows you to measure and report on configuration security best practices for OpenShift Container Platform.
Review Compliance Dashboard
Execute the first Compliance Scan
Once the RHACS is installed the first compliance scan needs to be executed to ensure that the Compliance results are available. So let’s execute our first Compliance Scan.
Compliance Dashboard without the First Compliance Scan
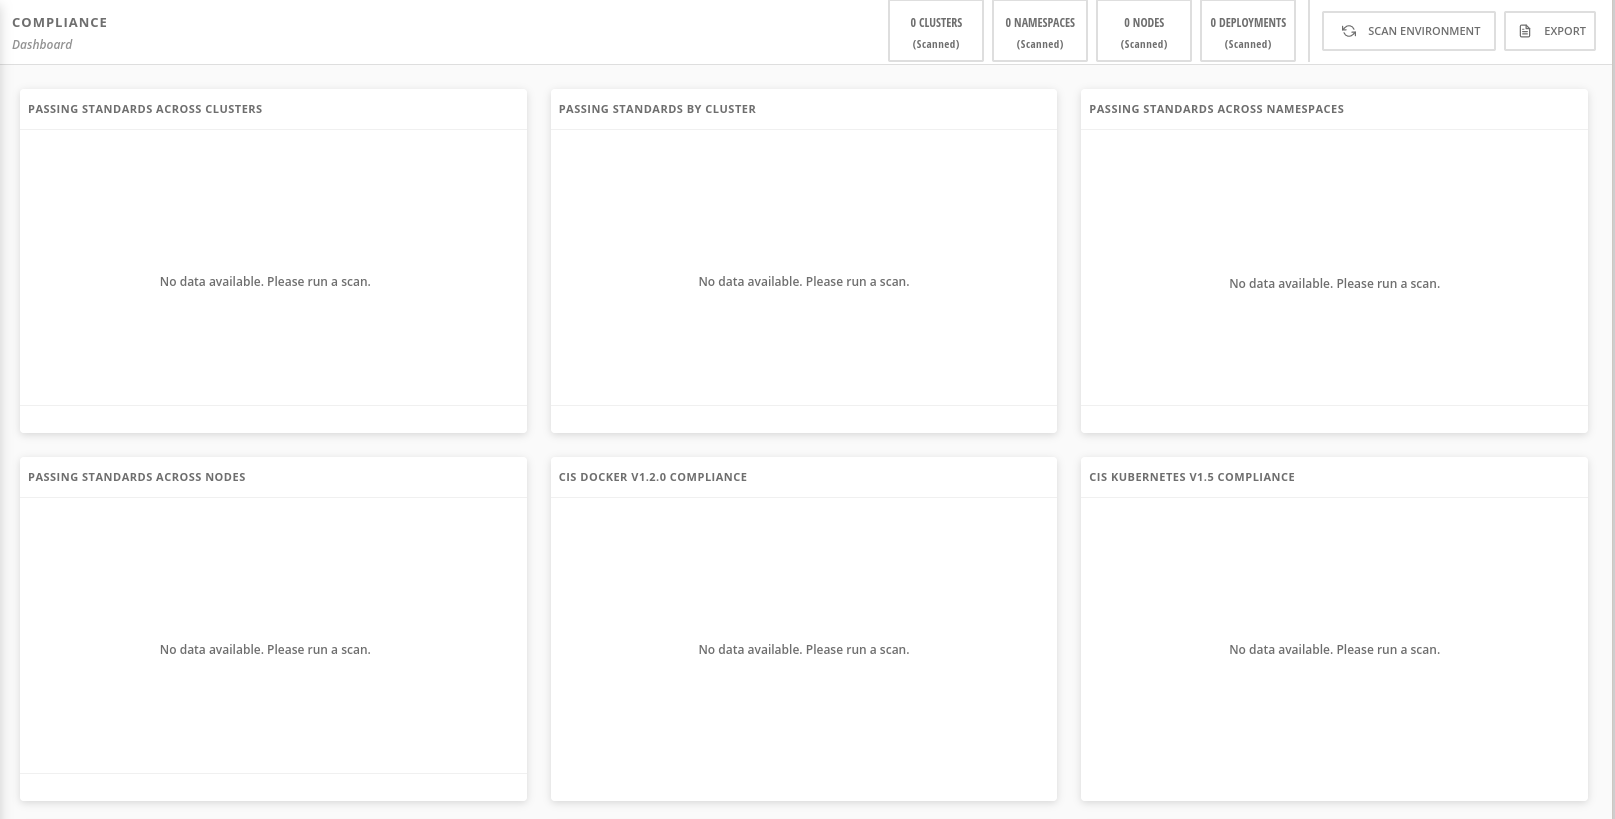
Run compliance scanner
Compliance Result
TODO: Add more descriptions in compliance dashboard scan
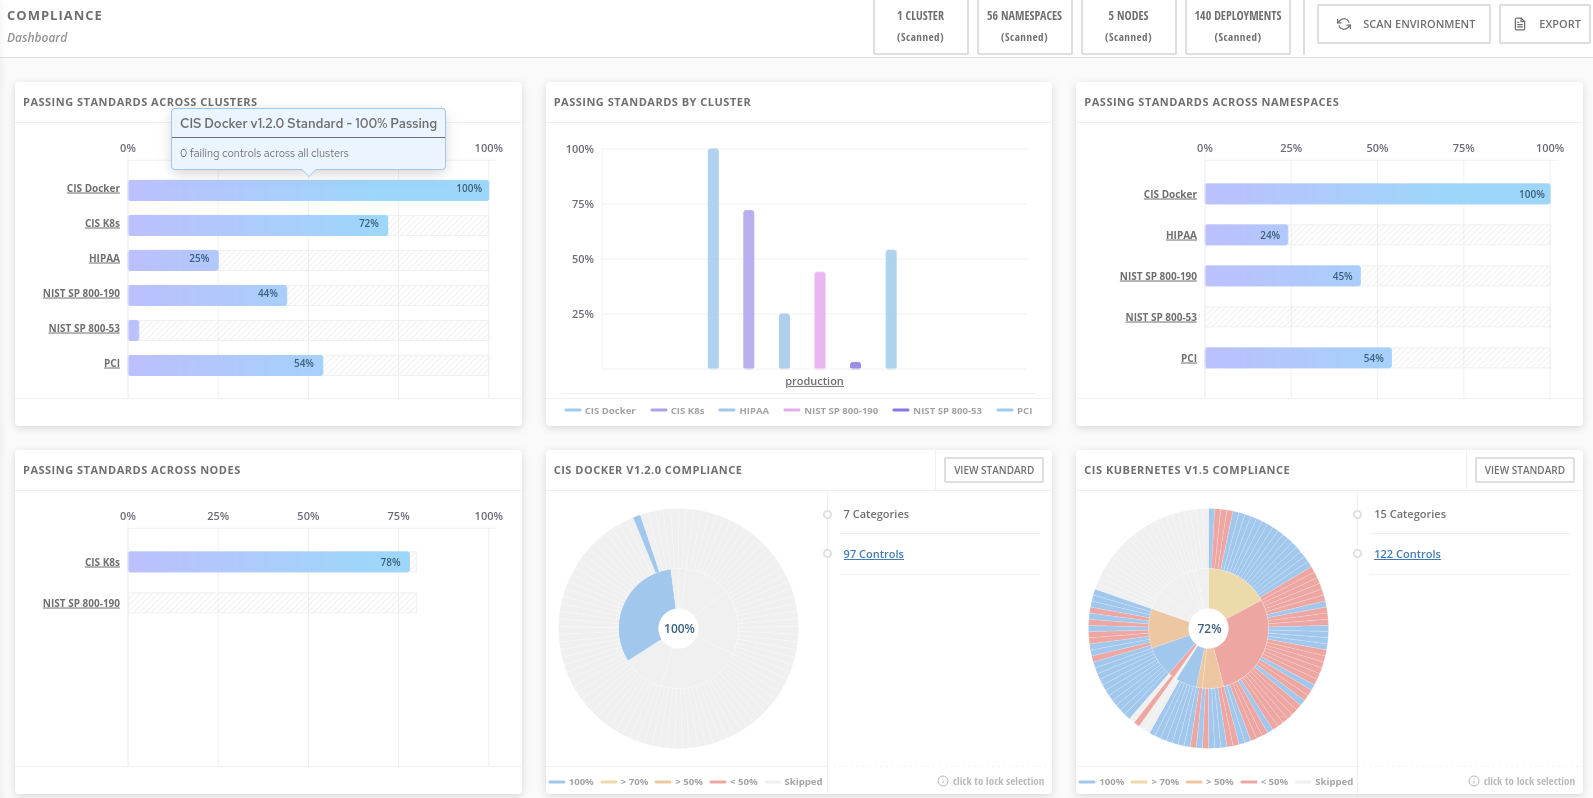
Review the Compliance Reports in the Compliance Dashboard
The compliance reports gather information for configuration, industry standards, and best practices for container-based workloads running in OpenShift.
In many ways, you’ve already seen the compliance features - because they’re tied to controls that we saw in Risk, in the Network Graph, and in Policies
Each standard represents a series of controls, with guidance provided by StackRox on the specific OpenShift configuration or DevOps process required to meet that control.
-
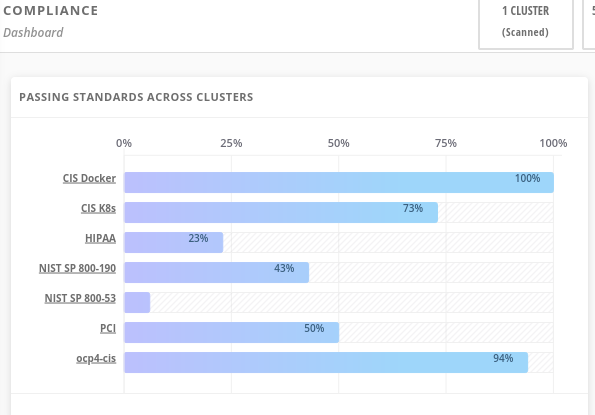
Click on PCI, or the PCI percentage bar, in the upper-left “Passing Standards Across Clusters” graph
-
Click on Control 1.1.4, “Requirements for a firewall…”
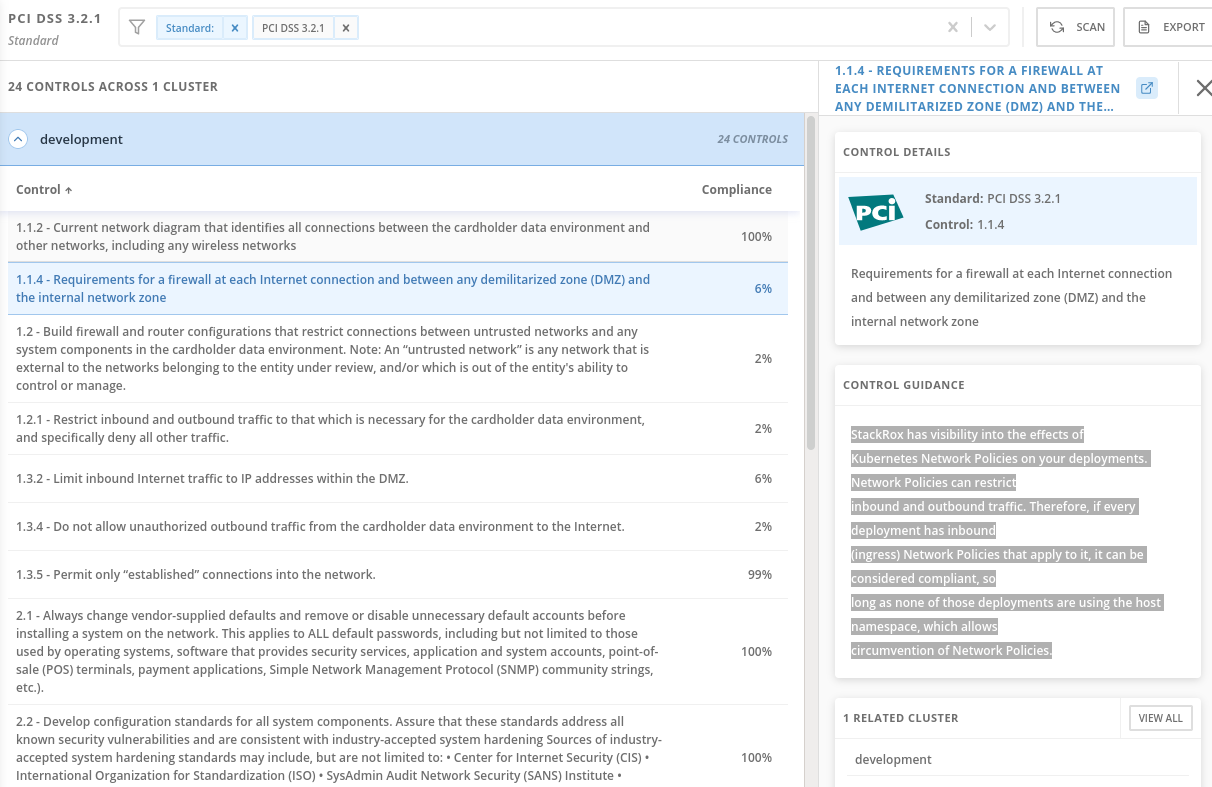
For example, PCI-DSS has controls that refer to firewalls and DMZ - not exactly cloud-native
In OpenShift, that requirement, and other isolation requirements, is met by Network Policies, and the 32% compliance score here indicates that only about one third of my deployments have correctly defined policies.
-
Click on Compliance tab from the left hand side menu
-
Click on NIST SP 800-190. Click on Control 4.1.1, “Image vulnerabilities…”
-
Similarly - NIST 800-190, the application containers security standard, requires a pipeline-based build approach to mitigating vulnerabilities in images.
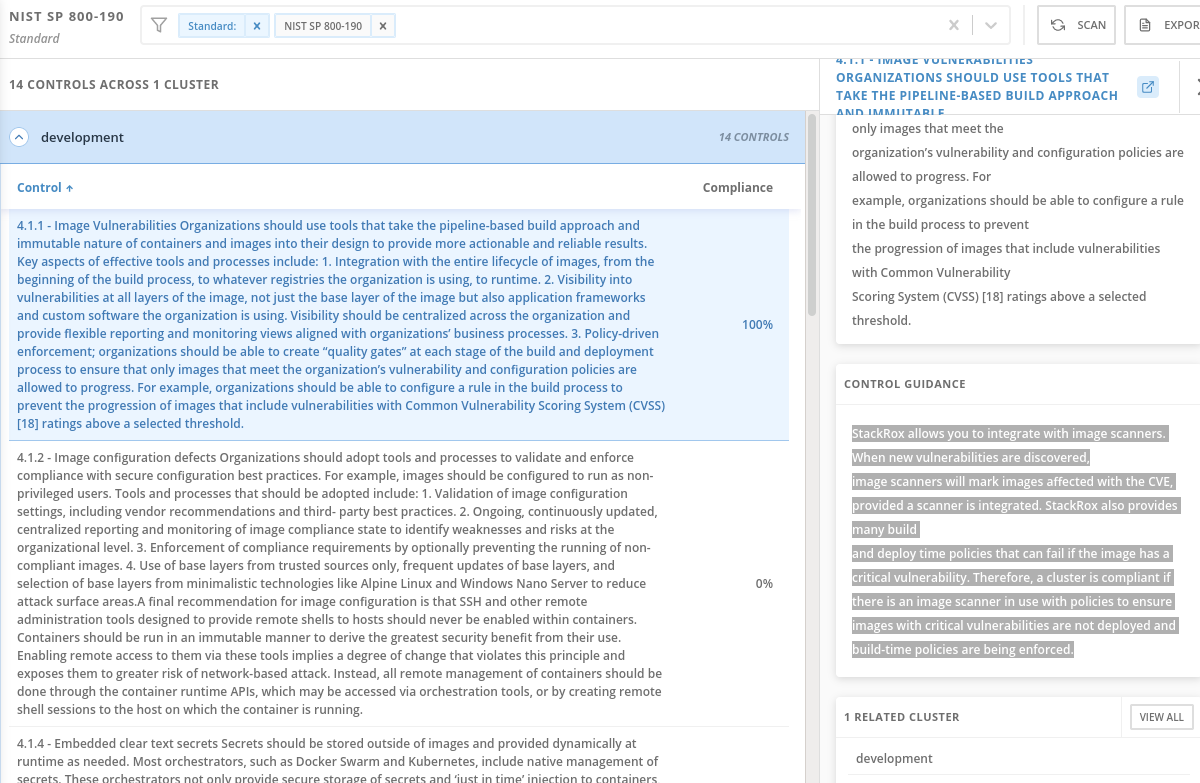
Because we added enforcement to the CVSS >7 policy, we now meet the requirement dictated by control 4.1.1, and the 0% score changes to 100% because we now have the control in place to prevent known vulnerabilities from being deployed
Namespace Compliance Details
-
Click on Compliance tab on the left hand side menu
-
Click on Namespaces in the top toolbar of the compliance page
Of course, like every other report - it’s also valuable to break this data down by Clusters, Namespaces, and Deployments.
Namespaces in particular - being able to see, application-by-application, or team-by-team, where the gaps in compliance are.
Evidence Export
-
Click on Compliance tab on the left hand side menu
-
Last thing about compliance - you’re only as compliant as you can prove!
-
Click on the Export button in the upper right to show the “Evidence as CSV” option
This is the evidence export that your auditors will want to see for proof that the security controls mandated are actually in place.
Integrating the OpenShift Compliance Operator with ACS
Red Hat Advanced Cluster Security for Kubernetes supports OpenShift Container Platform configuration compliance standards through an integration with the OpenShift Container Platform Compliance Operator.
Follow the next steps to install and integrate the Compliance Operator with Advanced Cluster Security.
-
Create a Namespace object YAML file by running:
oc apply -f co-ns.yamlapiVersion: v1
kind: Namespace
metadata:
name: openshift-compliance-
Create the Compliance Operator OperatorGroup object YAML file by running:
apiVersion: operators.coreos.com/v1
kind: OperatorGroup
metadata:
  name: compliance-operator
  namespace: openshift-compliance
spec:
  targetNamespaces:
  - openshift-compliance
oc apply -f co-og.yaml-
Create the Compliance Operator Subscription object YAML file by running:
apiVersion: operators.coreos.com/v1alpha1
kind: Subscription
metadata:
  name: compliance-operator-sub
  namespace: openshift-compliance
spec:
  channel: "release-0.1"
  installPlanApproval: Automatic
  name: compliance-operator
  source: redhat-operators
  sourceNamespace: openshift-marketplace
oc apply -f co-subs.yaml-
Verify the installation succeeded by inspecting the CSV file:
oc get csv -n openshift-compliance | grep complianceoc get csv -n openshift-compliance | grep compliance
compliance-operator.v0.1.39 Compliance Operator 0.1.39 Succeeded-
Verify that the Compliance Operator is up and running:
oc get pod -n openshift-complianceoc get pod -n openshift-compliance
NAME READY STATUS RESTARTS AGE
compliance-operator-5989ff994b-mrhc9 1/1 Running 1 4m42s
ocp4-openshift-compliance-pp-6d7c7db4bd-2gnrf 1/1 Running 0 3m2s
rhcos4-openshift-compliance-pp-c7b548bd-k4sz2 1/1 Running 0 3m2sRunning compliance scans
We now want to make sure that the nodes are scanned appropiately. For this, we’ll need a ScanSettingsBinding, this bind a profile with scan settings in order to get scans to run.
-
Create a ScanSettingBinding object that binds to the default ScanSetting object and scans the cluster using the cis and cis-node profiles.
oc apply -f co-scan.yamlapiVersion: compliance.openshift.io/v1alpha1
kind: ScanSettingBinding
metadata:
name: cis-scan
namespace: openshift-compliance
profiles:
- apiGroup: compliance.openshift.io/v1alpha1
kind: Profile
name: ocp4-cis
settingsRef:
apiGroup: compliance.openshift.io/v1alpha1
kind: ScanSetting
name: default-
Check the scansettingbinding generated:
oc get scansettingbinding cis-scan -n openshift-compliance -o yaml-
With this the scan will start as you can check with the CRD of ComplianceScan.
oc get compliancescan -n openshift-compliance ocp4-cis oc get compliancescan -n openshift-compliance
NAME PHASE RESULT
ocp4-cis RUNNING NOT-AVAILABLE-
After the scan is done, you’ll see it was persistent in the relevant namespace:
oc get compliancescan -n openshift-complianceNAME PHASE RESULT
ocp4-cis DONE NON-COMPLIANTReview Compliance Scans of the Compliance Operator in RHACS
After completing the previous steps, you will be able to find the results from the Compliance Operator compliance reports in RHACS.
-
If RHACS was installed prior to the Compliance Operator, we’ll need to restart the ACS sensor in the OpenShift cluster to see these results.
oc delete pods -l app.kubernetes.io/component=sensor -n stackrox-
With the Sensor restarted, kick off a compliance scan in ACS to see the updated results:
In the ACS User Interface, select Compliance from the left menu, and click Scan Environment in the top menu bar. The scan should only take a few seconds; once it’s complete you should see entries for both the ACS built-in and compliance operator standards:
-
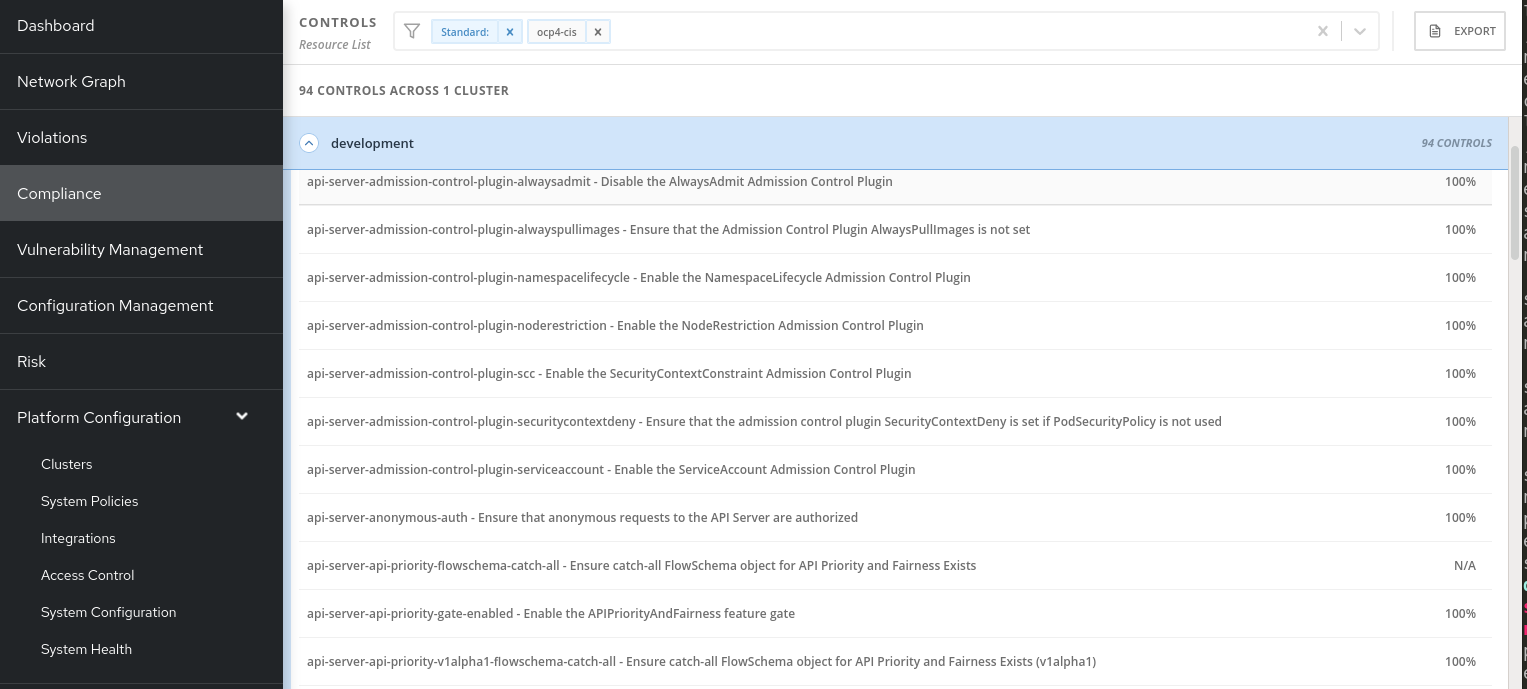
Check that the ocp4-cis report from the Compliance Operator is shown in ACS Compliance Dashboard:
-
To see the detailed results, click on the name or bar of any of the standards. To investigate the results of the OpenShift CIS benchmark scan, for example, click ocp4-cis:
For more information check the Compliance Operator guide
Configure Policy in RHACS to Invoke Compliance related Controls
The Built-in standards in RHACS Compliance provide guidance on required configurations to meet each individual control. Standards like PCI, HIPAA, and NIST 800-190 are focused on workloads visible to RHACS, and apply to all workloads running in any Kubernetes cluster that RHACS is installed in.
Much of the control guidance can be implemented using RHACS policies, and providing appropriate policy with enforcement in RHACS can change compliance scores.
As an example, we’ll look at a control in the NIST 800-190 that requires that container images be kept up to date, and to use meaningful version tags: "practices should emphasize accessing images using immutable names that specify discrete versions of images to be used."
| This configuration will change the behavior of your Kubernetes clusters and possibly result in preventing new deployments from being created. After testing, you can quickly revert the changes using the instructions at the end of this section. |
-
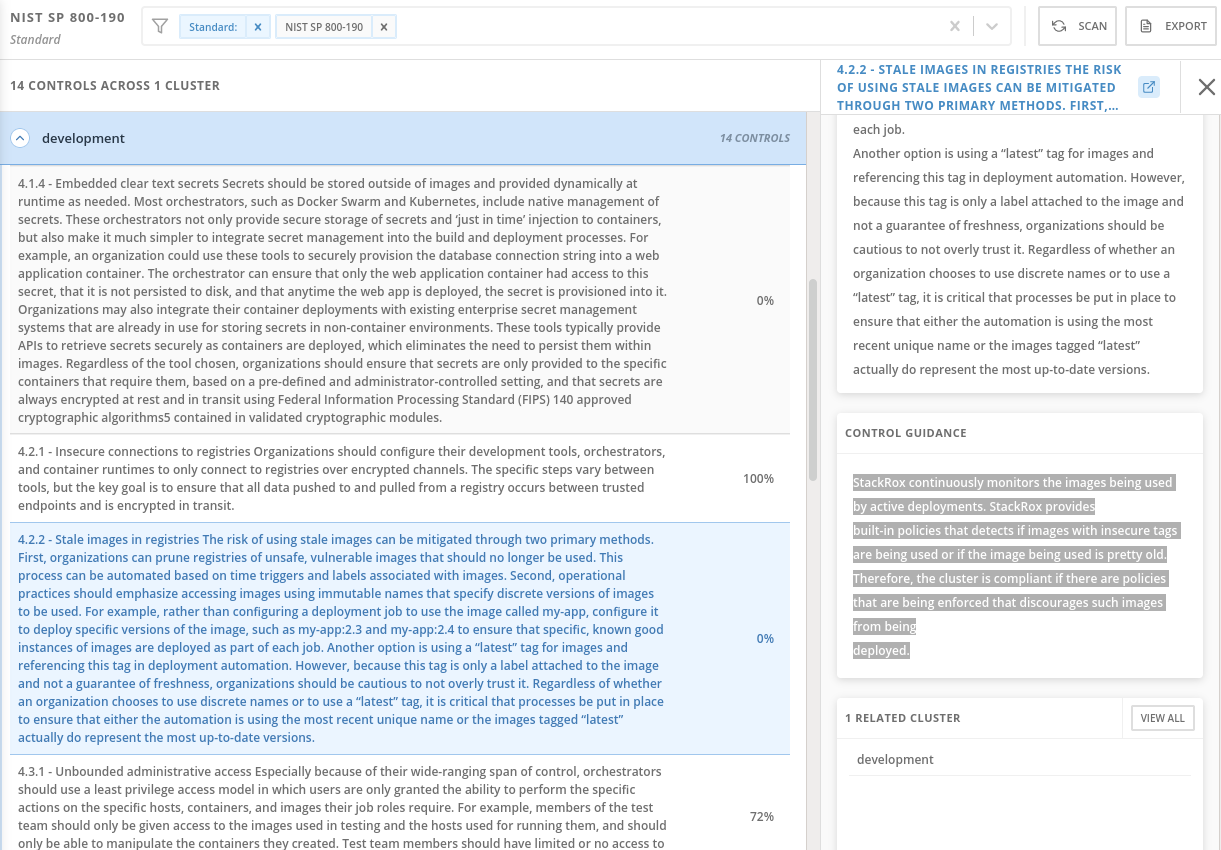
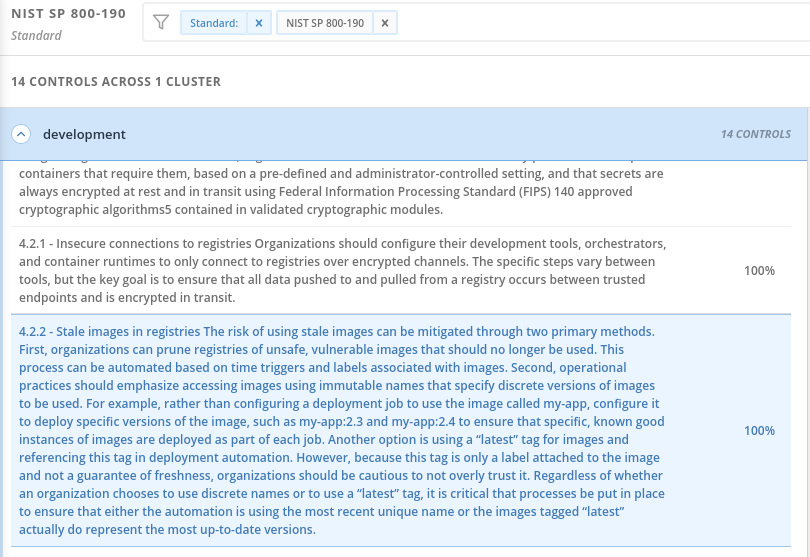
Inspect the NIST 800-190 Guidance for Control 4.2.2
-
Navigate back to the RHACS Compliance page.
-
In the section labeled "PASSING STANDARDS ACROSS CLUSTERS", click on NIST 800-190.
-
Scroll down to control 4.2.2 and examine the control guidance on the right.
The control guidance reads: "StackRox continuously monitors the images being used by active deployments. StackRox provides built-in policies that detects if images with insecure tags are being used or if the image being used is pretty old. Therefore, the cluster is compliant if there are policies that are being enforced that discourages such images from being deployed."
Enforce Policies that Meet Guidance for NIST Control 4.2.2
There are two separate default system policies that, together, meet this control’s guidance, "90-day Image Age," and "Latest tag". Both must have enforcement enabled for this control to be satisfied.
-
Navigate to Platform Configuration → Policy Management
-
Find and click on the policy named, "90-day Image Age" which by default is second in the list. We’re not going to change this policy other than to enable enforcement.
-
Click Actions → Edit Policy to get to the Policy settings.
-
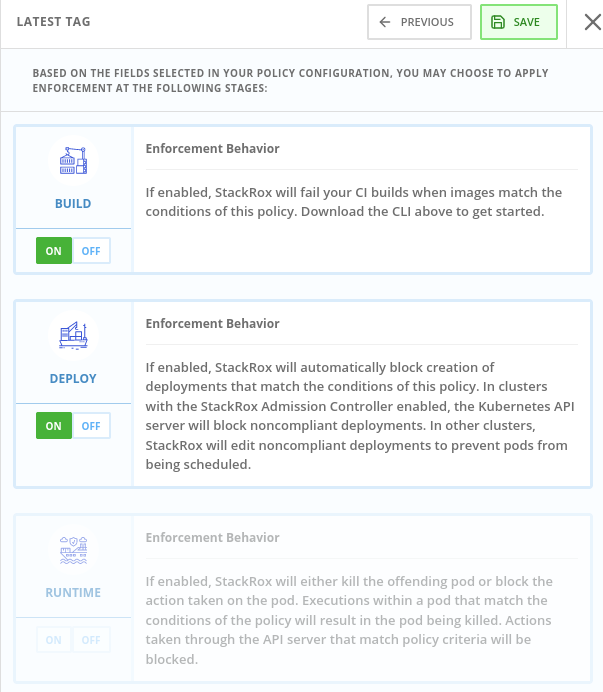
Click Next at the bottom panel to get to the Policy Behavior page.
-
On the response method options, click Inform and Enforce.
-
Click on for both Build and Deploy enforcement.
-
Click Next at the bottom panel until you get to Review Policy page.
-
Click Save.
-
At the main Policy Management page, find the Policy named, "Latest tag" and repeat steps 3 - 8 to enable enforcement and save the policy.
View Updated Compliance Scan Results in RHACS
-
In order to see the impact on NIST 800-190 scores:
-
Navigate back to the compliance page.
-
Click "Scan Environment" in the upper right.
-
In the section labeled "PASSING STANDARDS ACROSS CLUSTERS", click on NIST 800-190.
-
Scroll down to control 4.2.2 and verify that the control now reports 100% compliance.
Revert the Policy Changes
To avoid rejecting any other deployments to the cluster, you should disable the enforcement after viewing the updated RHACS results.
Navigate to Platform Configuration → Policy Management Find and click on the policy named, "90-day Image Age" which by default is second in the list. Click Edit to get to the Policy settings.
-
Click Actions → Edit Policy to get to the Policy settings.
-
Click Next at the bottom panel to get to the Policy Behavior page.
-
On the response method options, click Inform.
-
Click Next at the bottom panel until you get to Review Policy page.
-
Click Save.
-
At the main Policy Management page, find the Policy named, "Latest tag" and repeat the steps to disable enforcement and save the policy.