Service Resiliency
|
Before Start
You should have NO virtualservice nor destinationrule (in |
Retry
Instead of failing immediately, retry the Service N more times
We will make pod recommendation-v2 fail 100% of the time. Get one of the pod names from your system and replace on the following command accordingly:
kubectl exec -it -n tutorial $(kubectl get pods -n tutorial|grep recommendation-v2|awk '{ print $1 }'|head -1) -c recommendation /bin/bashYou will be inside the application container of your pod recommendation-v2-2036617847-spdrb. Now execute:
curl localhost:8080/misbehave
exit
This is a special endpoint that will make our application return only `503`s.
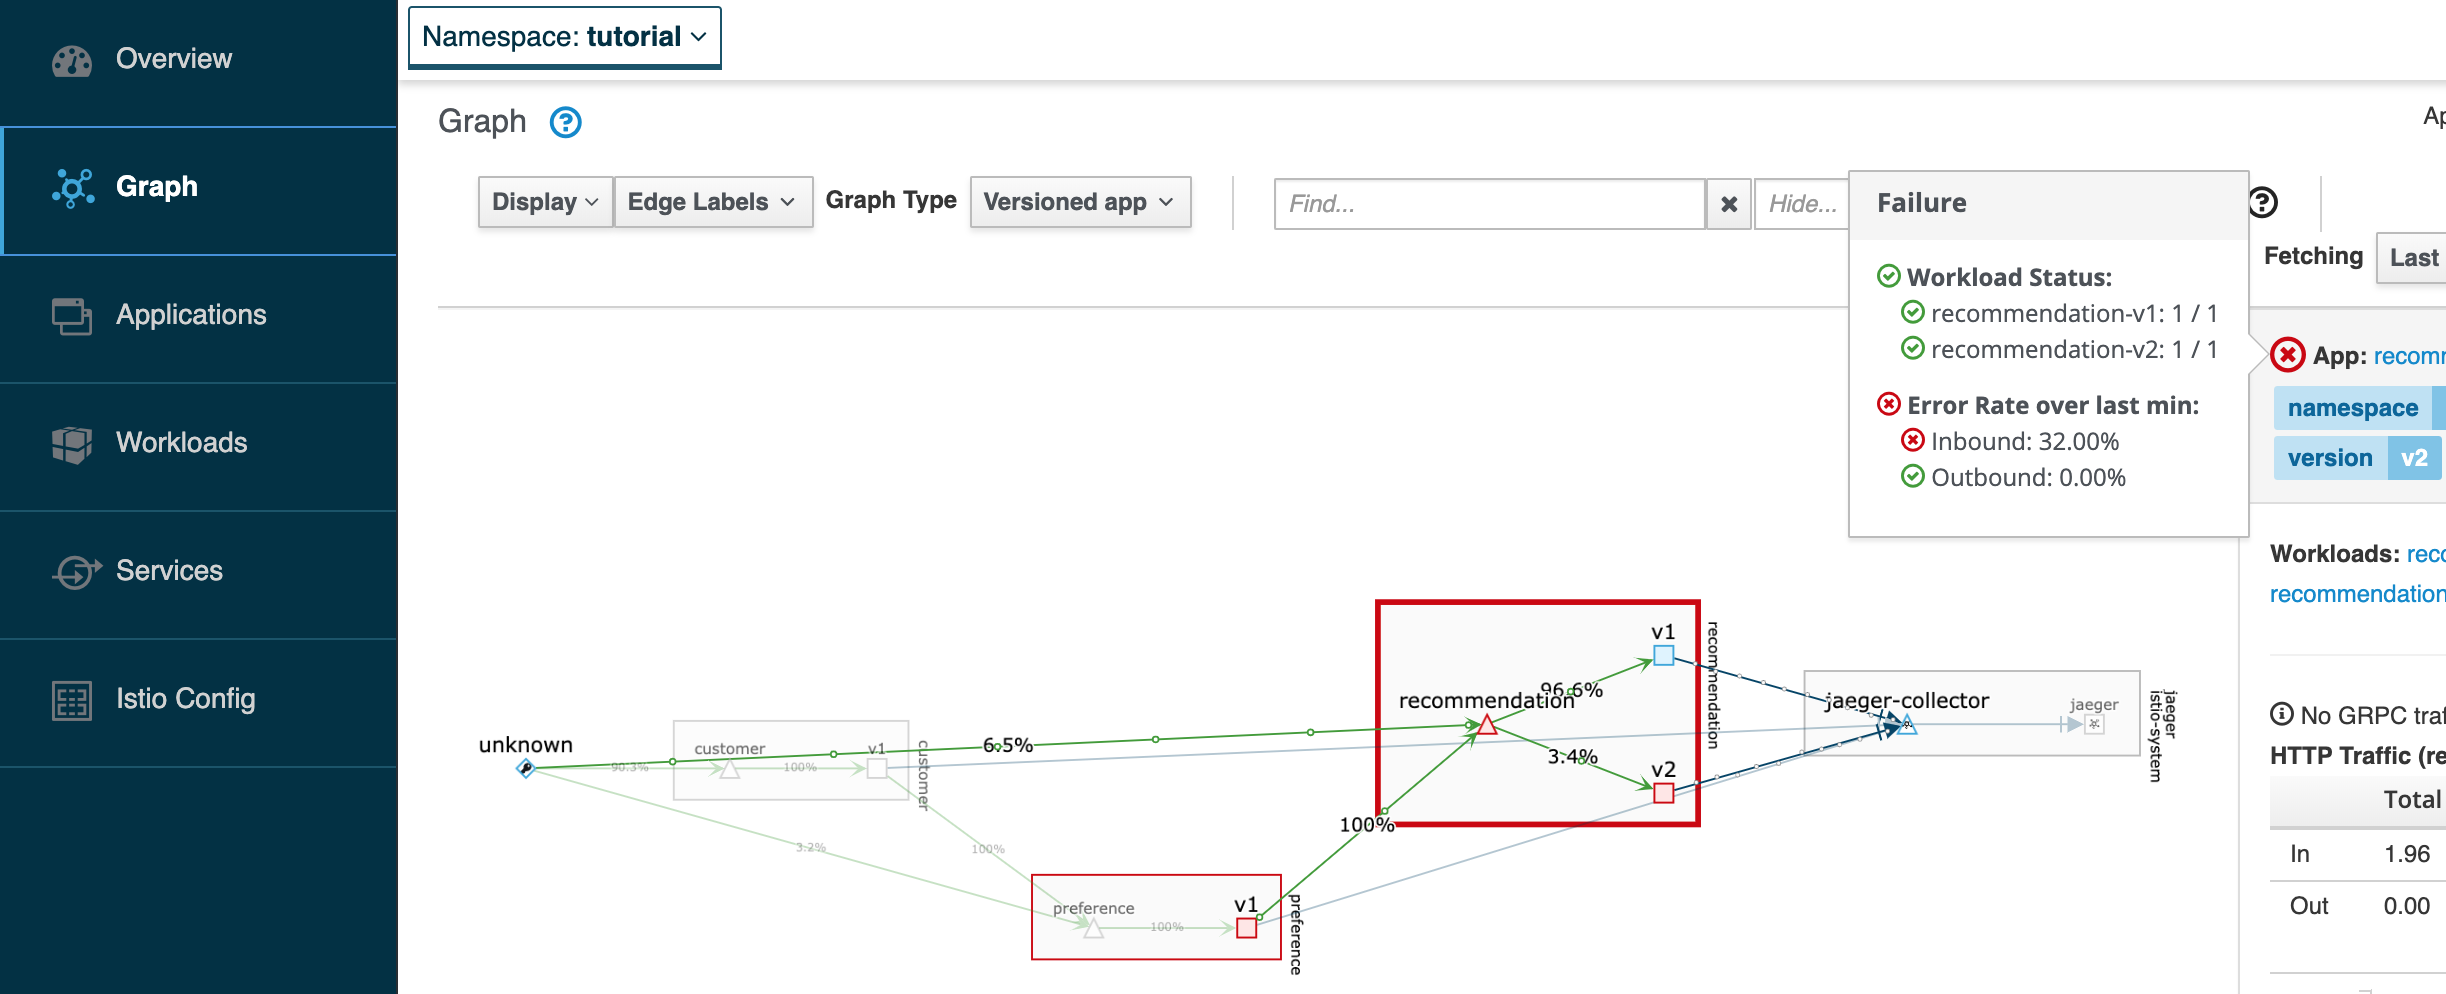
You will see it works every time because Istio will retry the recommendation service automatically and it will land on v1 only.
./scripts/run.sh $GATEWAY_URL/customercustomer => preference => recommendation v1 from 'recommendation-v1-2036617847-m9glz': 196
customer => preference => recommendation v1 from 'recommendation-v1-2036617847-m9glz': 197
customer => preference => recommendation v1 from 'recommendation-v1-2036617847-m9glz': 198If you open Kiali, you will notice that v2 receives requests, but that failing request is never returned to the user as preference will retry to establish the connection with recommendation, and v1 will reply.
istioctl dashboard kialikubectl get route kiali -n istio-system --output 'jsonpath={.status.ingress[].host}'In Kiali, go to Graph, select the recommendation square, and place the mouse over the red sign, like the picture bellow.
Now, make the pod v2 behave well again
kubectl exec -it -n tutorial $(kubectl get pods -n tutorial|grep recommendation-v2|awk '{ print $1 }'|head -1) -c recommendation /bin/bashYou will be inside the application container of your pod recommendation-v2-2036617847-spdrb. Now execute:
curl localhost:8080/behave
exit
The application is back to round-robin load-balancing between v1 and v2
./scripts/run.sh $GATEWAY_URL/customercustomer => preference => recommendation v1 from 'recommendation-v1-2039379827-h58vw': 129
customer => preference => recommendation v2 from 'recommendation-v2-2036617847-m9glz': 207
customer => preference => recommendation v1 from 'recommendation-v1-2039379827-h58vw': 130Timeout
Wait only N seconds before giving up and failing. At this point, no other virtual service nor destination rule (in tutorial namespace) should be in effect.
To check it run kubectl get virtualservice and kubectl get destinationrule and if it is necessary run kubectl delete virtualservice virtualservicename -n tutorial and kubectl delete destinationrule destinationrulename -n tutorial
| You will deploy docker images that were previously built for this tutorial. If you want to build recommendation with Quarkus to add a timeout visit: Modify recommendation:v2 to have timeout |
| You will deploy docker images that were previously built for this tutorial. If you want to build recommendation with Spring Boot to add a timeout visit: Modify recommendation:v2 Spring Boot to have timeout |
If you have not built the images on your own then let’s deploy the customer pod with its sidecar using the already built images for this tutorial:
First, introduce some wait time in recommendation v2 by making it a slow performer with a 3 second delay by running the command
kubectl patch deployment recommendation-v2 -p '{"spec":{"template":{"spec":{"containers":[{"name":"recommendation", "image":"quay.io/rhdevelopers/istio-tutorial-recommendation:v2-timeout"}]}}}}' -n tutorialHit the customer endpoint a few times, to see the load-balancing between v1 and v2 but with v2 taking a bit of time to respond
./scripts/run.sh $GATEWAY_URL/customerThen add the timeout rule
kubectl create -f istiofiles/virtual-service-recommendation-timeout.yml -n tutorialYou will see it return v1 after waiting about 1 second. You don’t see v2 anymore, because the response from v2 expires after the timeout period and it is never returned.
./scripts/run.sh $GATEWAY_URL/customercustomer => preference => recommendation v1 from 'recommendation-v1-6976858b48-cs2rt': 2907
customer => preference => recommendation v1 from 'recommendation-v1-6976858b48-cs2rt': 2908
customer => preference => recommendation v1 from 'recommendation-v1-6976858b48-cs2rt': 2909Clean up
| You will deploy docker images that were previously built. If you want to build recommendation with Quarkus to remove the timeout visit: Modify recommendation:v2 to remove timeout |
| You will deploy docker images that were previously built. If you want to build recommendation with Spring Boot to remove the timeout visit: Modify recommendation:v2 to remove timeout |
Change the implementation of v2 back to the image that responds without the delay of 3 seconds:
kubectl patch deployment recommendation-v2 -p '{"spec":{"template":{"spec":{"containers":[{"name":"recommendation", "image":"quay.io/rhdevelopers/istio-tutorial-recommendation:v2"}]}}}}' -n tutorialThen delete the virtual service created for timeout by:
kubectl delete -f istiofiles/virtual-service-recommendation-timeout.yml -n tutorialor you can run:
./scripts/clean.sh tutorialFail Fast with Max Connections and Max Pending Requests
Load test without circuit breaker
Let’s perform a load test in our system with siege. We’ll have 10 clients sending 4 concurrent requests each:
siege -r 10 -c 4 -v $GATEWAY_URL/customerYou should see an output similar to this:
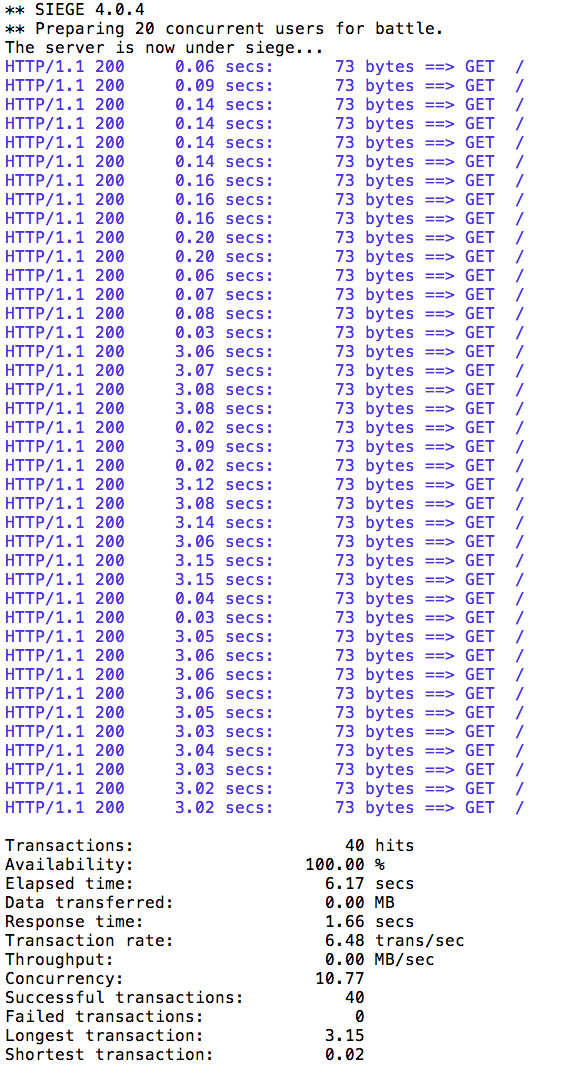
All of the requests to our system were successful.
Now let’s make things a bit more interesting.
We will make pod recommendation-v2 fail 100% of the time.
Get one of the pod names from your system and replace on the following command accordingly:
kubectl exec -it -n tutorial $(kubectl get pods -n tutorial|grep recommendation-v2|awk '{ print $1 }'|head -1) -c recommendation /bin/bashYou will be inside the application container of your pod recommendation-v2-2036617847-spdrb. Now execute:
curl localhost:8080/misbehave
exit
Open a new terminal window and run next command to inspect the logs of this failing pod:
First you need the pod name:
kubectl get pods -n tutorialNAME READY STATUS RESTARTS AGE
customer-3600192384-fpljb 2/2 Running 0 17m
preference-243057078-8c5hz 2/2 Running 0 15m
recommendation-v1-60483540-9snd9 2/2 Running 0 12m
recommendation-v2-2815683430-vpx4p 2/2 Running 0 15sAnd get the pod name of recommendation-v2.
In previous case, it is recommendation-v2-2815683430-vpx4p.
Then check its log:
kubectl logs recommendation-v2-2815683430-vpx4p -c recommendation -n tutorialrecommendation request from 'recommendation-v2-2815683430-vpx4p': 10
recommendation request from 'recommendation-v2-2815683430-vpx4p': 11
recommendation request from 'recommendation-v2-2815683430-vpx4p': 12
recommendation request from 'recommendation-v2-2815683430-vpx4p': 13Scale up the recommendation v2 service to two instances:
kubectl scale deployment recommendation-v2 --replicas=2 -n tutorialNow, you’ve got one instance of recommendation-v2 that is misbehaving and another one that is working correctly.
Let’s redirect all traffic to recommendation-v2:
kubectl create -f istiofiles/destination-rule-recommendation-v1-v2.yml -n tutorialkubectl create -f istiofiles/virtual-service-recommendation-v2.yml -n tutorialLet’s perform a load test in our system with siege.
We’ll have 10 clients sending 4 concurrent requests each:
siege -r 10 -c 4 -v $GATEWAY_URL/customerYou should see an output similar to this:
All of the requests to our system were successful.
So the automatic retries are working as expected. So far so good, the error is never send back to the client. But inspect the logs of the failing pod again:
| Substitute the pod name to your pod name. |
kubectl logs recommendation-v2-2815683430-vpx4p -c recommendation -n tutorialrecommendation request from 'recommendation-v2-2815683430-vpx4p': 35
recommendation request from 'recommendation-v2-2815683430-vpx4p': 36
recommendation request from 'recommendation-v2-2815683430-vpx4p': 37
recommendation request from 'recommendation-v2-2815683430-vpx4p': 38Notice that the number of requests has been increased by an order of 20. The reason is that the requests are still able to reach the failing service, so even though all consecutive requests to failing pod will fail, Istio is still sending traffic to this failing pod.
This is where the Circuit Breaker comes into the scene.
Load test with circuit breaker
Circuit breaker and pool ejection are used to avoid reaching a failing pod for a specified amount of time. In this way when some consecutive errors are produced, the failing pod is ejected from eligible pods and all further requests are not sent anymore to that instance but to a healthy instance.
kubectl replace -f istiofiles/destination-rule-recommendation_cb_policy_version_v2.yml -n tutorialsiege -r 10 -c 4 -v $GATEWAY_URL/customerYou should see an output similar to this:
All of the requests to our system were successful.
But now inspect again the logs of the failing pod:
kubectl logs recommendation-v2-2815683430-vpx4p -c recommendation -n tutorialrecommendation request from 'recommendation-v2-2815683430-vpx4p': 38
recommendation request from 'recommendation-v2-2815683430-vpx4p': 39
recommendation request from 'recommendation-v2-2815683430-vpx4p': 40| Substitute the pod name to your pod name. |
Now the request is only send to this pod once or twice until the circuit is tripped and pod is ejected. After this, no further request is send to failing pod.
Clean up
Remove Istio resources:
kubectl delete -f istiofiles/destination-rule-recommendation_cb_policy_version_v2.yml -n tutorialkubectl delete -f istiofiles/virtual-service-recommendation-v2.yml -n tutorialScale down to one instance of recommendation-v2.
kubectl scale deployment recommendation-v2 --replicas=1 -n tutorialRestart recommendation-v2 pod:
kubectl delete pod -l app=recommendation,version=v2