Container Anatomy
10 MINUTE READ
If you are new to containers, this section will help your understanding in what actually makes up a container, introduce the Open Container Initiative (OCI) specifications and demystify some of what is actually happening under the covers.

1. What makes up a Container?
A Container can be defined as a process with its own file system. The process is governed by the OCI runtime specification (github.com/opencontainers/runtime-spec) whilst the file system and configuration is governed by the OCI container image format (github.com/opencontainers/image-spec).
These specifications are open industry standards by the Open Container Initiative (OCI) which is an open governance structure for the express purpose of creating standards around container formats and runtimes.
2. Container Image Format
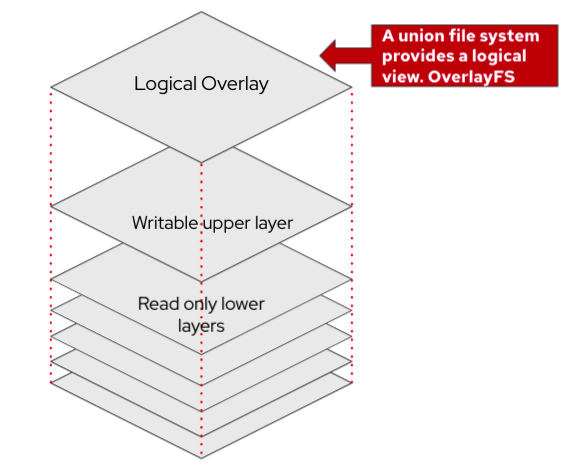
Container images are made up of layers, most of which are immutable with the exception of a writeable upper layer. A union file system provides a logical view when the container is running. (OverlayFS is a union mount filesystem implementation for Linux). The union file system works on top of the other file-systems. It gives a single coherent and unified view to files and directories of separate file-system. In other words, it mounts multiple directories to a single root. It is more of a mounting mechanism than a file system.
Today you are the container builder, so the important aspects to understand are:
-
Choose to have fewer layers as it takes less time to build the logical view union file system at runtime.
-
Smaller container images are preferable as they will take less time to download and use less disk space.
-
Upper layers may potentially overwrite bottom layers. So a file may not be present because it was deleted by an upper layer.
-
Logically deleting the file in the upper layer will still add to overall image size.
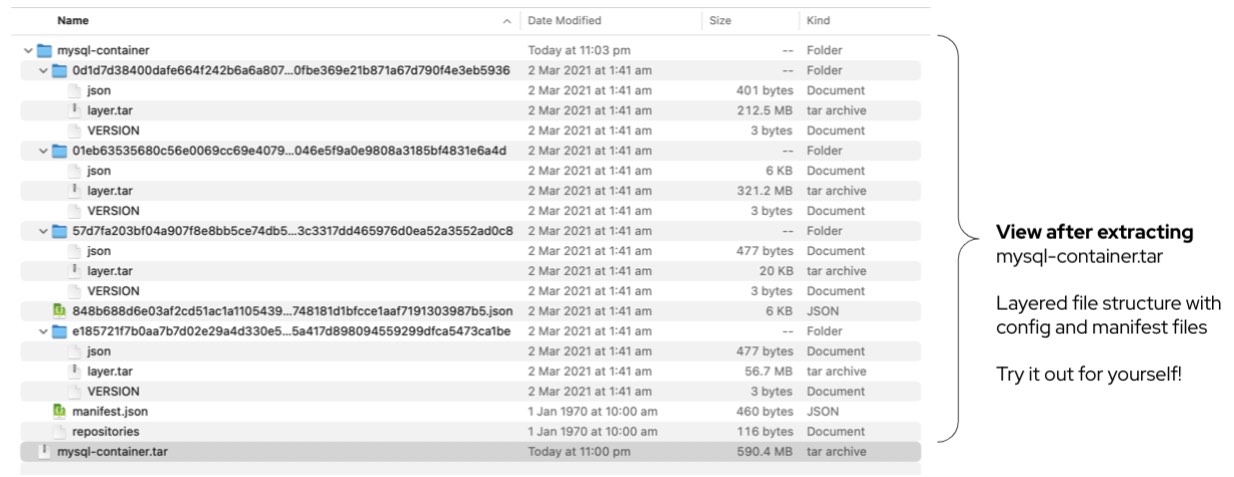
Within the container image, layers are formatted as archives (tar files) and are indexed in Image index and Manifest (json format) files. Furthermore config files provide the means of storing command line options, environment variables, and properties such as time created. The figure below shows the extract of a container image and how the internals of layering, indexing are organised.
|
The above container image was exported to a tar file with the podman save command. |
3. Containerfile
A Containerfile is a text based file which provides instructions to assemble an image. Each row in a Containerfile corresponds to a new layer. The available commands that are usable inside a Containerfile and a Dockerfile are equivalent.
The Containerfile below is a mysql image from the Red Hat Container Catalog.
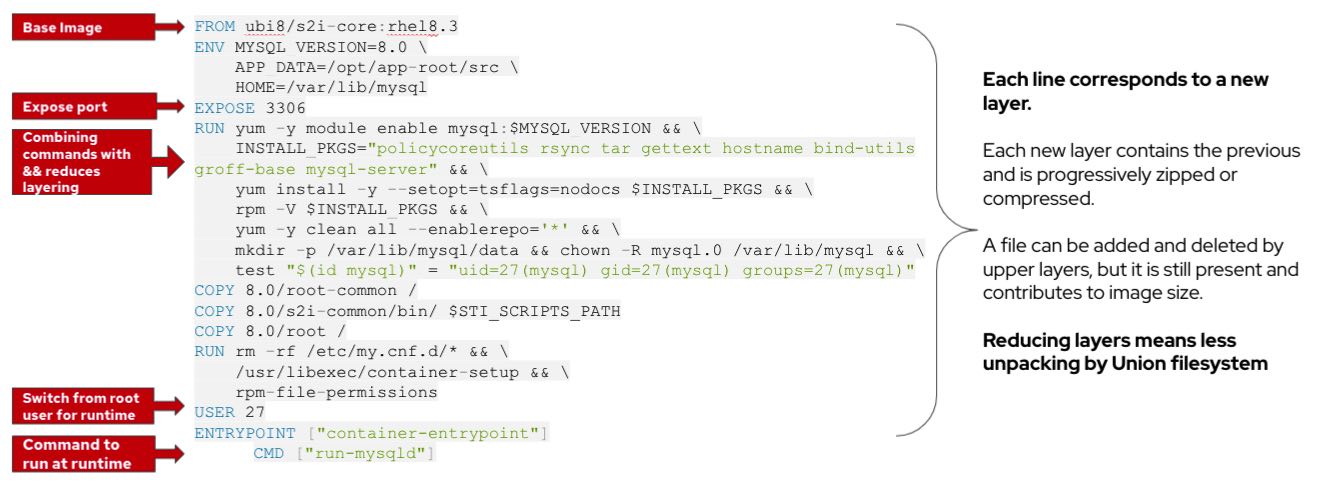
As the image is built the commands are executed in order from top down until the image is built. The table below provides an overview of typical commands seen in a Containerfile.
FROM |
To specify the parent image. |
WORKDIR |
To set the working directory for any commands that follow in the Dockerfile. |
RUN |
To install any applications and packages required for your container. |
COPY |
To copy over files or directories from a specific location. |
ADD |
As COPY, but also able to handle remote URLs and unpack compressed files. |
ENTRYPOINT |
Command that will always be executed when the container starts. If not specified, the default is /bin/sh -c |
CMD |
Arguments passed to the entrypoint. If ENTRYPOINT is not set (defaults to /bin/sh -c), the CMD will be the commands the container executes. |
EXPOSE |
To define which port through which to access your container application. |
LABEL |
To add metadata to the image. |
You may also see Containerfiles with multistage builds where multiple FROM commands may be present. Multistage builds provide a means to help refine the runtime image as opposed to having an image which also contains all the necessary software to build. For instance you typically don’t need maven to run a java based jar but do need it to build.
4. Container Identification
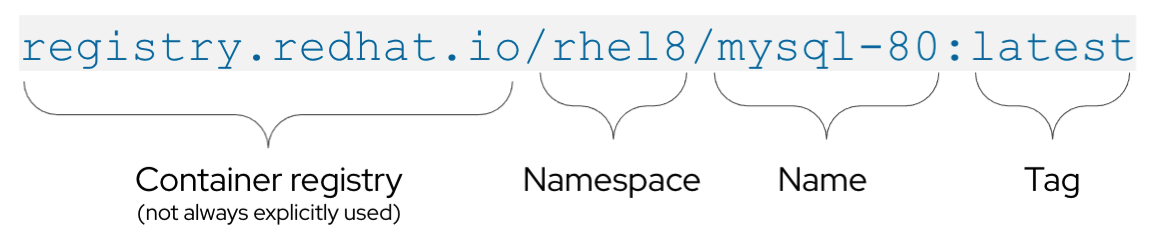
Once you build a container you need to give it a tag to be able to identify it. An image tag is a label applied to a container image in a repository that distinguishes a specific image from other images. Typically, the tag represents a version number of some sort.
Containers fully qualified image registry path is below:
|
If you only reference a container by its short name i.e. rhel8/mysql-80:latest , there will be an assumption made as to which registry to try. For example in RHEL 8, the default registries that will be looked up are registry.access.redhat.com, registry.redhat.io, docker.io Red Hat recommends that users always use fully qualified names when referring to container images in any context. |
5. Container Runtime
Like the container image specification, there is a runtime specification which defines a lifecycle for a container. This defines hooks to be invoked prior to starting, creating or shutting down the container.
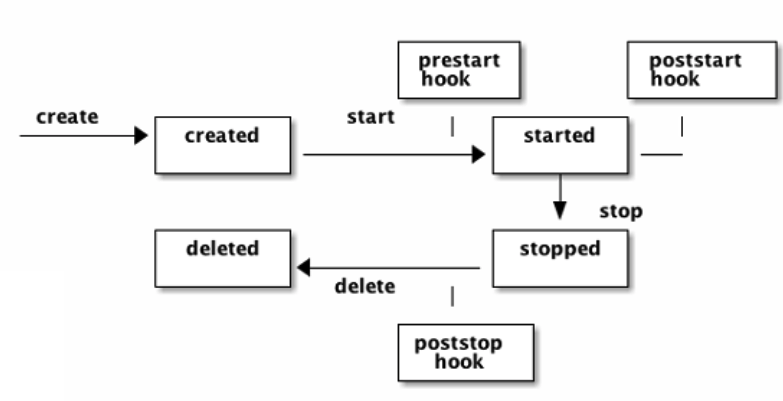
The state of a container includes properties like OCI Version, status, process id (pid) and container ID. The container id must be unique across all containers on this host and can be found with the following command:
podman ps
CONTAINER ID IMAGE         COMMAND    CREATED    STATUS                PORTS NAMES     IS INFRA
d65aecc325a4 ubi8/ubi      /bin/bash  3 secs ago Exited (0) 5 secs ago peaceful_hopper false
74b1da000a11 rhel8/rsyslog rsyslog.sh 2 mins ago Up About a minute     musing_brown    false
6. Container Tools
The open source community has created new container tools to eliminate the required use of root access and a daemon process compared with how Docker is designed.
These new tools buildah, skopeo and podman each provide more focussed functionality. You can think of podman as a developers replacement for Docker, skopeo as a simpler way to inspect and copy images and buildah provides specialist ways of building images whether from a Containerfile or interactively.
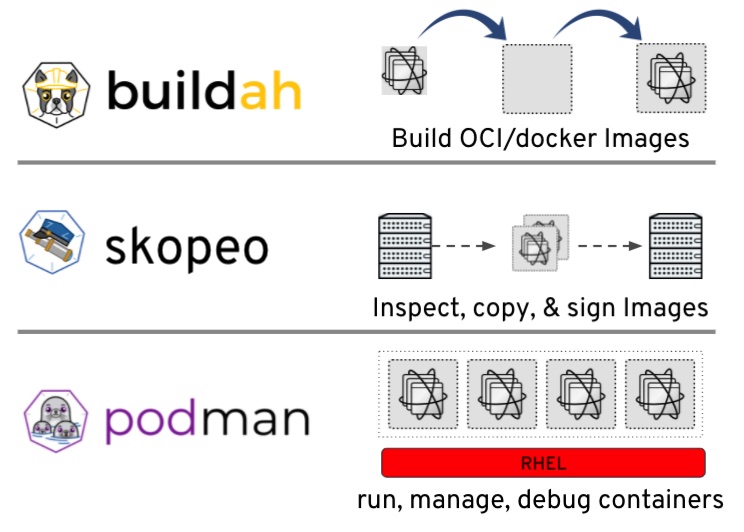
Podman
Podman command format will be very familiar to Docker users but doesnt require a daemon.
# Pull an image from the registry
podman pull registry.fedoraproject.org/f34/python3
# List images in local storage
podman images
# Run the container in the background and map ports
podman run -dt -p 8080:8080/tcp registry.fedoraproject.org/f29/httpd
Buildah
Buildah can act as a drop-in replacement for the Docker daemon’s docker build command (i.e., building images with a traditional Dockerfile) but is flexible enough to allow you to build images with whatever tools you prefer to use. ( bud = build-using-dockerfile )
buildah bud -t hello .
is the same as
docker build -t hello .
Unlike Docker build, Buildah doesn’t commit changes to a layer automatically for every instruction meaning it results in a single layer (great news for union file system performance). Furthermore it allows you to build images from scratch (i.e. no base container or no FROM image) so you can make containers as small as possible.
To use Buildah in an interactive mode:
-
Start with creating a working container with Buildah.
The following saves the container name into the $container variable to use in subsequent commands. You can view working containers with the buildah containers command.
# container=$(buildah from registry.access.redhat.com/ubi8/python-38)
# echo $container
python-38-working-container
# buildah containers
CONTAINER ID  BUILDER  IMAGE ID     IMAGE NAME                       CONTAINER NAME
df1d24a08d19     *     a6d7938156c7 registry.access.redhat.com/ub... python-38-working-container
-
Interact with a bash shell as your are building it like below.
# buildah run $container bash
(app-root) bash-4.4$ mkdir scripts
.....
exit
-
Next add configuration, labels and environment variables.
# buildah config --label maintainer="John Smith <john.smith@gmail.com>" $container
# buildah config --env FLASK_APP=flaskr --env FLASK_ENV=development $container
# buildah config --workingdir /opt/hello-2.10 $container
# buildah config --entrypoint /usr/local/bin/hello $container
# buildah copy $container hello-2.10.tar.gz /tmp/hello-2.10.tar.gz
-
Finally save the working container to an image hello:latest which will then be available to run
# buildah commit $container hello:latest
For more information see Getting started with Buildah
Skopeo
Inspect a container without needing the docker daemon.
skopeo inspect docker://docker.io/fedora
Copy containers from one registry to another.
skopeo copy --dest-creds prod_user:prod_pass docker://internal.registry/myimage:latest docker://production.registry/myimage:v1.0
In the single line above the skopeo copy command replaces the 4 commands below.
docker login ...
docker pull internal.registry/myimage:latest
docker tag internal.registry/myimage:latest production.registry/myimage:v1.0
docker push production.registry/myimage:v1.0
7. Container Registries
When working with container images, you need somewhere to save and access them as they are created and that’s where a container registry comes in. The registry essentially acts as a place to store container images and share them out via a process of uploading to (pushing) and downloading from (pulling).
There are two types of container registry: public and private.
Public registries are:
-
great for individuals or small teams
-
get up and running as quickly as possible. Basic in their abilities.
-
easy to use
Private registries have:
-
Security and privacy
-
Enterprise container image storage
-
Host remotely or on-premises
Typically your enterprise will require a container registry and we recommend to look for features such as: multiple authentication systems; role-based access control management; vulnerability scanning capabilities; auditable logs and optimized for automation.
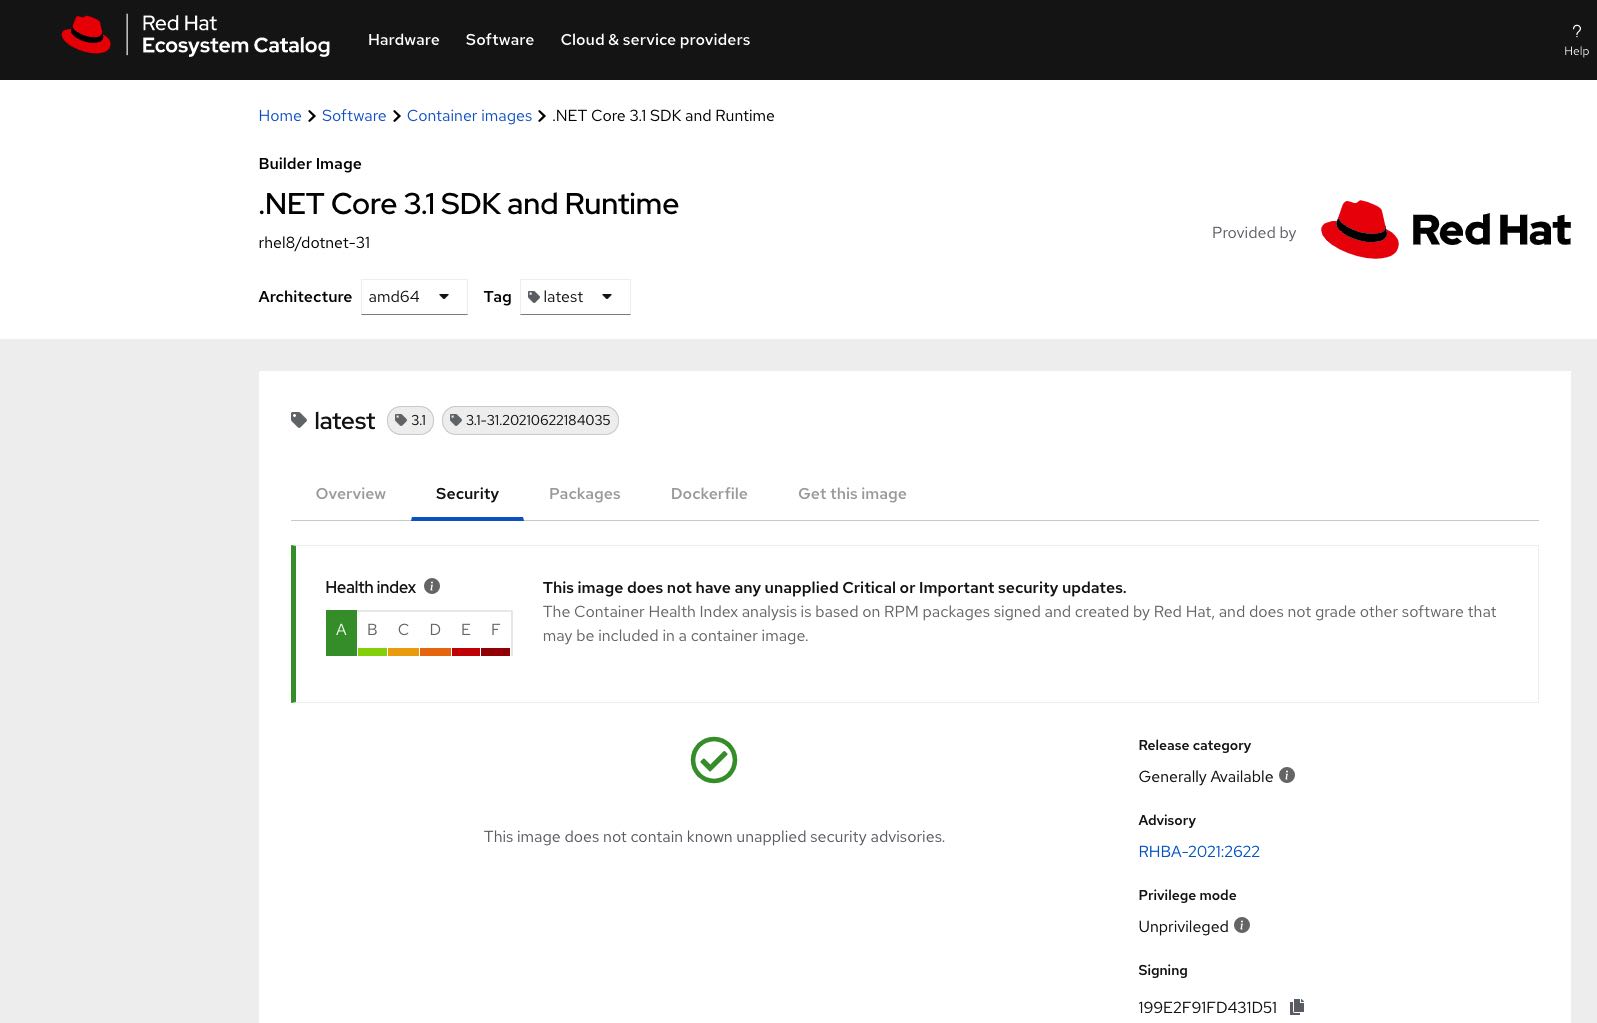
Red Hat’s Enterprise Container Registry
Red Hat Quay is a private container image registry that enables you to build, distribute, and deploy containers with the storage you need to scale quickly. It analyzes your images for security vulnerabilities using built-in Clair, identifying potential issues and addressing them before they become security risks.

You can try Quay through a free account with Quay.io which is a managed service OR browse the results of scanning through the Red Hat Container catalog like in the figure below.
More information
But what else do you need to know about containers? Well you might want to understand
-
File system mounting
-
User permissions
-
Port mapping
-
Network
-
Resource limiting
-
Secrets, configuration, environment variables
-
Host system
Many of these will be covered as we step through the exercises but for more information take a look at