Using Buildah Interactively
10 MINUTE EXERCISE
In this chapter we’ll try to make the container image we’ve been using a bit more secure using buildah.

buildah is used to create OCI-compliant container images, such as the quay.io/bfarr/container-workshop-httpd that we’ve been using. We’ll start by fixing a the security vulnerability we found in the previous section.
Fixing the Vulnerability with Buildah Interactively
One of the things that makes buildah unique is the ability to interact with container images from the host’s command line. (As we’ll see in the next section, it also allows the creation of images from a Dockerfile or, more generically a " Containerfile "). This will make it easy for us to remediate the vulnerability we found in the last section.
Where we left off with our container image is that we needed to patch the bash package installed on the container
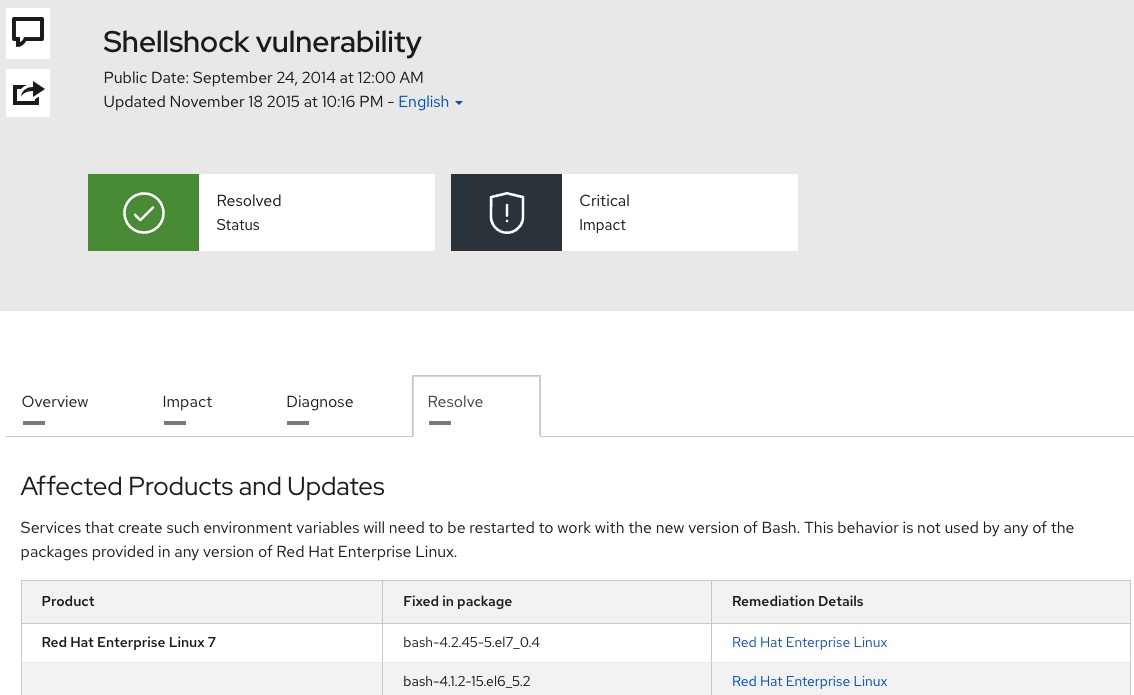
This can be problematic if our image does not already have installed on it all the tools (such as package management tools like dnf or yum) necessary to remediate the problem. But with buildah’s native command functionality this is no longer a problem.
-
If you don’t have one open already, open a terminal as a non-root user and confirm your user by running the following command:
whoami%USER%
-
Next, as a non-root user we need to do some setup that will allow buildah to interact with the container in this native command mode. Run the following in the terminal
The main reason for running this command is that we’ll be mounting filesystems inside the container and non-root users normally do not have privileges to do this. Running
buildah unshareis a way of preparing to work with containers "rootlessly" (if you will). For a discussion of what this is, see here.Think of it as a way that
buildahcan work with container "rootlessly" just aspodmandid in the last sectionbuildah unshare
-
You should notice that upon running the command your terminal turns to look like a root terminal. You are not actually root, but rather working within a "namespace" that makes you appear as root when it comes to interacting with buildah’s containers
[root@ansible-1 ~]#
-
Next we tell buildah to implicitly create a "working container" from our currently vulnerable image:
CONTAINER=$(buildah from quay.io/bfarr/container-workshop-httpd) (1)1 We’re effectively assigning a shell variable CONTAINERto the id of the buildah container that starts with the state of the image we want to updateIf you haven’t yet downloaded the image, the image might be downloaded first from the image registry before you can enter the next command
-
To confirm that our working container is up, we can run the following command (which is a little like
podman psbut for "working containers")buildah containersCONTAINER ID BUILDER IMAGE ID IMAGE NAME CONTAINER NAME ef575a8a3408 * 60dde8abf76e quay.io/bfarr/container-wo... container-workshop-httpd-working-container
-
We can then use buildah to effectively mount the root of the container’s filesystem
CONTAINER_MOUNT_POINT=$(buildah --storage-driver=vfs mount ${CONTAINER}) \(1)
&& echo "Container ${CONTAINER}'s filesystem mounted on host at ${CONTAINER_MOUNT_POINT}"
1 CONTAINER_MOUNT_POINT is getting set with the path to the mount in the host filesystem. We store it in a shell variable because this tends to be a long path Container container-workshop-httpd-working-container's filesystem mounted on host at /home/%USER%/.local/share/containers/storage/overlay/500abaa5921678c20f37f689ae72e37734445934e8c223775a2b71cce091e3f6/merged (1)1 The highlighted section will be different on your instance. This is just making clear where the container mount point is.
-
We can even peek inside the container image through the mount point
ls -l ${CONTAINER_MOUNT_POINT}total 0 lrwxrwxrwx. 1 root root 7 Apr 20 03:58 bin -> usr/bin dr-xr-xr-x. 2 root root 6 Dec 14 2017 boot drwxr-xr-x. 2 root root 6 Apr 20 03:58 dev drwxr-xr-x. 51 root root 19 May 30 08:29 etc drwxr-xr-x. 2 root root 6 Apr 20 04:00 home lrwxrwxrwx. 1 root root 7 Apr 20 03:58 lib -> usr/lib lrwxrwxrwx. 1 root root 9 Apr 20 03:58 lib64 -> usr/lib64 drwxr-xr-x. 2 root root 6 Dec 14 2017 media drwxr-xr-x. 2 root root 6 Dec 14 2017 mnt drwxr-xr-x. 2 root root 6 Dec 14 2017 opt drwxr-xr-x. 2 root root 6 Apr 20 03:58 proc dr-xr-x---. 4 root root 18 May 30 08:28 root drwxr-xr-x. 14 root root 18 May 30 08:29 run lrwxrwxrwx. 1 root root 8 Apr 20 03:58 sbin -> usr/sbin drwxr-xr-x. 2 root root 6 Dec 14 2017 srv drwxr-xr-x. 2 root root 6 Apr 20 03:58 sys drwxrwxrwt. 7 root root 46 May 30 08:29 tmp drwxr-xr-x. 13 root root 19 Apr 20 03:58 usr drwxr-xr-x. 19 root root 17 May 30 08:29 var
-
Now that we have a mount point we can copy files from the host directly into the container. In our case however, we want to use the host’s package management tooling to install the updated bash package on the container
${CONTAINER}. Run this command:dnf install -y \(1) --installroot=$CONTAINER_MOUNT_POINT \(2) bash (3)1 dnf is the package management tool installed on your host instance. The -ymeans that if dnf prompts the user, such as whether to install a given package, the answer will always be yes2 This tells dnf that the requested packages should be installed relative to this installroot ( ${CONTAINER_MOUNT_POINT}and thus the root of the container) instead of '/', the root of the host instance3 We are telling dnf to install the latest available compatible version of bash for our container (i.e. at --installroot)You may see a few errors upon running the above command. They are non-critical. The important thing is that you see the highlighted section below in your own local output
-
In the output the key message you should see is highlighted:
Package bash-4.2.45-2.el7.x86_64 is already installed.
Dependencies resolved.
===================================================================================================
 Package             Architecture          Version                      Repository            Size
===================================================================================================
Upgrading:
 bash                x86_64                4.2.46-34.el7                ubi-7                1.0 M

Transaction Summary
===================================================================================================
Upgrade  1 Package

Total download size: 1.0 M
Downloading Packages:
bash-4.2.46-34.el7.x86_64.rpm                                      415 kB/s | 1.0 MB     00:02
---------------------------------------------------------------------------------------------------
Total                                                              414 kB/s | 1.0 MB     00:02
Running transaction check
Transaction check succeeded.
Running transaction test
Transaction test succeeded.
Running transaction
  Preparing        :                                                                           1/1
  Upgrading        : bash-4.2.46-34.el7.x86_64                                                 1/2
  Running scriptlet: bash-4.2.46-34.el7.x86_64                                                 1/2
  Cleanup          : bash-4.2.45-2.el7.x86_64                                                  2/2
  Running scriptlet: bash-4.2.45-2.el7.x86_64                                                  2/2
  Verifying        : bash-4.2.46-34.el7.x86_64                                                 1/2
  Verifying        : bash-4.2.45-2.el7.x86_64                                                  2/2
Installed products updated.

Upgraded:
  bash-4.2.46-34.el7.x86_64  (1)

Complete!
1 Notice that this package is more recent than the minimum release needed to address the vulnerability
-
Now we will commit these changes to a new image locally on the host that we’ll test. We commit the changes with
buildah commit \(1)
    ${CONTAINER} \(2)
    localhost/container-workshop-httpd-secure (3)
1 commitmeans to take the working container and save it as a container image2 This is the ID of the working container that we want saved as an image 3 The name the image should be saved as. This saves the image to the user’s local container store on the host instance
-
This should yield output like the following
Getting image source signatures
Copying blob 123257361dae skipped: already exists
Copying blob c9e02f9d3afe skipped: already exists
Copying blob 86284899b0cc skipped: already exists
Copying blob bcf3865bf7f7 skipped: already exists
Copying blob 4e7c990a129f skipped: already exists
Copying blob 210af8709b71 skipped: already exists
Copying blob 47e96512450e skipped: already exists
Copying blob 8f10e6ebff19 skipped: already exists
Copying blob 486383b07939 skipped: already exists
Copying blob 23be1053bf93 skipped: already exists
Copying blob ee738432d587 skipped: already exists
Copying blob bc71779d57e9 done
Copying config 6b4a460f1e done
Writing manifest to image destination
Storing signatures
6b4a460f1e4077bd64b862fcdabe93928779e441ed3e84bb161e8cead079a3e0
-
Now we can
exitthe unshare environment so that we can properly test out our container fixexit