Getting Started
Now that you’ve verified that Argo CD is up and running, let’s explore how to access and manage Argo CD.
Connecting to Argo CD
Argo CD generates a default admin user, and a random password when first deployed.
You can connect to Argo CD using this user account via the CLI or web console.
Connecting with the CLI
To login using the CLI you’ll need to obtain the admin password and URL for the Argo CD instance:
To get the Argo CD password execute:
argoPass=$(kubectl -n argocd get secret argocd-initial-admin-secret -o jsonpath="{.data.password}" | base64 -d)
echo $argoPass
Get ArgoCD URL:
argoURL=$(minikube -p gitops service argocd-server -n argocd --url -p gitops | tail -n 1 | sed -e 's|http://||')
echo $argoURL
Extract the password from the admin user Secret:
argoPass=$(oc get secret/openshift-gitops-cluster -n openshift-gitops -o jsonpath='{.data.admin\.password}' | base64 -d)
echo $argoPass
Get the Route for the Argo CD/OpenShift GitOps server:
argoURL=$(oc get route openshift-gitops-server -n openshift-gitops -o jsonpath='{.spec.host}{"\n"}')
echo $argoURL
Login to Argo CD with the argocd CLI using the URL and password:
argocd login --insecure --grpc-web $argoURL --username admin --password $argoPassThe following message will be printed upon successful login:
'admin:login' logged in successfullyConnecting with the Web Console
Expose the ArgoCD console using the minikube service.
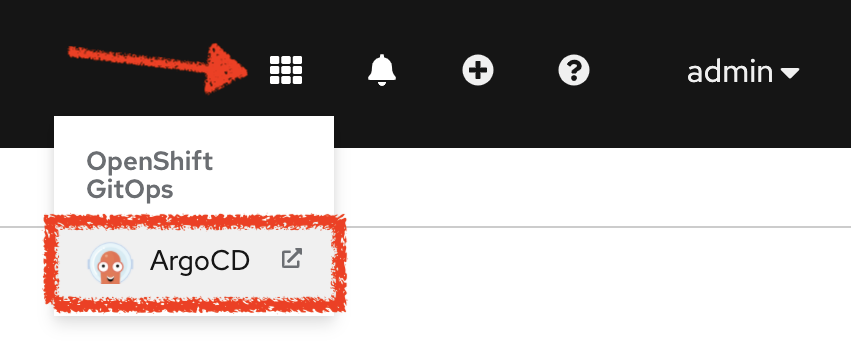
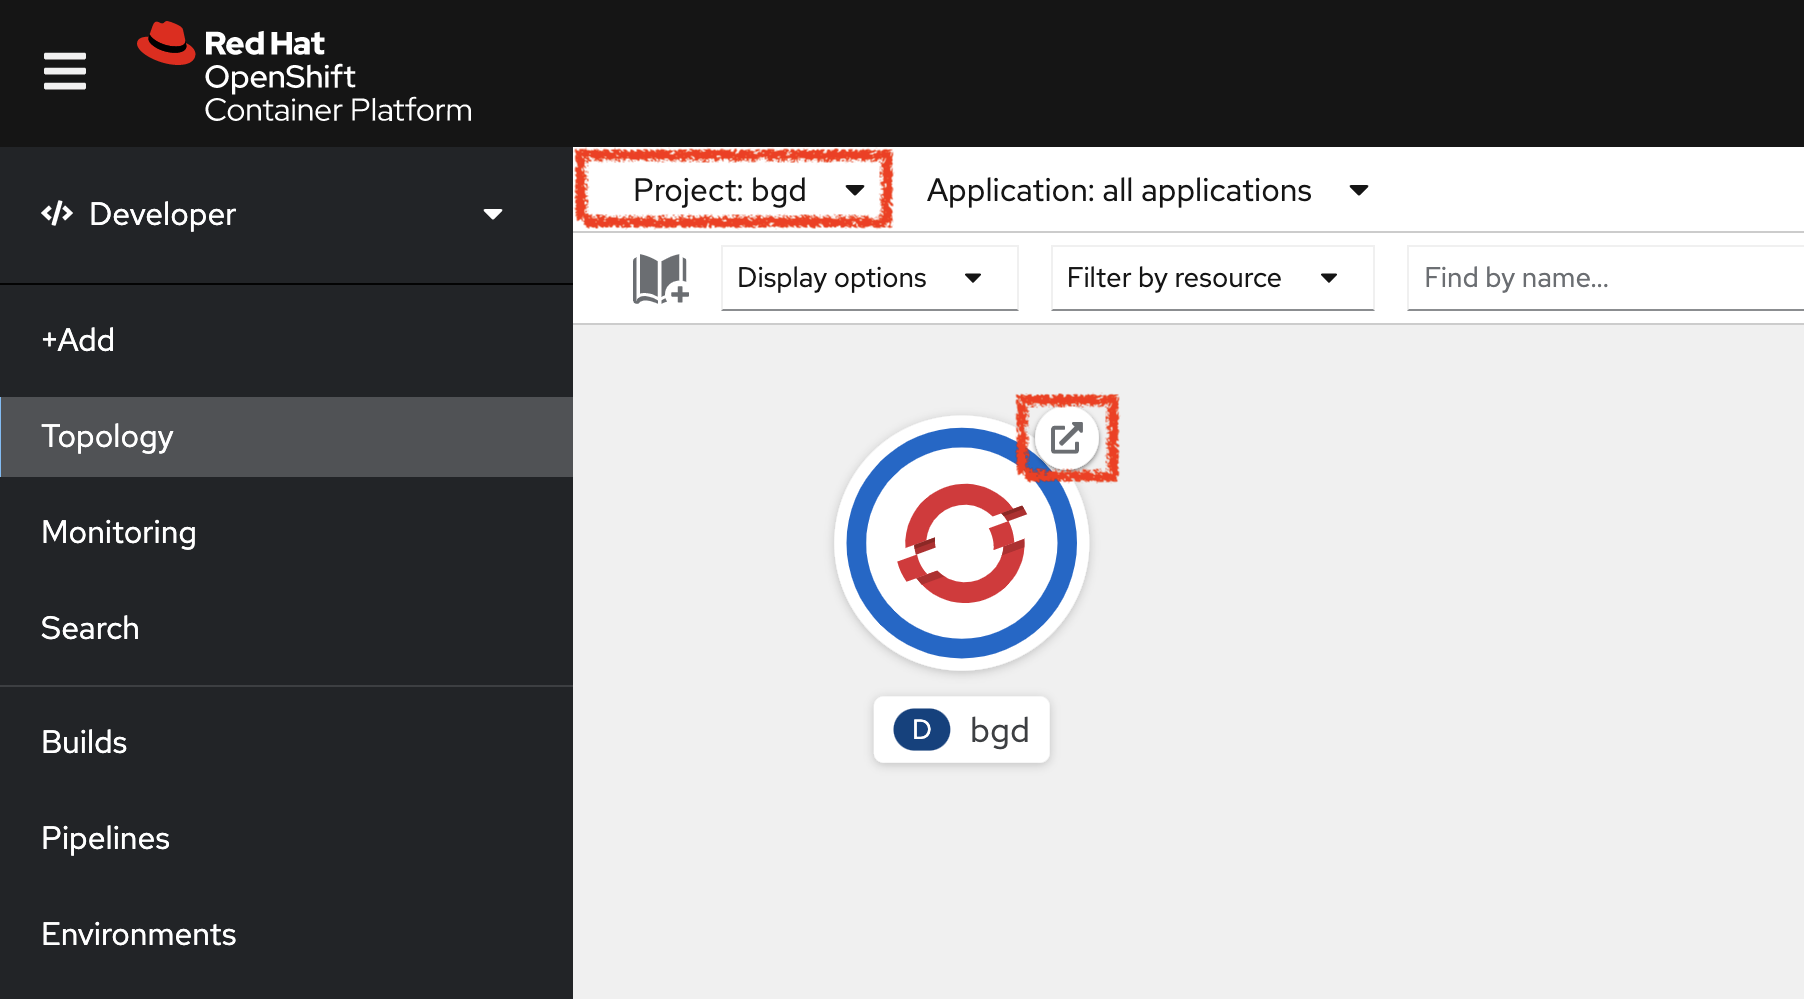
minikube -p gitops service argocd-server -n argocdIn the OpenShift Web Console, expand the Application Launcher in the top-right and click the ArgoCD icon:
Alternatively, get Argo CD Route using the oc CLI as previously done:
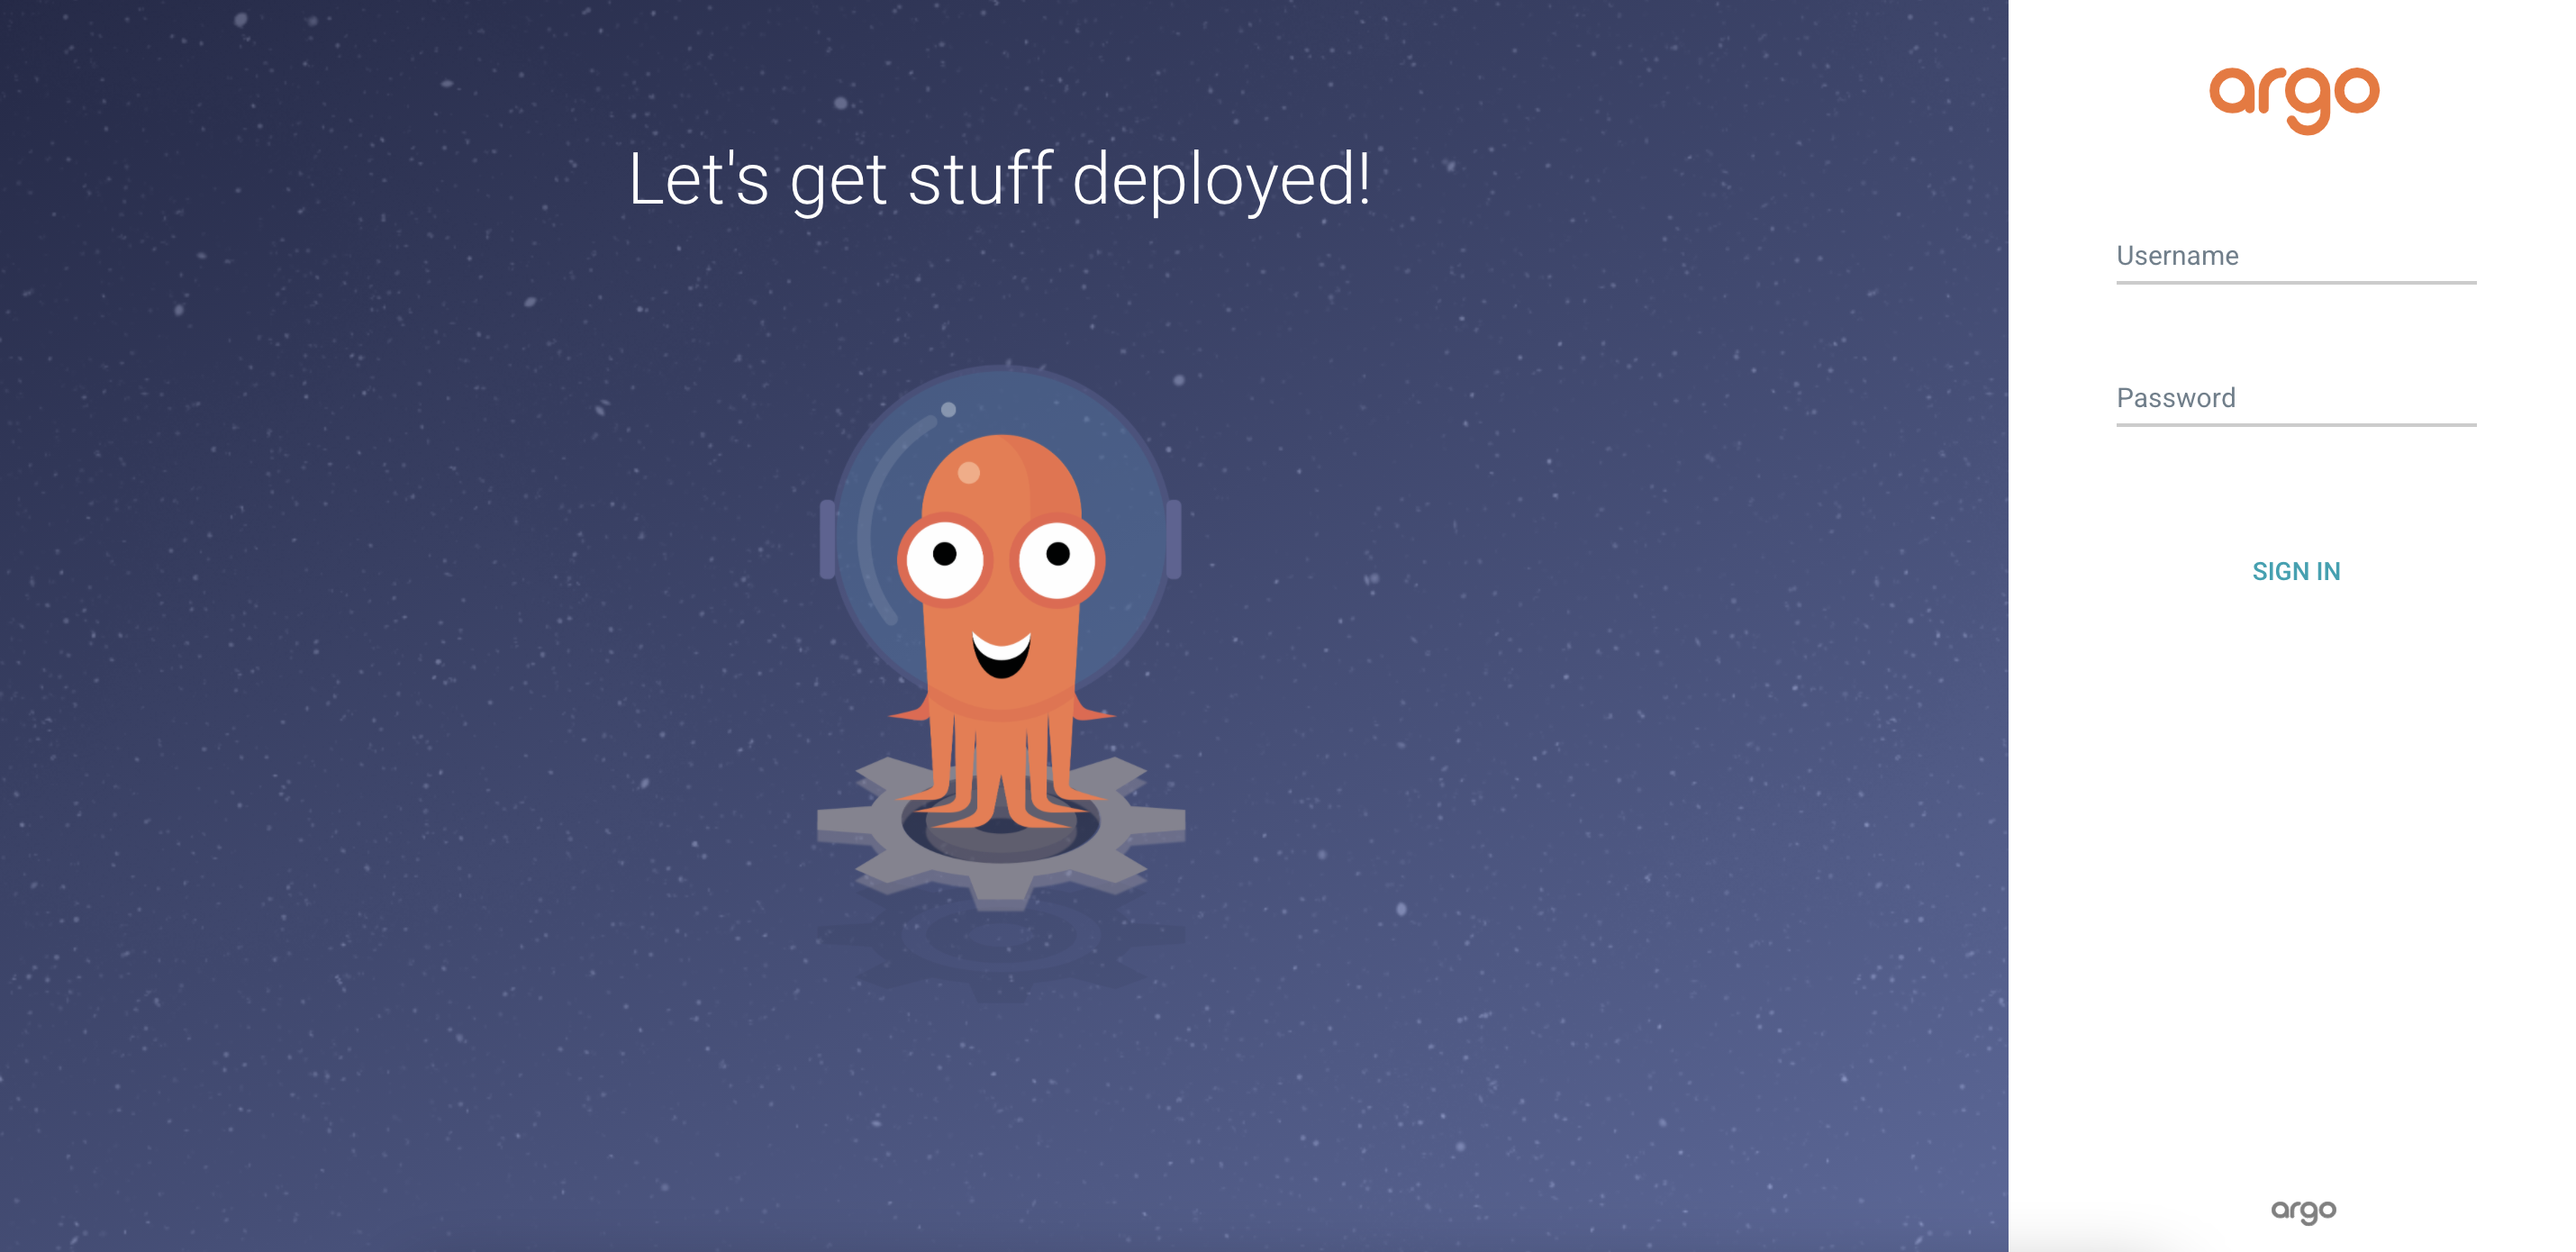
oc get route openshift-gitops-server -n openshift-gitops -o jsonpath='{.spec.host}{"\n"}'Access the Argo CD console by logging in with the username admin and the password extracted in the previous step:
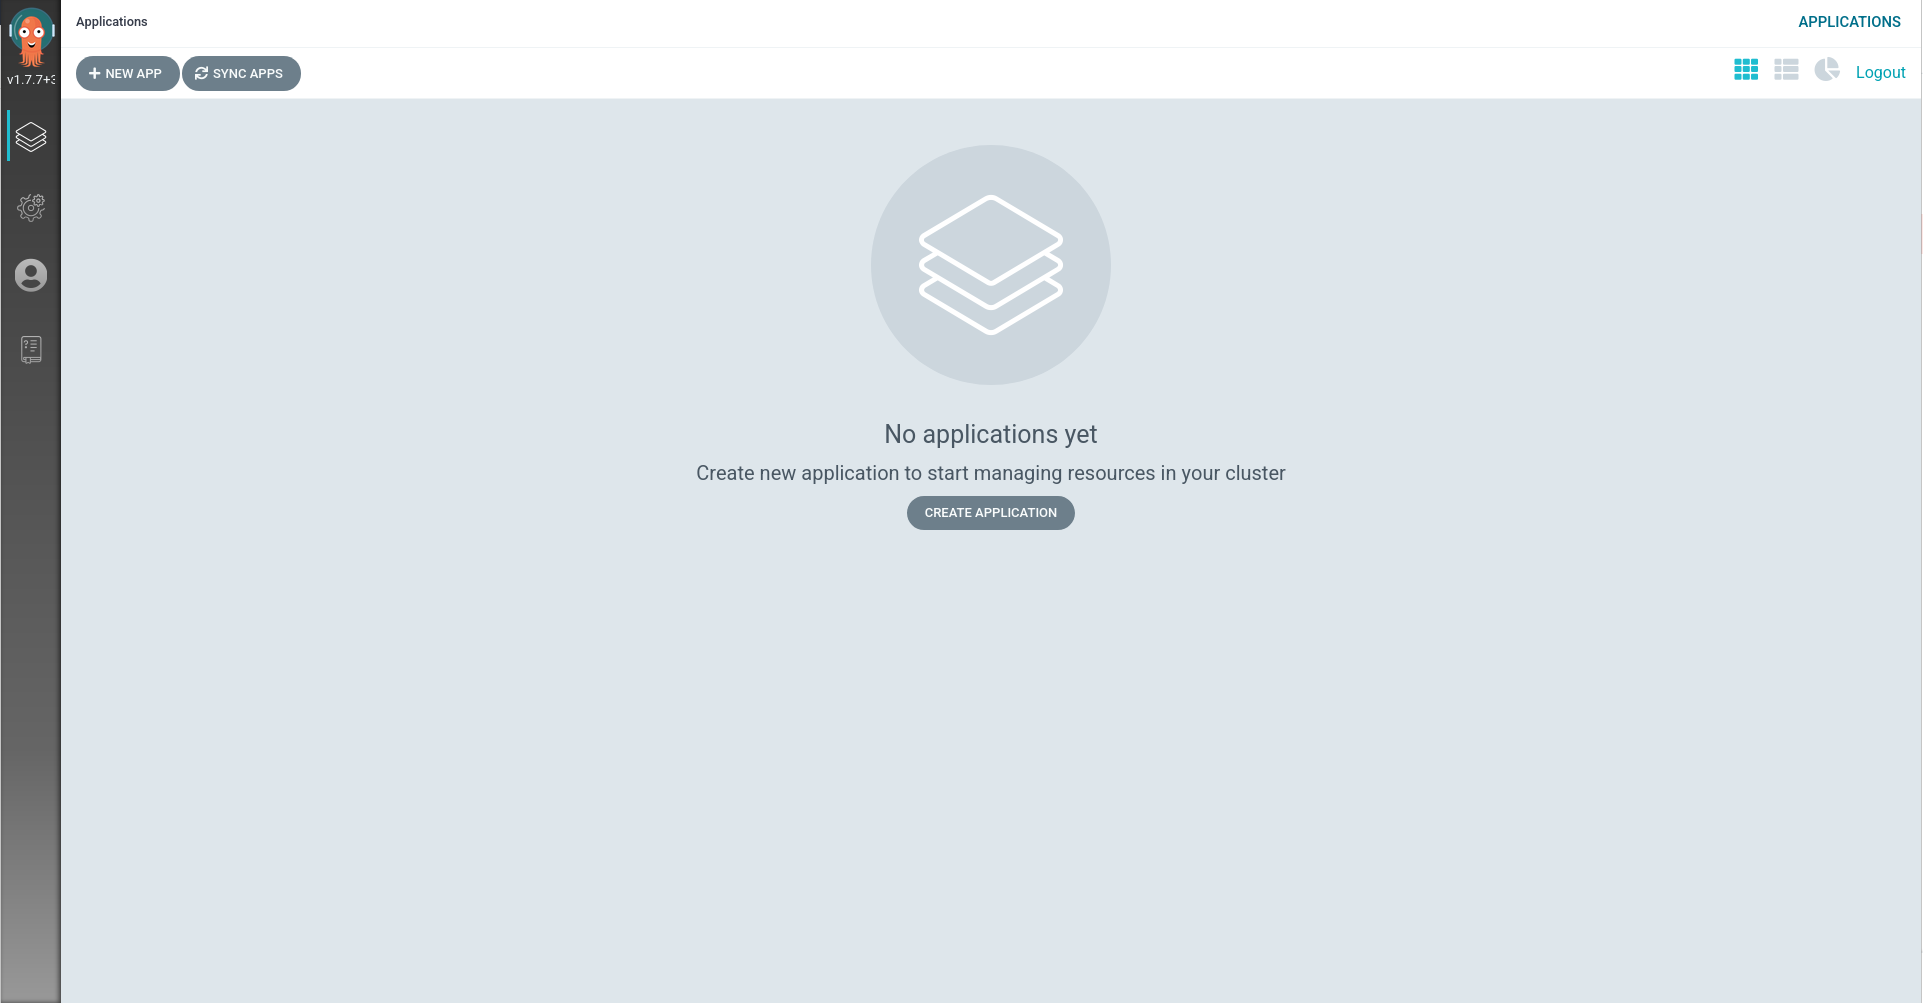
Once you’ve logged in, you should see the following page. This is the Argo CD Web UI.
Deploy a Sample Application
We’ll be using the redhat-developer-demos/openshift-gitops-examples Git repository to deploy our first application. It contains the manifests that define the application state.
Review the Application Manifests
The application manifests include a Namespace, Deployment, and networking manifests for Minikube/OpenShift. Deploying these manifests to a cluster will result in an application that supports ingress.
|
Review, but do not apply these manifests to your cluster. We will do that shortly using Argo CD. |
A Namespace:
apiVersion: v1
kind: Namespace
metadata:
  name: bgd
spec: {}
status: {}
A Deployment:
---
apiVersion: apps/v1
kind: Deployment
metadata:
  labels:
    app: bgd
  name: bgd
  namespace: bgd
spec:
  replicas: 1
  selector:
    matchLabels:
      app: bgd
  strategy: {}
  template:
    metadata:
      labels:
        app: bgd
    spec:
      containers:
      - image: quay.io/redhatworkshops/bgd:latest
        name: bgd
        env:
        - name: COLOR
          value: "blue"
        resources: {}
---A Service of type NodePort:
---
apiVersion: v1
kind: Service
metadata:
  labels:
    app: bgd
  name: bgd
  namespace: bgd
spec:
  type: NodePort
  ports:
  - port: 8080
    protocol: TCP
    targetPort: 8080
  selector:
    app: bgd
---
An Ingress:
apiVersion: networking.k8s.io/v1
kind: Ingress
metadata:
  name: bgd
spec:
  rules:
    - host: bgd.devnation
      http:
        paths:
          - path: /
            pathType: Prefix
            backend:
              service:
                name: bgd
                port:
                  number: 8080
A Service of type ClusterIP:
---
apiVersion: v1
kind: Service
metadata:
  creationTimestamp: null
  labels:
    app: bgd
  name: bgd
  namespace: bgd
spec:
  ports:
  - port: 8080
    protocol: TCP
    targetPort: 8080
  selector:
    app: bgd
---
A Route:
apiVersion: route.openshift.io/v1
kind: Route
metadata:
  labels:
    app: bgd
  name: bgd
  namespace: bgd
spec:
  port:
    targetPort: 8080
  to:
    kind: Service
    name: bgd
    weight: 100
Deploy the Application
A managed collection of manifests is known as an Application within Argo CD. Therefore, you must define it as such using an Application CR (CustomResource) in order to have Argo CD apply these manifests in your cluster.
Let’s review the Argo CD Application manifest used to deploy this application and break this down a bit:
apiVersion: argoproj.io/v1alpha1
kind: Application
metadata:
  name: bgd-app
  namespace: argocd
spec:
  destination:
    namespace: bgd
    server: https://kubernetes.default.svc (1)
  project: default (2)
  source: (3)
    path: apps/bgd/overlays/bgd
    repoURL: https://github.com/redhat-developer-demos/openshift-gitops-examples
    targetRevision: minikube
  syncPolicy: (4)
    automated:
      prune: true
      selfHeal: false
    syncOptions:
- CreateNamespace=true| 1 | The destination server is the same server we installed Argo CD on. |
| 2 | Here you’re installing the application in Argo CD’s default project (.spec.project). |
| 3 | The manifest repo, and the path within it where the YAML resides. |
| 4 | The syncPolicy is set to automated. It will automatically prune resources resources that have been removed from the Git repo, but will not automatically correct resources that deviate from the definition stored in the repo, i.e manual changes use kubectl will not be "healed". |
Apply the Application CR by running the following command:
kubectl apply -f documentation/modules/ROOT/examples/minikube/bgd-app/bgd-app.yamlapiVersion: argoproj.io/v1alpha1
kind: Application
metadata:
name: bgd-app
namespace: openshift-gitops
spec:
destination:
namespace: bgd
server: https://kubernetes.default.svc (1)
project: default (2)
source: (3)
path: apps/bgd/overlays/bgd
repoURL: https://github.com/redhat-developer-demos/openshift-gitops-examples
targetRevision: main
syncPolicy: (4)
automated:
prune: true
selfHeal: false
syncOptions:
- CreateNamespace=true| 1 | The destination server is the same server we installed Argo CD on. | ||
| 2 | Here you’re installing the application in Argo CD’s default project (.spec.project).
|
||
| 3 | The manifest repo, and th path within it where the YAML resides. | ||
| 4 | The syncPolicy is set to automated. It will automatically prune resources resources that have been removed from the Git repo, but will not automatically correct resources that deviate from the definition stored in the repo, i.e manual changes made using kubectl will not be "healed". |
Apply the Application CR by running the following command:
kubectl apply -f documentation/modules/ROOT/examples/bgd-app/bgd-app.yamlThe newly created Application appears as a tile with the title bgd-app in the Argo CD UI.
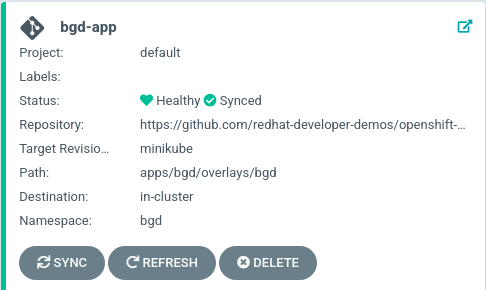
Clicking on this tile takes you to the application details page. You may see it as still progressing or fully synced.
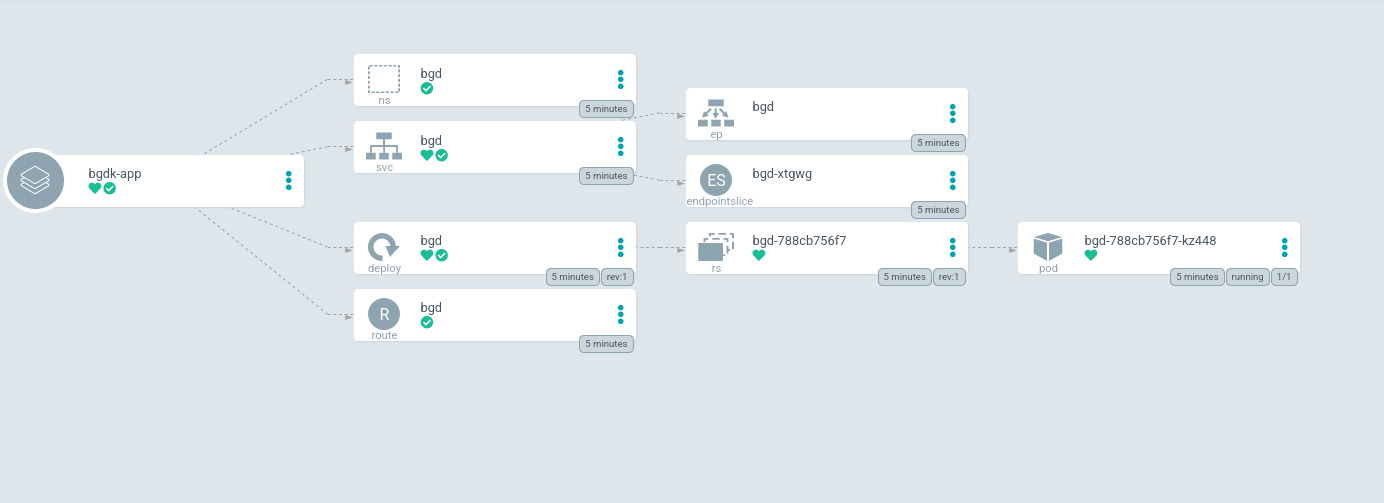
You may have to click on show hidden resources on this page to see all of the resources.
|
At this point the application should be up and running. Verify that the resources were created:
kubectl get all -n bgdThe output should list a Service, Deployment, and Pod:
NAME                       READY   STATUS    RESTARTS   AGE
pod/bgd-788cb756f7-kz448   1/1     Running   0          10m

NAME          TYPE        CLUSTER-IP       EXTERNAL-IP   PORT(S)    AGE
service/bgd   ClusterIP   172.30.111.118   <none>        8080/TCP   10m

NAME                  READY   UP-TO-DATE   AVAILABLE   AGE
deployment.apps/bgd   1/1     1            1           10m
Verify the the rollout is complete:
kubectl rollout status deploy/bgd -n bgdObtain the URL, and visit your application in a web browser:
Add Minikube IP (minikube ip) and the Ingress hostname bgd.devnation to your Host file, like /etc/hosts.
Example:
192.168.39.242 bgd.devnationFrom Web Console, select bgd project from drop-down menu, then click to the application’s Route to access it.
Alternatively, get app Route from CLI:
oc get route bgd -n bgd -o jsonpath='{.spec.host}{"\n"}'Your application should look like this.

Addressing Configuration Drift
Let’s introduce a change in the application environment! Patch the live Deployment manifest to change the color of the bubbles in the application from blue to green:
kubectl -n bgd patch deploy/bgd --type='json' -p='[{"op": "replace", "path": "/spec/template/spec/containers/0/env/0/value", "value":"green"}]'Wait for the rollout to happen:
kubectl rollout status deploy/bgd -n bgdRefresh the tab where your application is running. You should see green bubbles.

Looking over at your Argo CD Web UI, you can see that Argo detects your application as "Out of Sync".
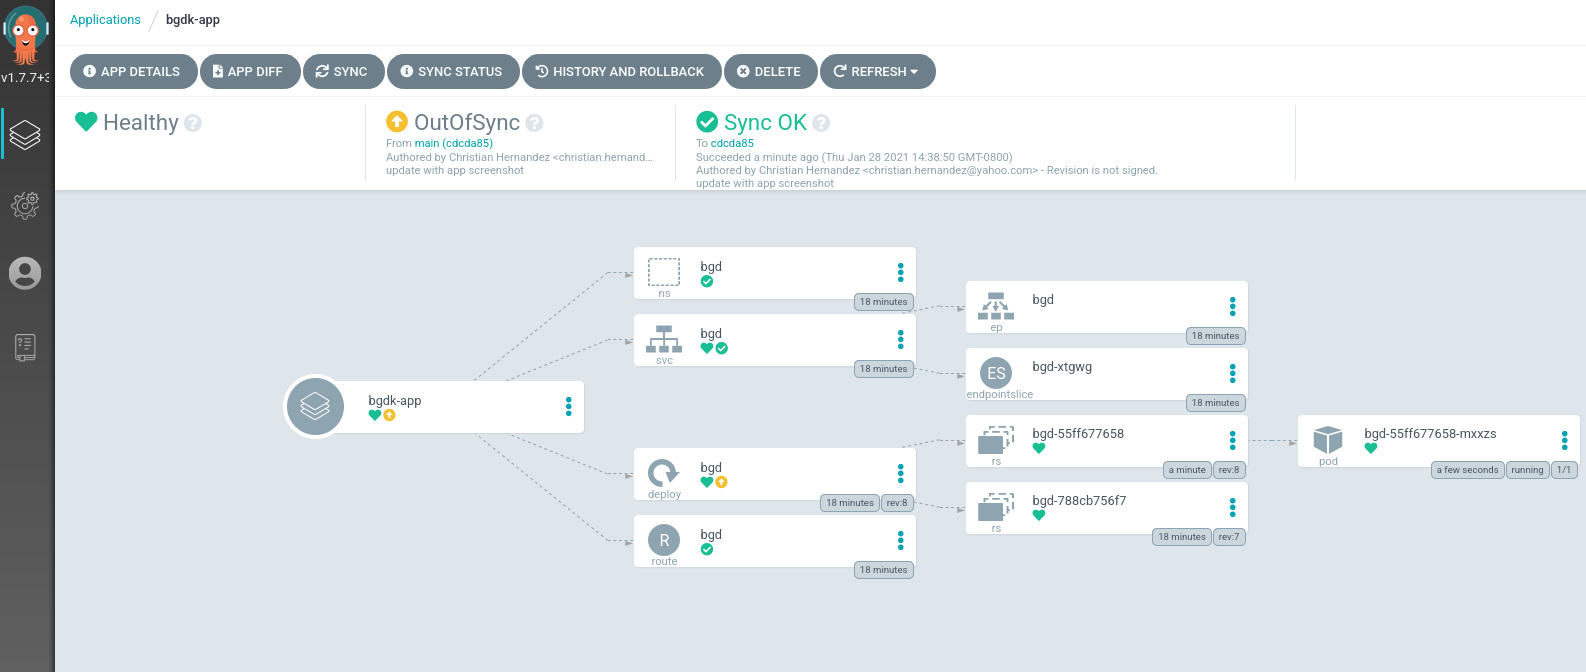
You can sync your app via the Argo CD by:
-
First clicking
SYNC -
Then clicking
SYNCHRONIZE
Alternatively, you can run the following command:
argocd app sync bgd-appAfter the sync process is done, the Argo CD UI should mark the application as in sync.
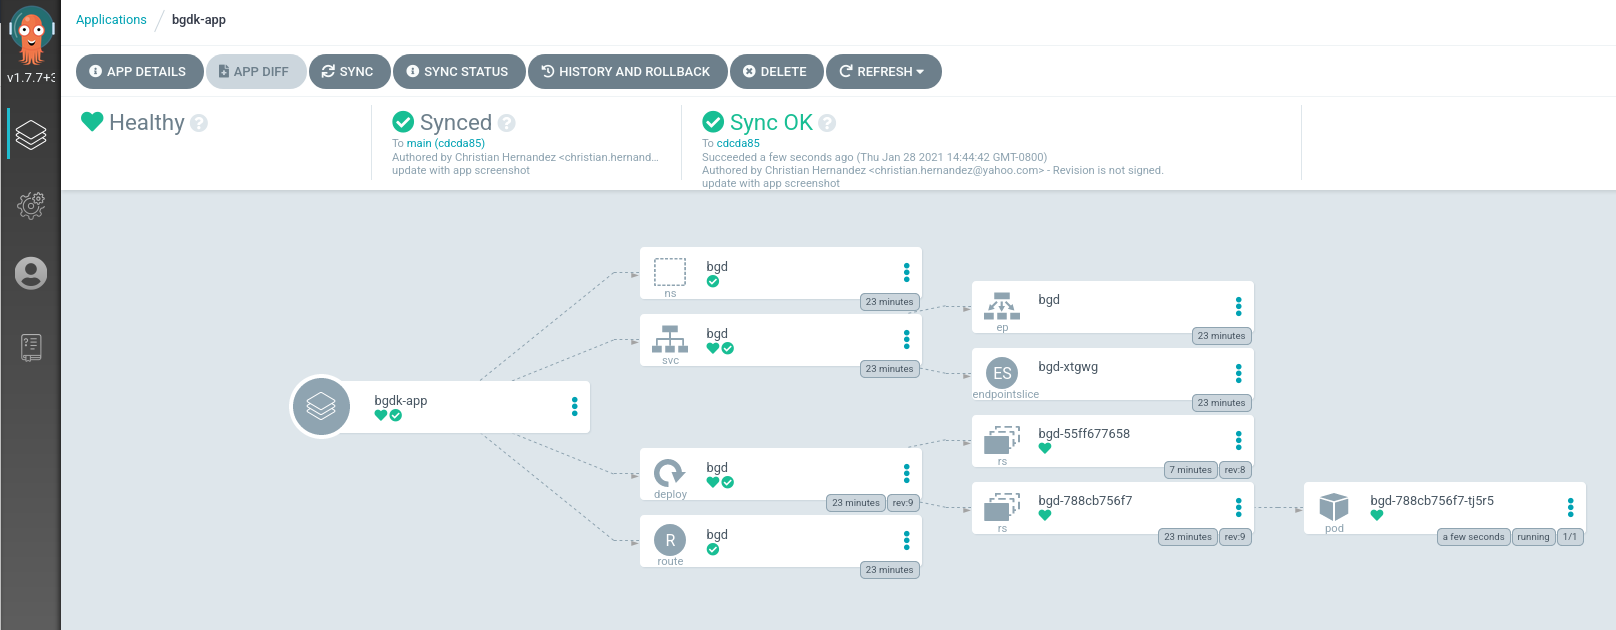
Reload the page on the tab where the application is running. The bubbles should have returned to their original blue color.
You can setup Argo CD to automatically correct drift by setting the
Application manifest to do so. Example:
spec:
  syncPolicy:
    automated:
      prune: true
      selfHeal: true
Or, as in our case, after the fact by running the following command: