Continuous Integration with Openshift Pipelines
30 MINUTE EXERCISE
In this lab you will learn about deployment pipelines and you will create a pipeline to automate the build of the Inventory service.
Create a Git Repository for Inventory Code
The first step is to create a Git repository to store your source code. You can use any Git server (e.g. GitHub, BitBucket, etc). For this lab we will use a Gitea git server.
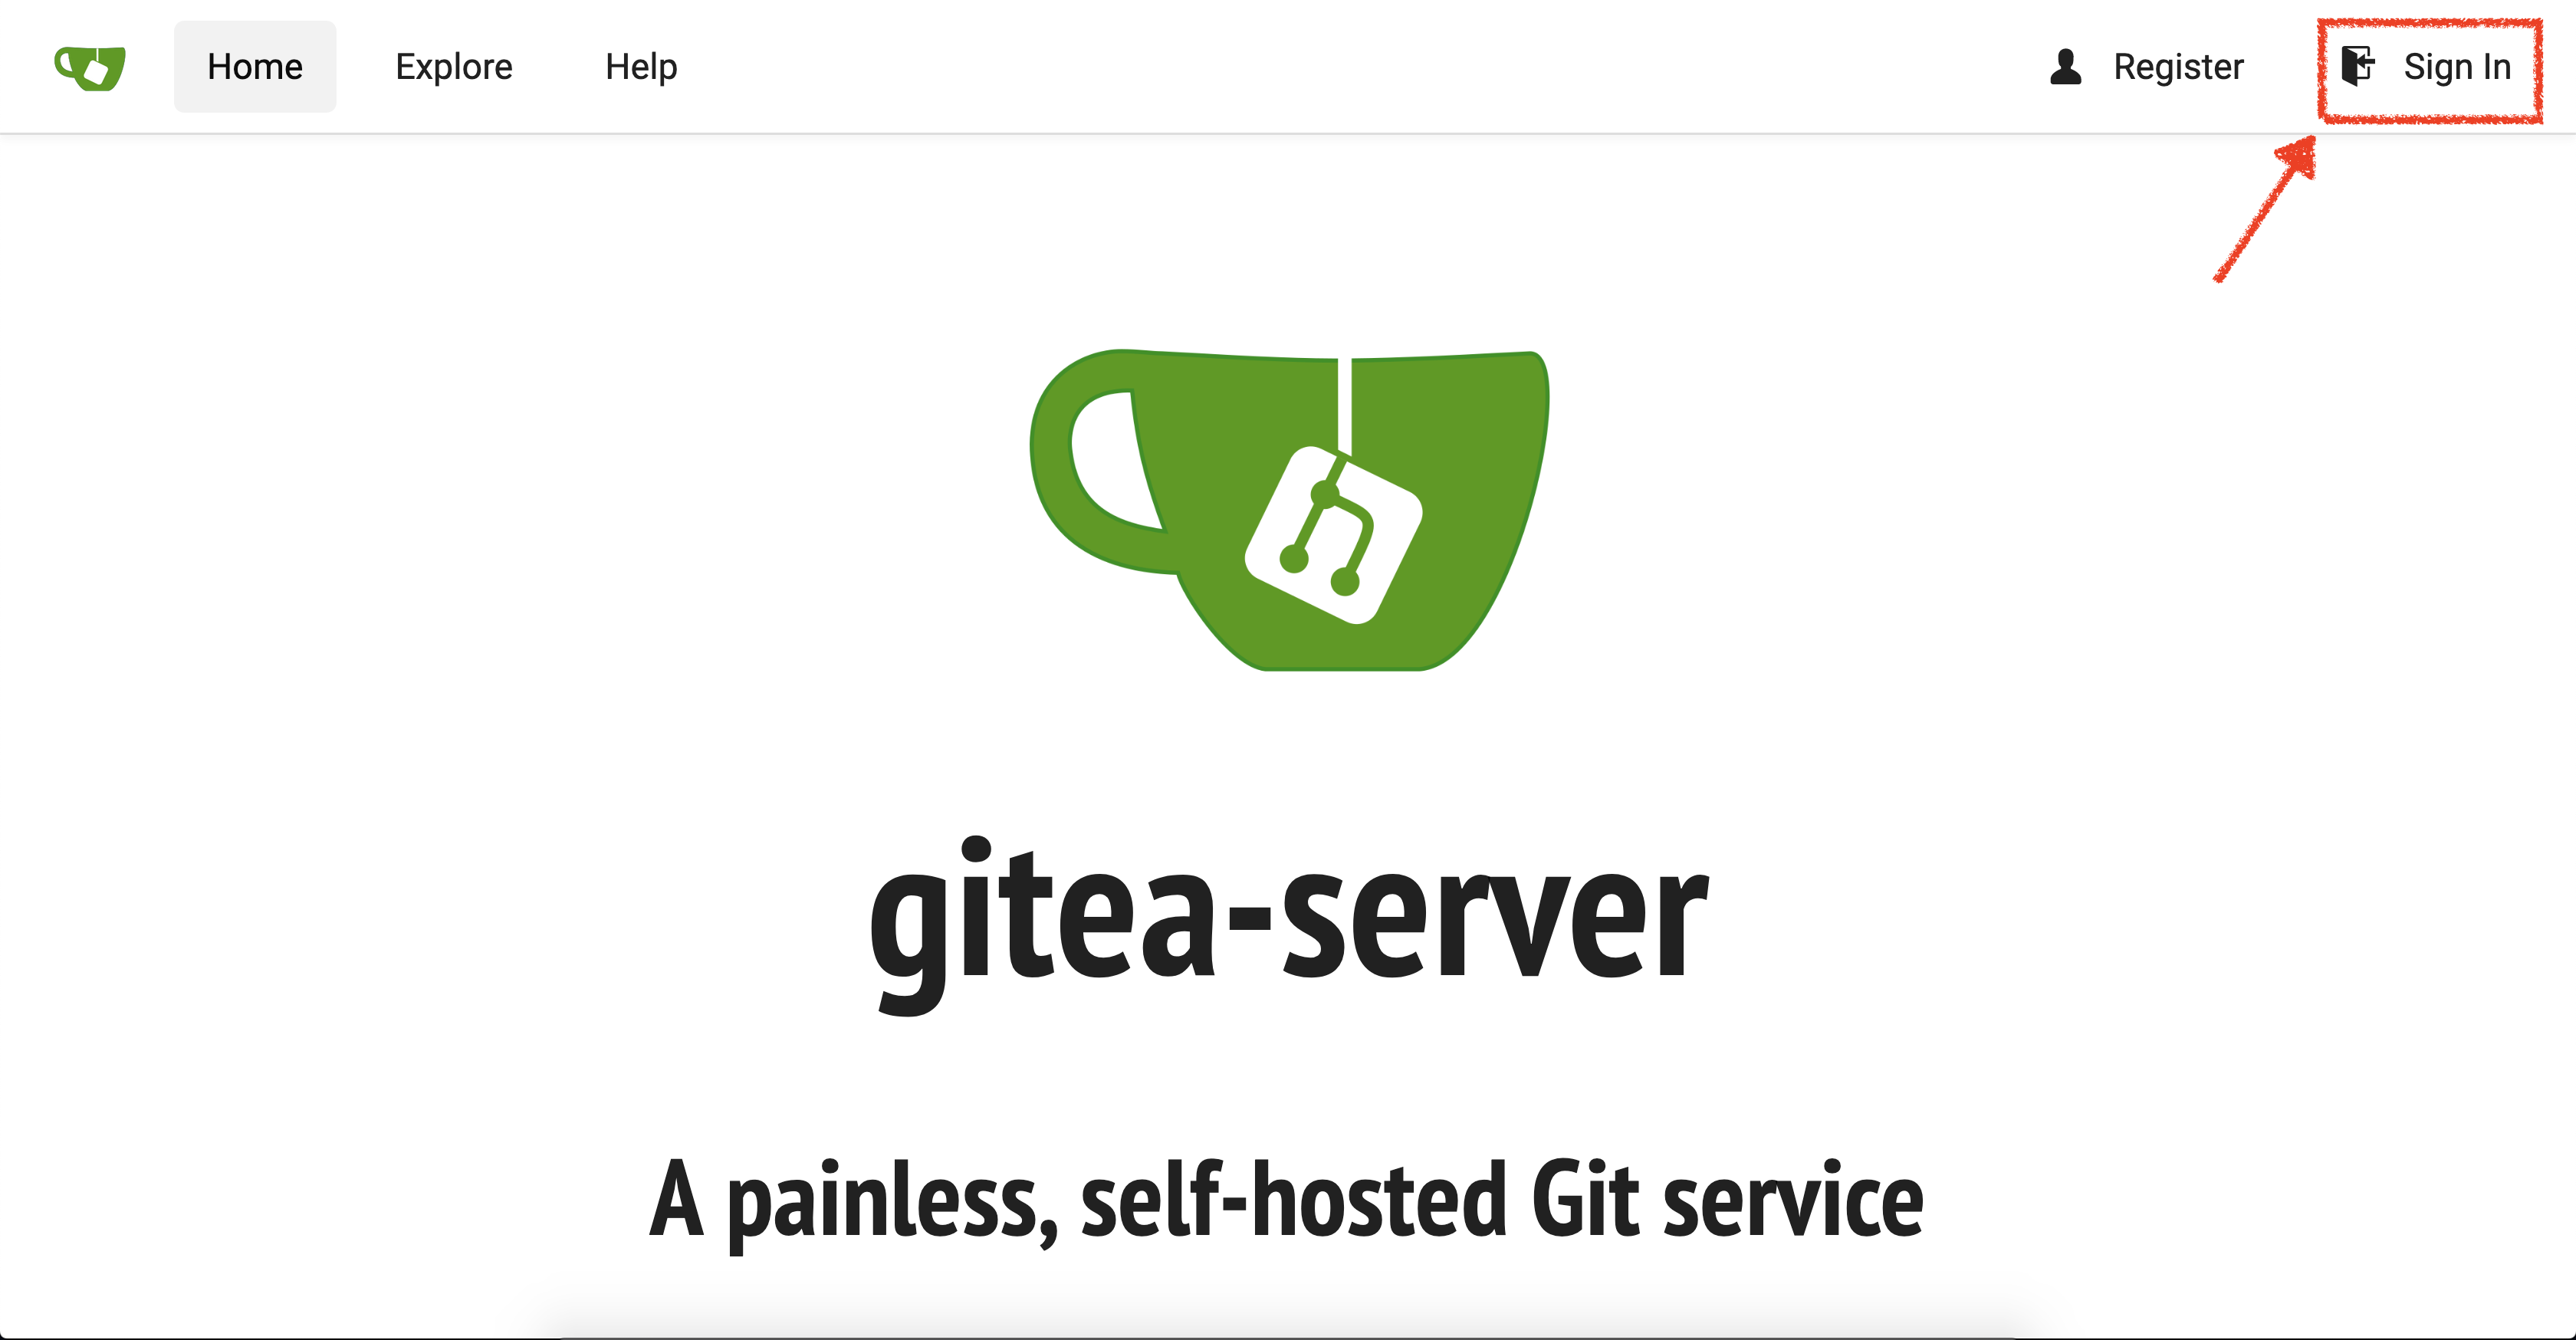
Click on the 'Developer Repository' button below

Then, click on 'Sign In' and login via OpenShift as user%USER_ID%/%OPENSHIFT_PASSWORD%
Create a new repository called 'inventory-quarkus'.
Click on the '+' icon → '+ New Repository' as below and enter the following values:
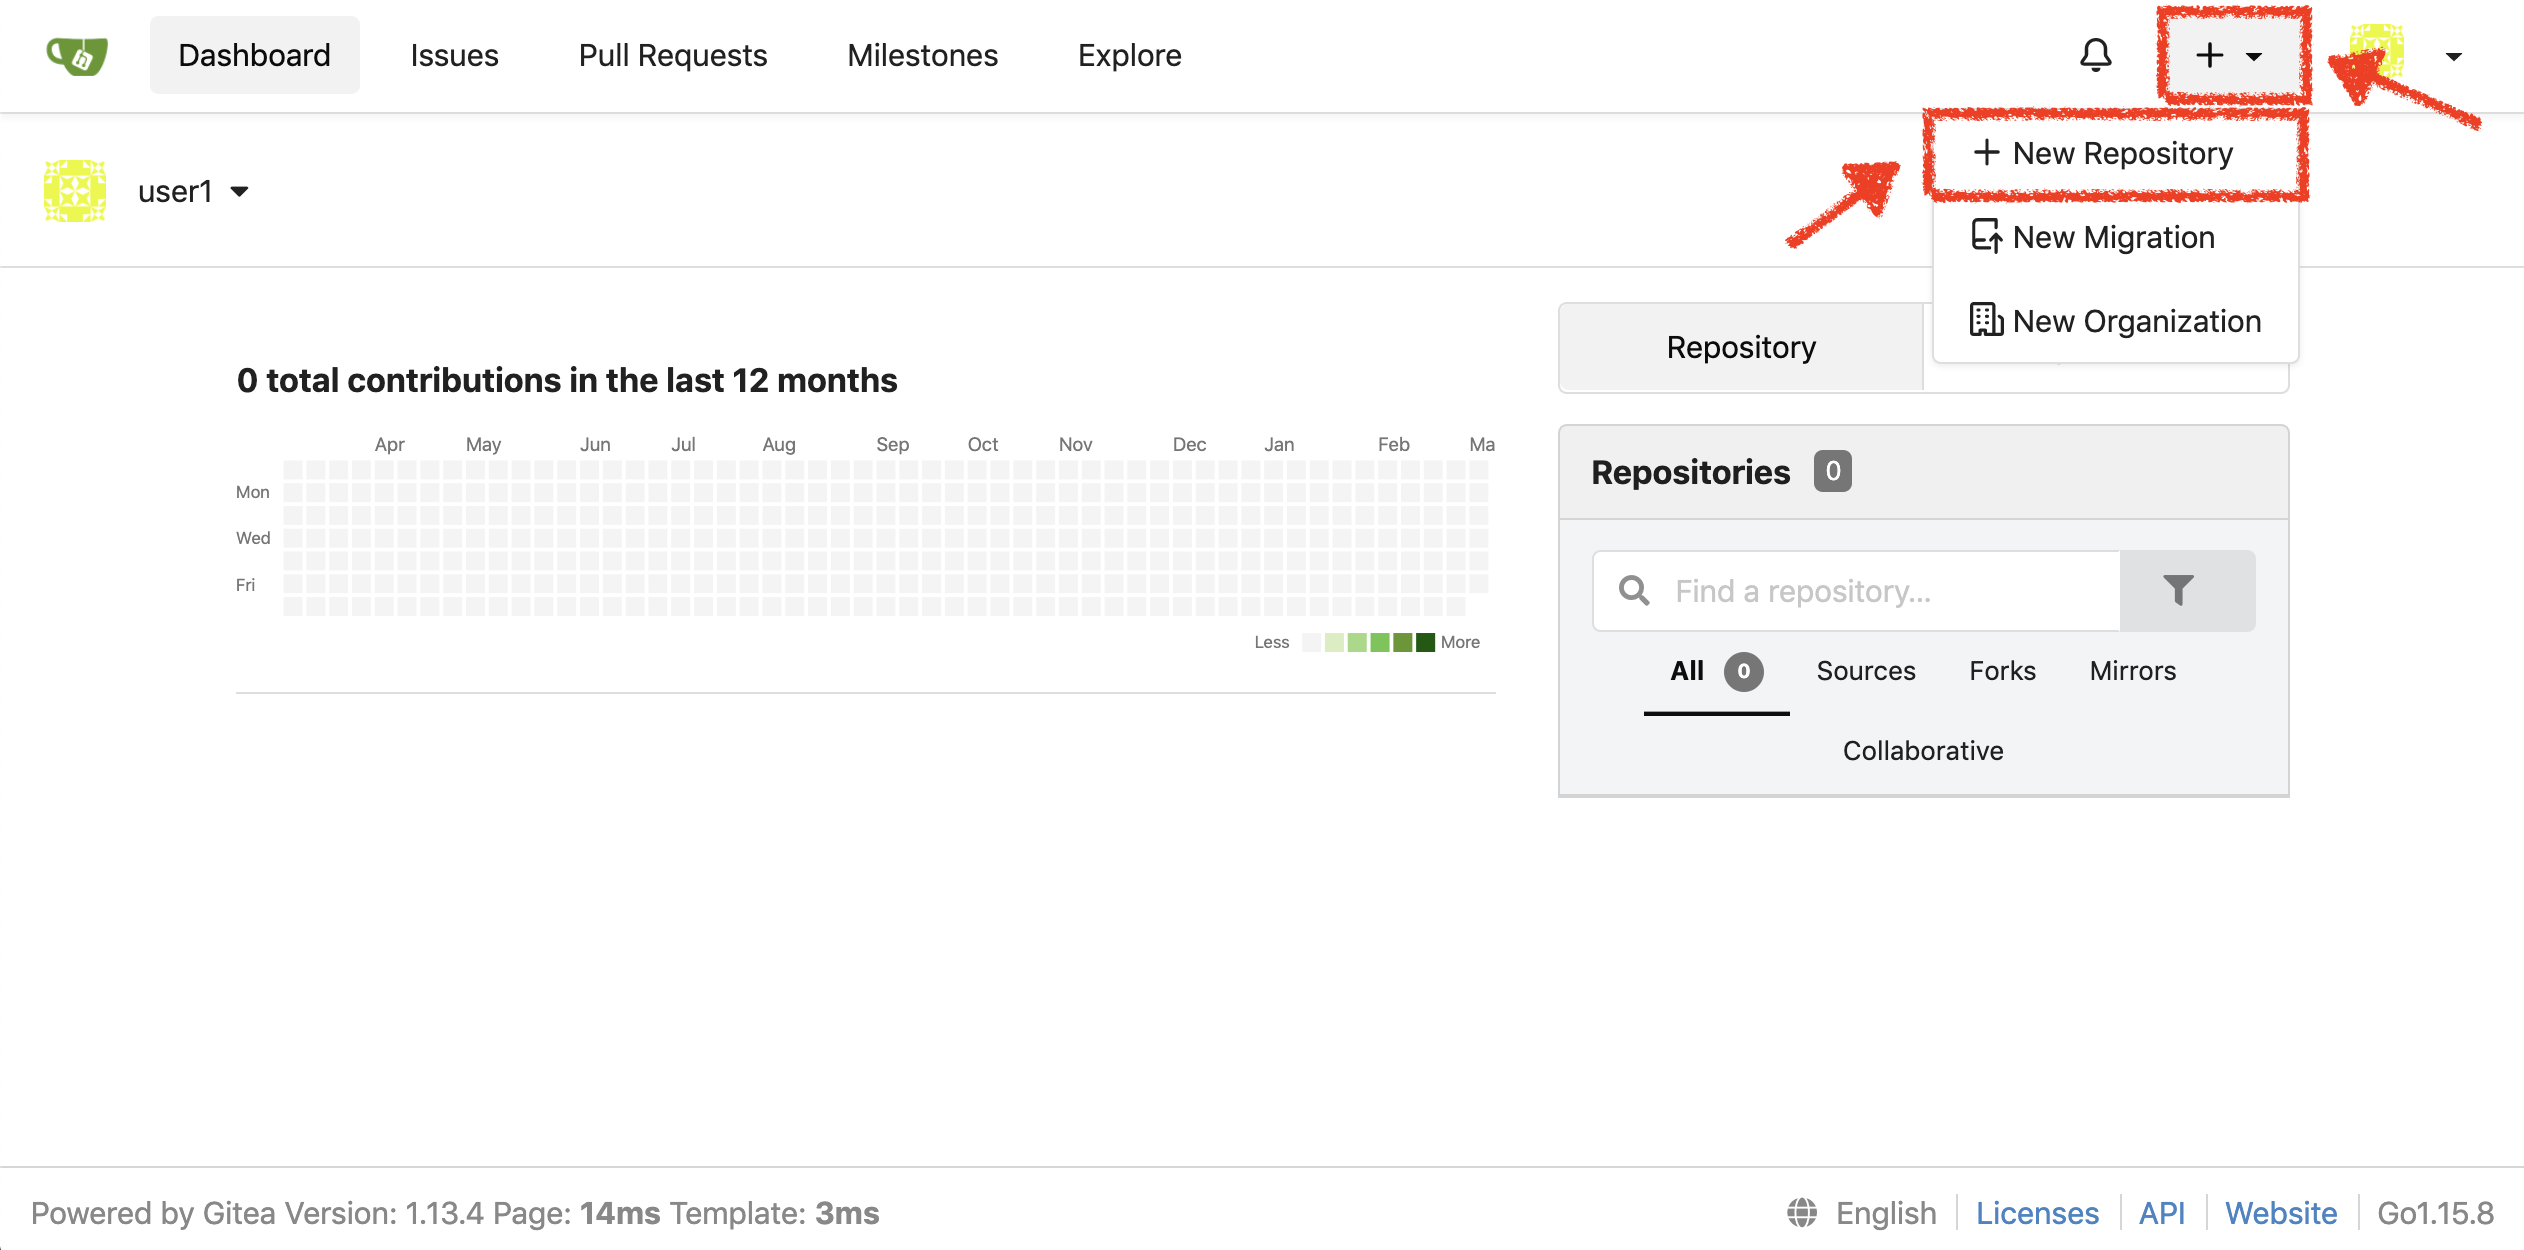
| Parameter | Value |
|---|---|
Repository Name* |
inventory-quarkus |
Click on 'Create Repository' button.
The Git repository is created now.
Push Inventory Code to the Git Repository
Now that you have a Git repository for the Inventory service, you should push your local source code into this Git repository.
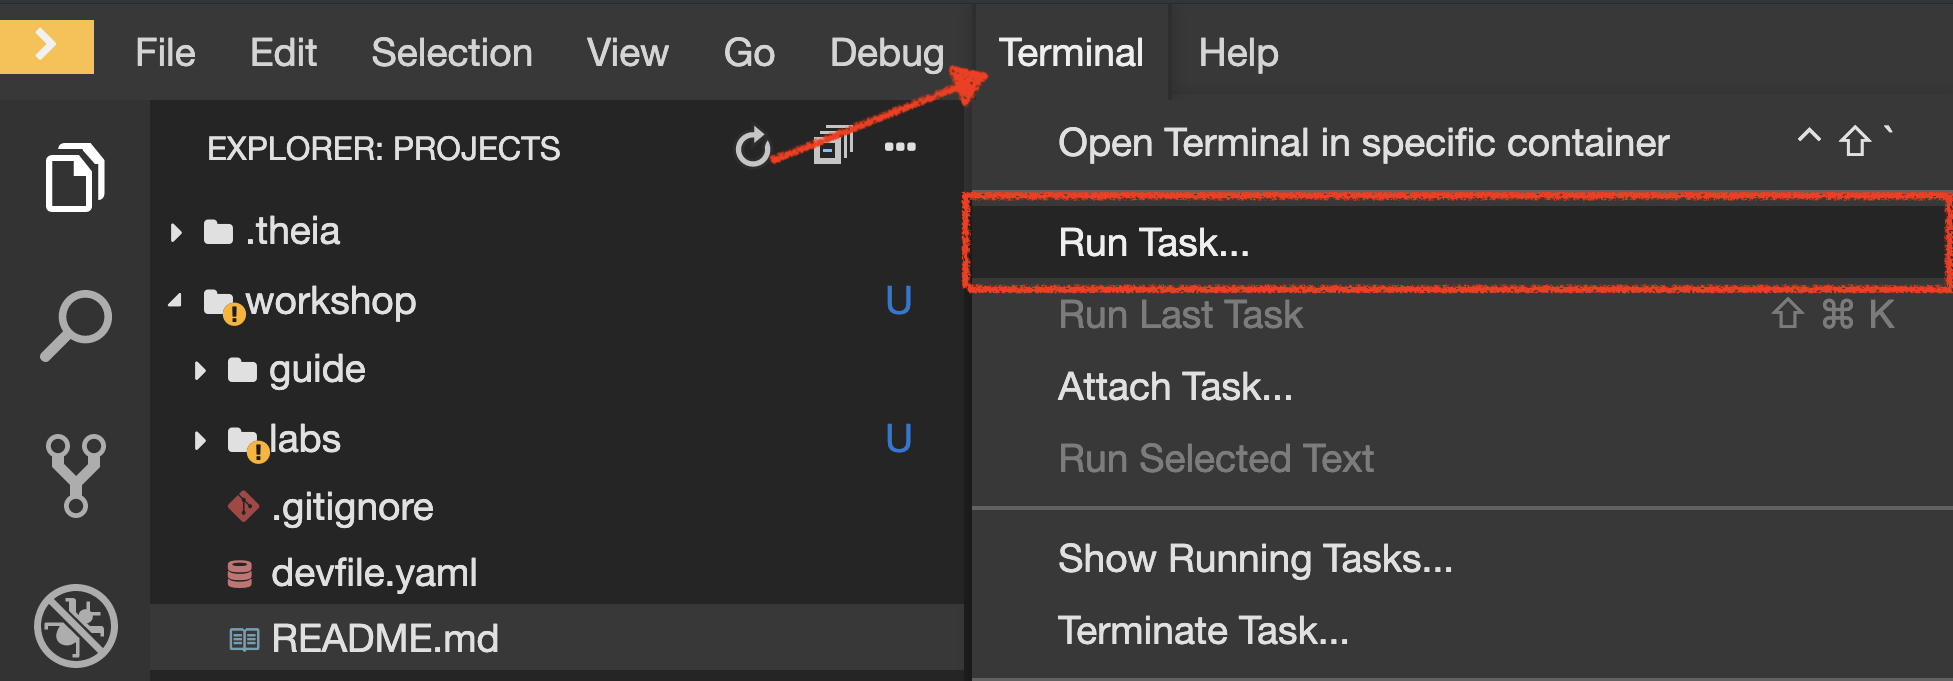
Click on 'Terminal' → 'Run Task…' → 'Inventory - Commit'
Execute the following commands in the '>_ workshop_tools' terminal window
cd /projects/workshop/labs/inventory-quarkus
git init
git remote add origin http://gitea-server.gitea.svc:3000/user%USER_ID%/inventory-quarkus.git
git add *
git commit -m "Initial"
git push http://user%USER_ID%:openshift@gitea-server.gitea.svc:3000/user%USER_ID%/inventory-quarkus.git
To open a '>_ workshop_tools' terminal window, click on 'Terminal' → 'Open Terminal in specific container' → 'workshop-tools'
|
The output should be as follows:
Initialized empty Git repository in /projects/workshop/labs/inventory-quarkus/.git/
[master (root-commit) f7b9db7] Initial
12 files changed, 831 insertions(+)
[...]
Enumerating objects: 29, done.
Counting objects: 100% (29/29), done.
Delta compression using up to 16 threads.
Compressing objects: 100% (20/20), done.
Writing objects: 100% (29/29), 10.76 KiB | 3.59 MiB/s, done.
Total 29 (delta 1), reused 0 (delta 0)
remote: . Processing 1 references
remote: Processed 1 references in total
To http://gitea-server.gitea.svc:3000/user%USER_ID%/inventory-quarkus.git
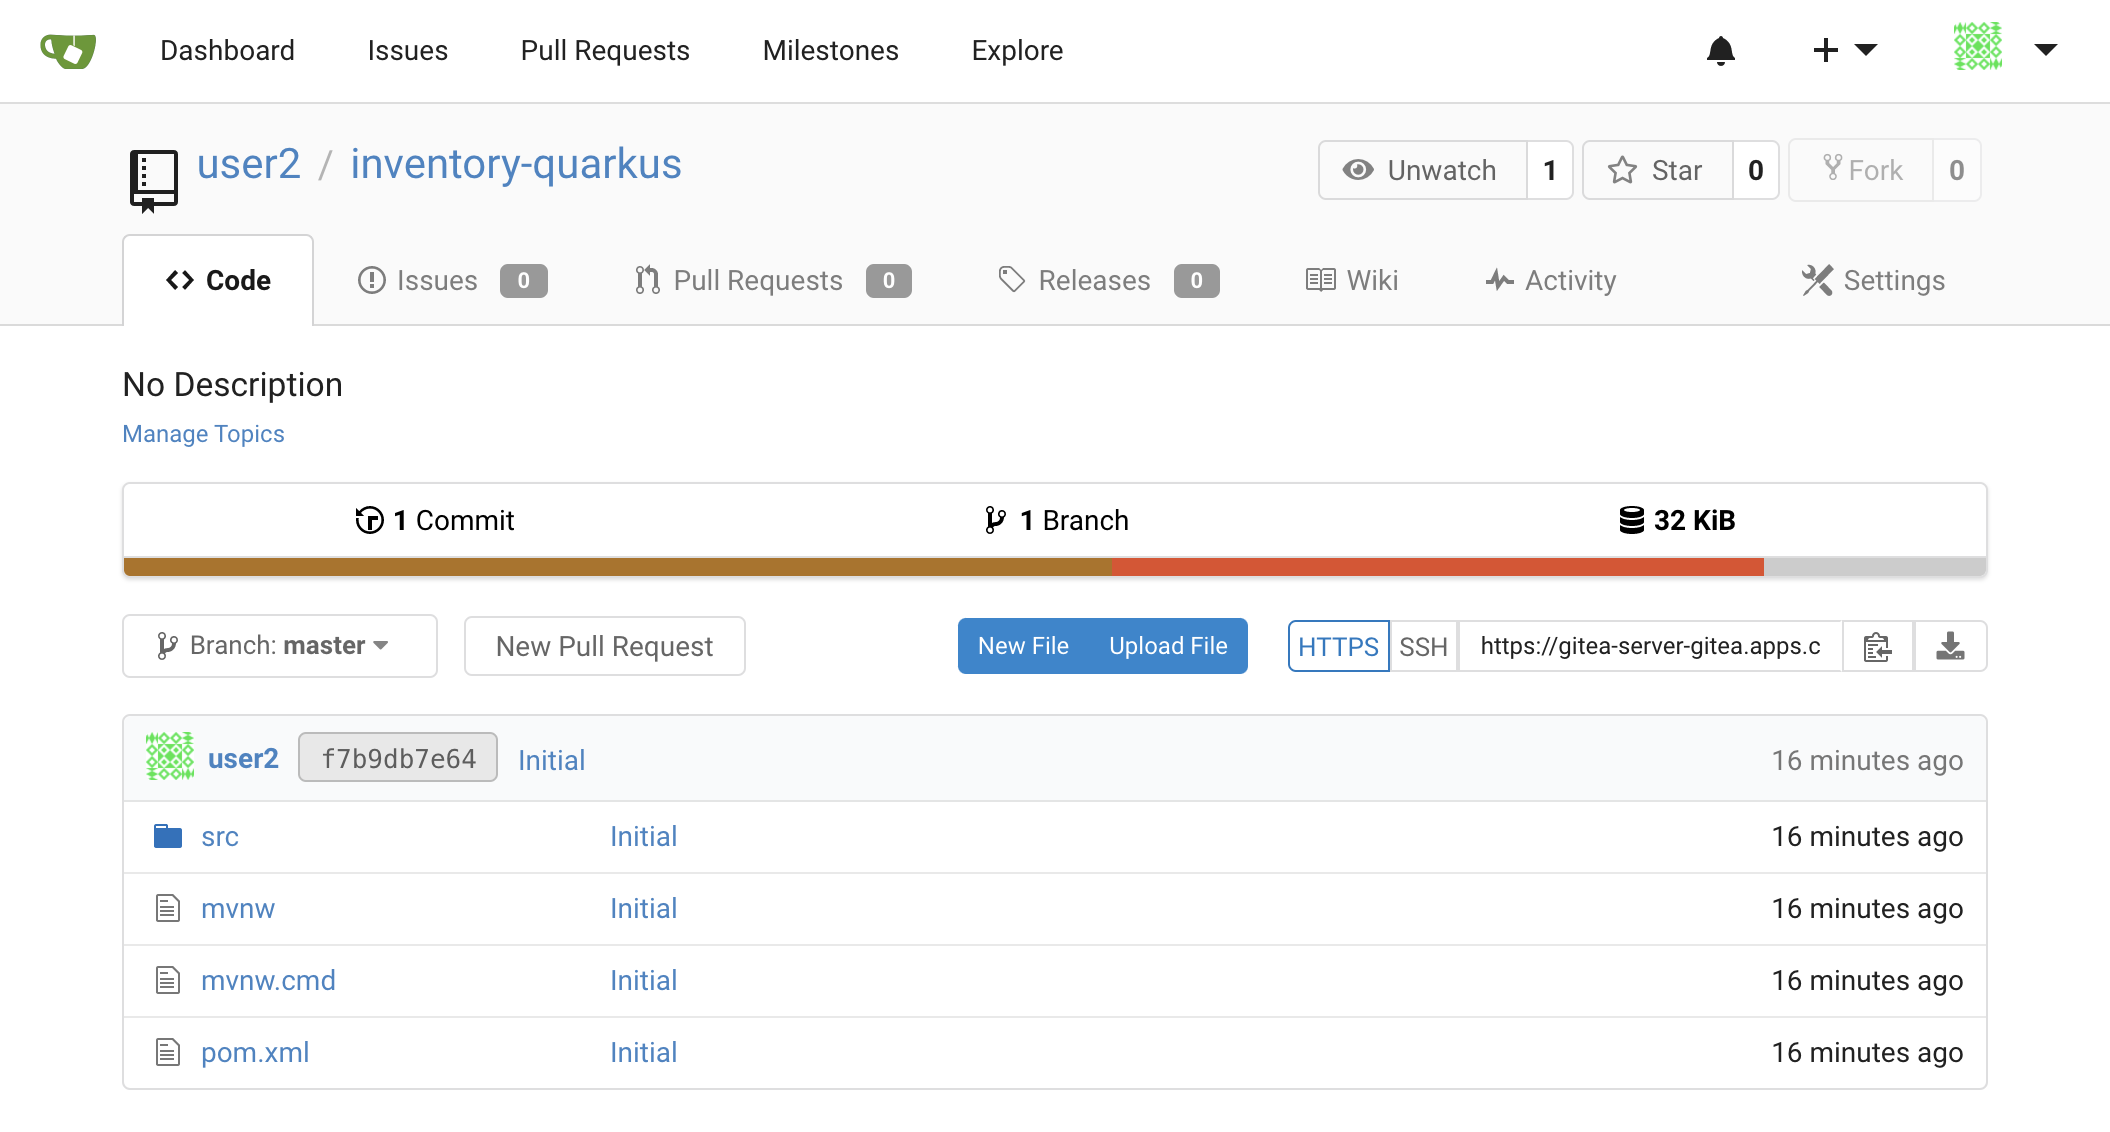
* [new branch] master -> masterOnce done, in your Git Repository, refresh the page of your 'inventory-quarkus' repository. You should
see the project files in the repository.
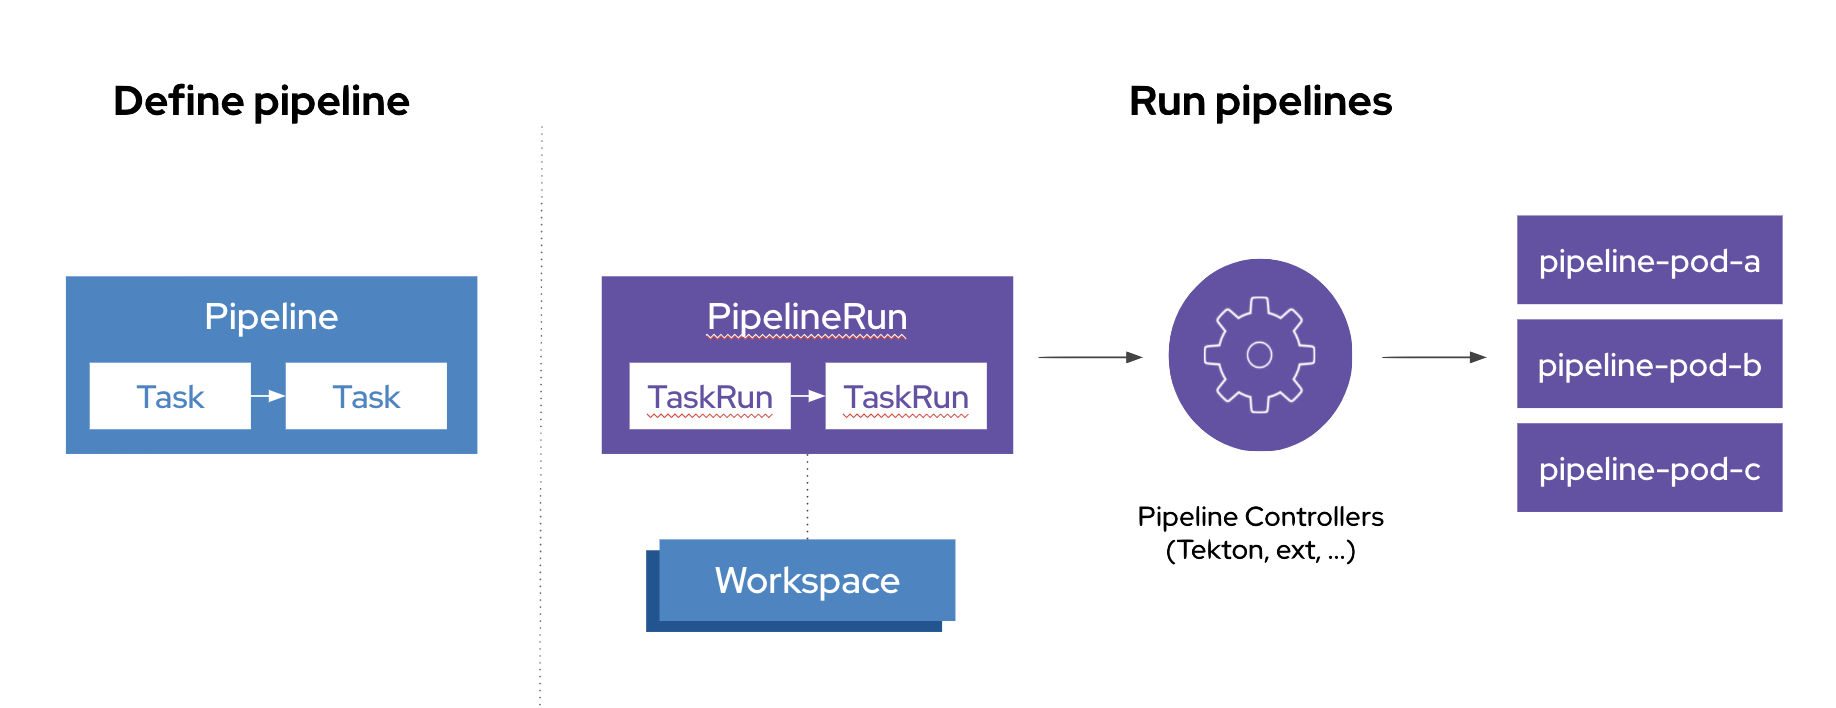
What is OpenShift Pipelines?
OpenShift Pipelines is a cloud-native, continuous integration and continuous delivery (CI/CD) solution for building pipelines based on Tekton project.
-
Standard CI/CD pipeline definition based on Tekton
-
Build images with Kubernetes tools such as S2I, Buildah, Buildpacks, Kaniko, etc
-
Deploy applications to multiple platforms such as Kubernetes, serverless and VMs
-
Easy to extend and integrate with existing tools
-
Scale pipelines on-demand
-
Portable across any Kubernetes platform
-
Designed for microservices and decentralized teams
-
Integrated with the OpenShift Developer Console
Tekton provides Kubernetes-style resources for creating serverless CI/CD-style pipelines on Kubernetes.
The custom resources needed to define a pipeline are:
-
Task - a reusable, loosely coupled number of steps that perform a specific task (e.g., building a container image)
-
Pipeline - the definition of the pipeline and the Task that it should perform
-
PipelineResource - inputs (e.g., git repository) and outputs (e.g., image registry) to and out of a Pipeline or Task
-
TaskRun - the result of running an instance of Task
-
PipelineRun - the result of running an instance of Pipeline, which includes a number of TaskRun
Switch to the Staging Environment
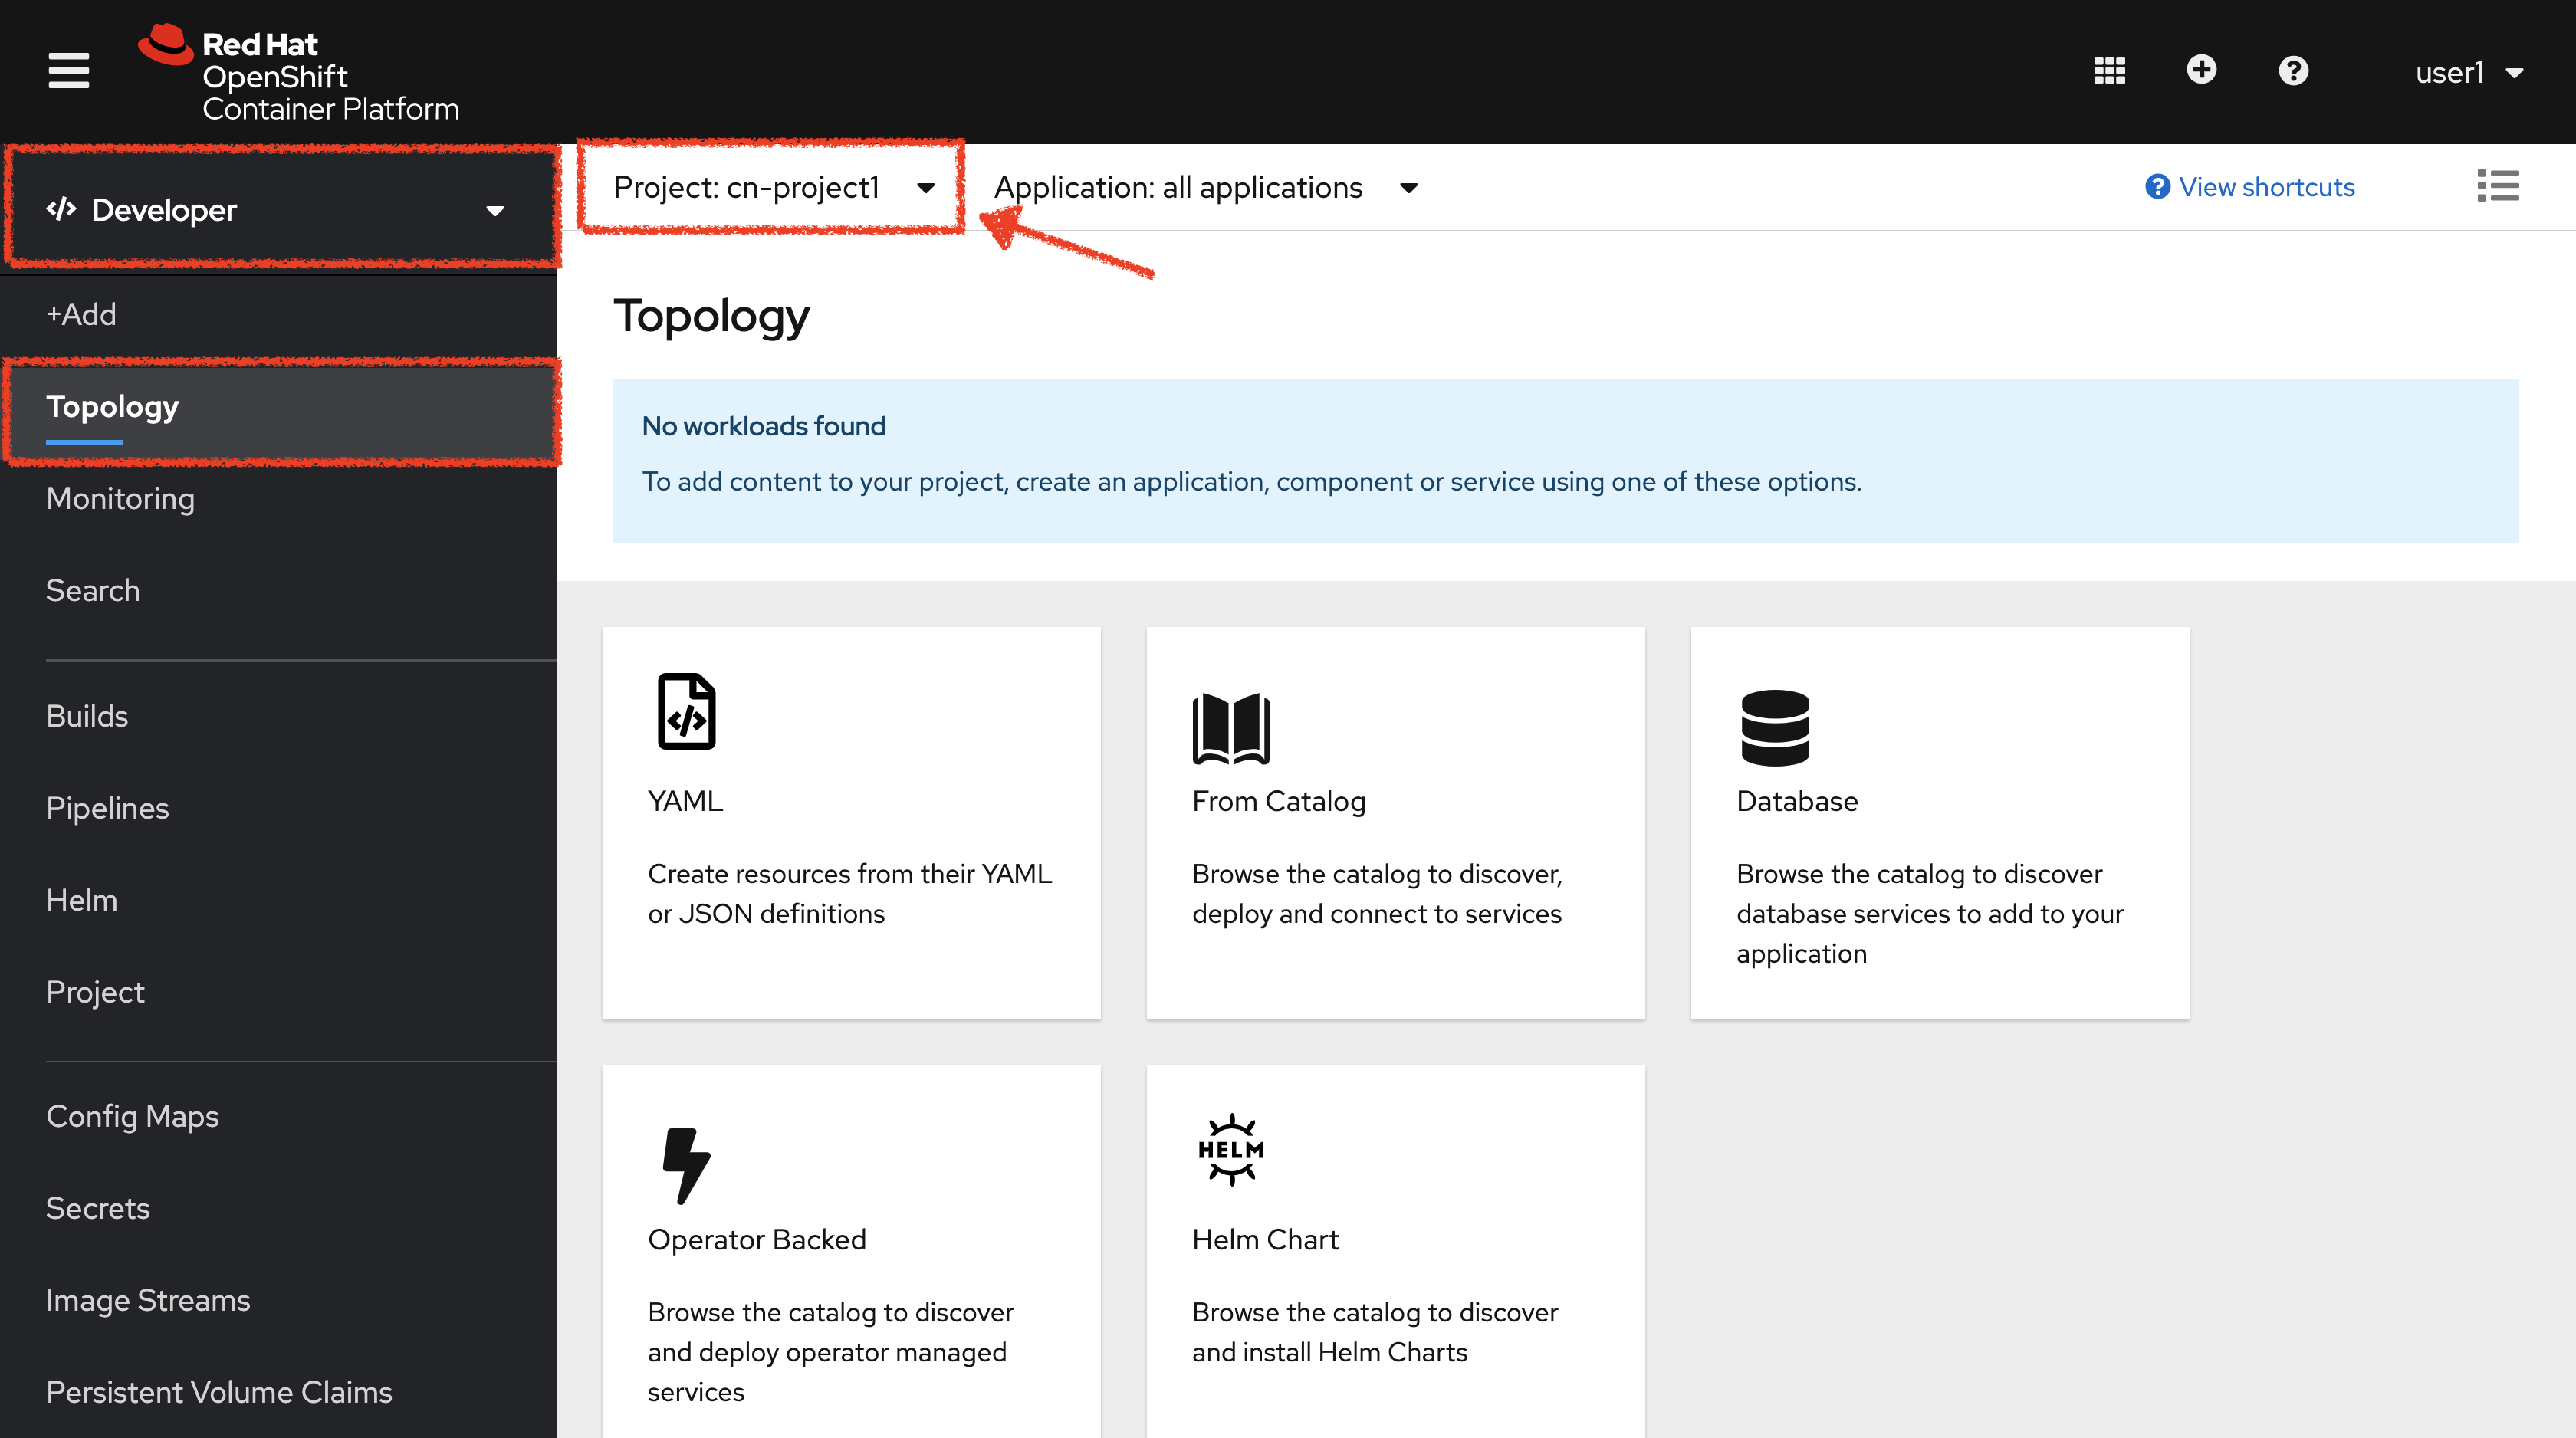
First, let’s switch your OpenShift Console to your Staging Environement i.e 'cn-project%USER_ID%'.
In the OpenShift Web Console, from the Developer view,
click on 'Topology' then select your 'cn-project%USER_ID%'.
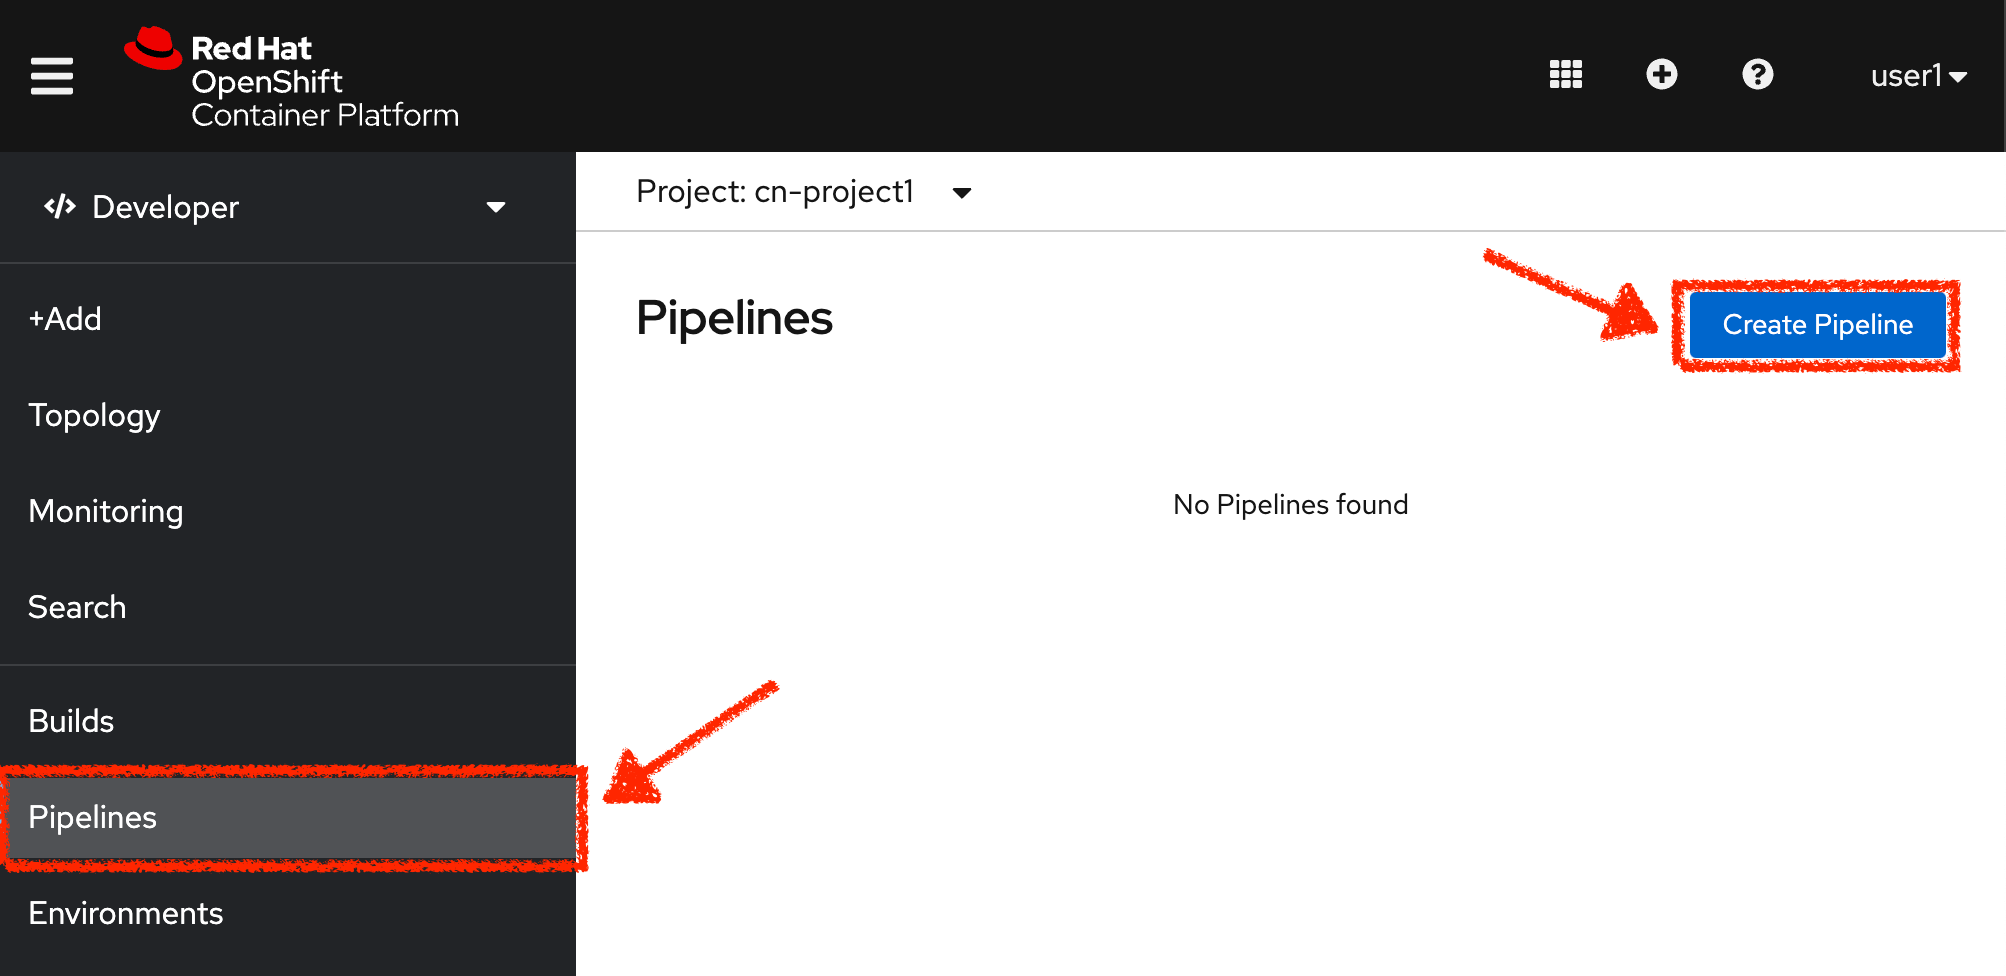
Create a Pipeline
A Pipeline defines a number of Task that should be executed and how they interact with each other via Workspace. Let’s define and configure these different components.
In the OpenShift Web Console, from the Developer view,
click on 'Pipelines' → 'Create Pipeline'.
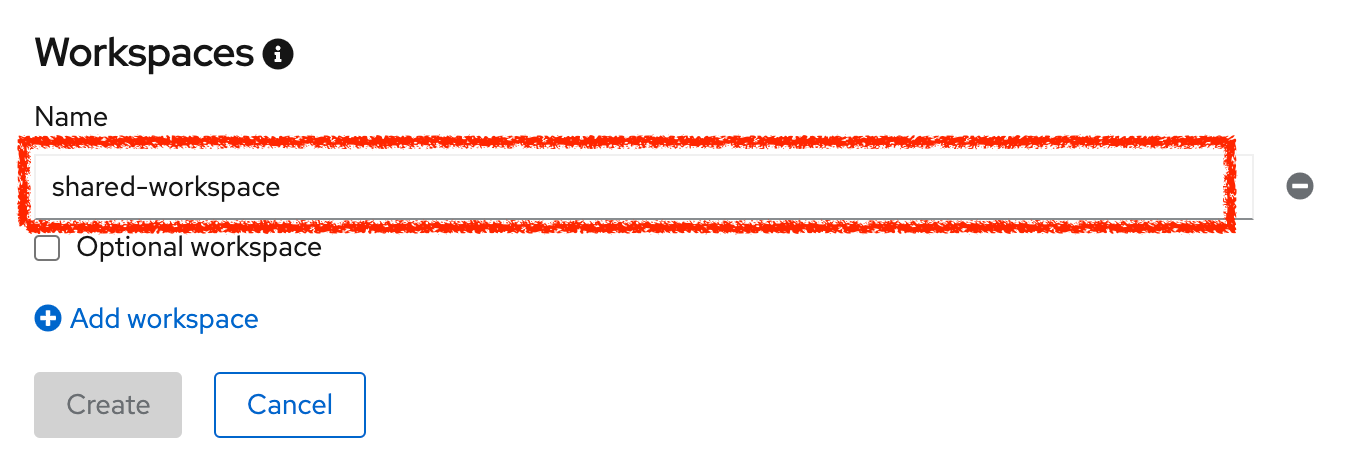
In the "Pipeline Builder" page, specify 'inventory-pipeline' as Name

Scroll down to the 'Workspaces' section and define a Workspace called 'shared-workspace'
Scroll up to the 'Tasks' section then click Add task.
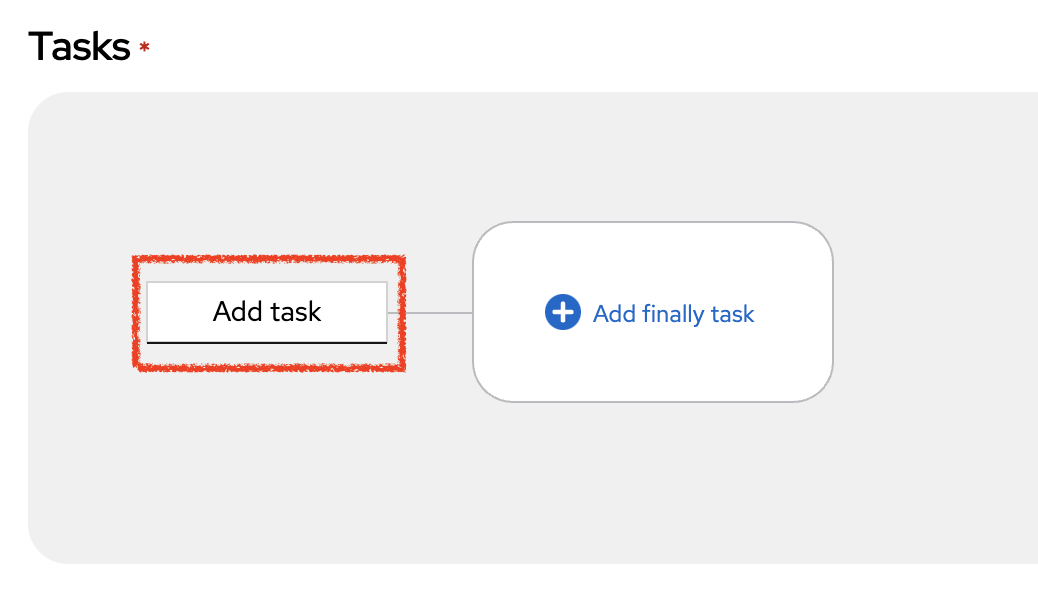
Start typing 'git-' next to the (+) and select 'git-clone'.
There are several options to choose from, look out for the Red Hat one. Then hit Add.
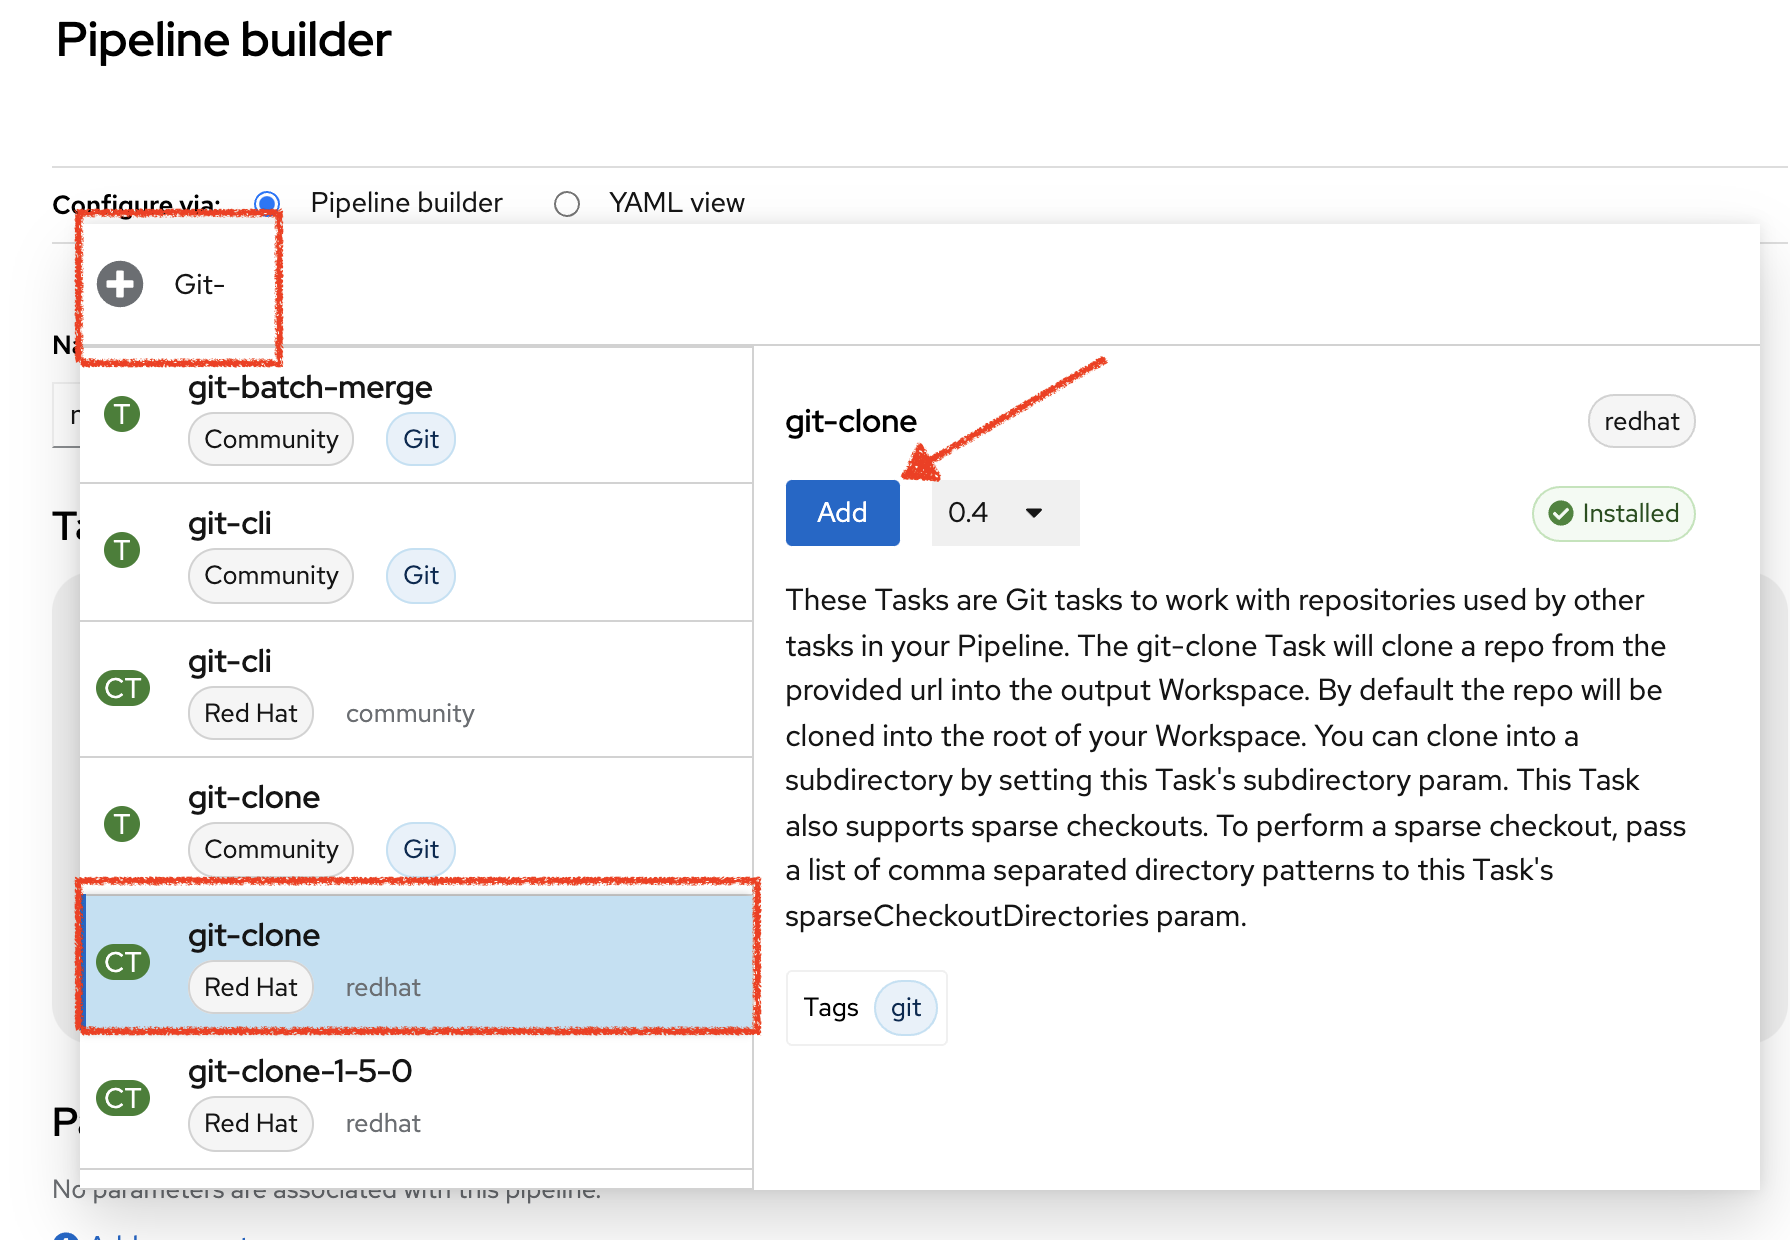
Click on the newly created 'git-clone' task and enter the following configuration:
| Parameter | Value |
|---|---|
Display Name |
git-clone |
url |
http://gitea-server.gitea.svc:3000/user%USER_ID%/inventory-quarkus.git |
Workspaces output |
shared-workspace |
Once done, let’s add another task. Click on the blue plus icon at the right hand side of the 'git-clone' task
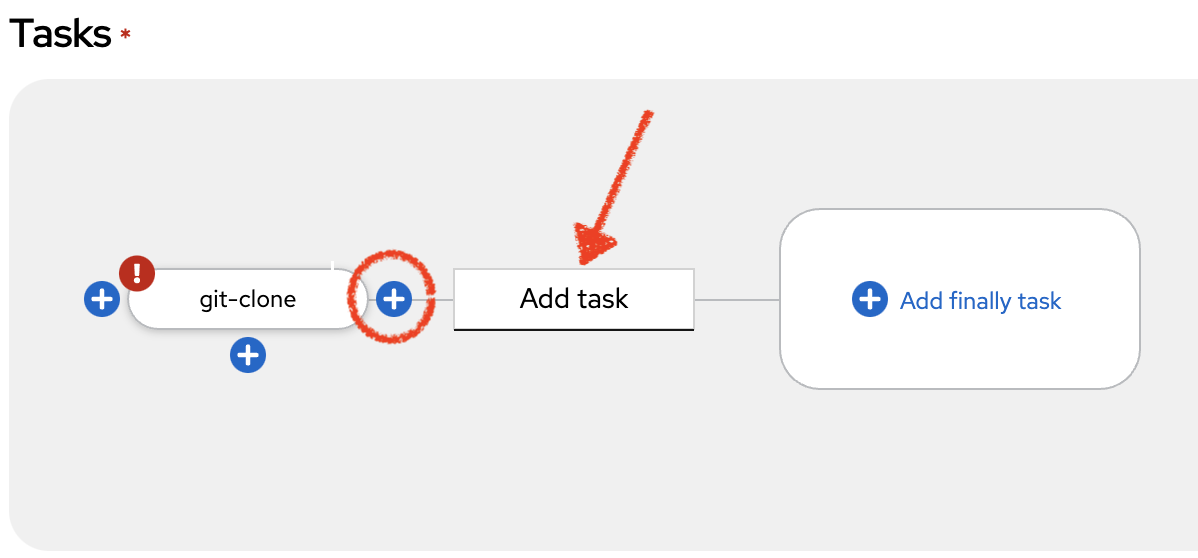
Then click on 'Add task' and as before next to the (+) type 's2i-java' When you see the Red Hat one select and add the 's2i-java' task
Click on the newly created 's2i-java' task and enter the following configuration:
| Parameter | Value |
|---|---|
Display Name |
s2i-java |
TLSVERIFY |
false |
MAVEN_MIRROR_URL |
http://nexus.opentlc-shared.svc:8081/repository/maven-all-public |
Image* |
image-registry.openshift-image-registry.svc:5000/cn-project%USER_ID%/inventory-coolstore |
Workspaces source |
shared-workspace |
Once done, click on 'Create'. Your simple Pipeline is now created.
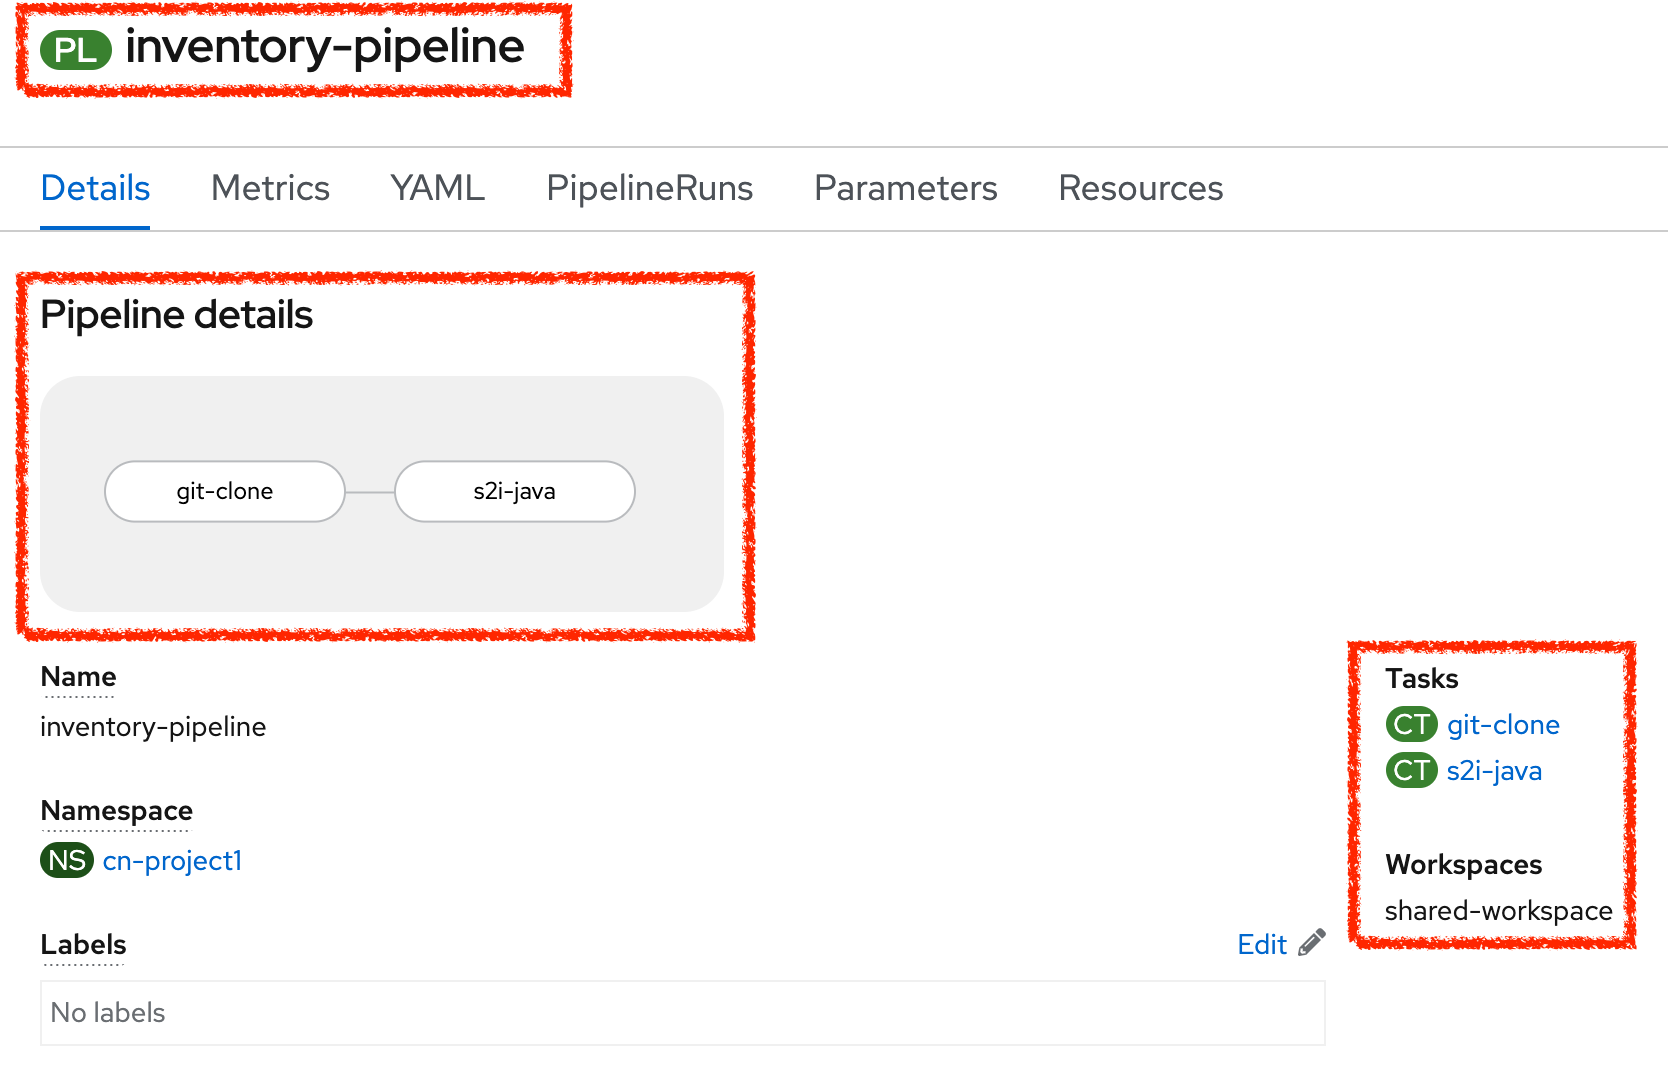
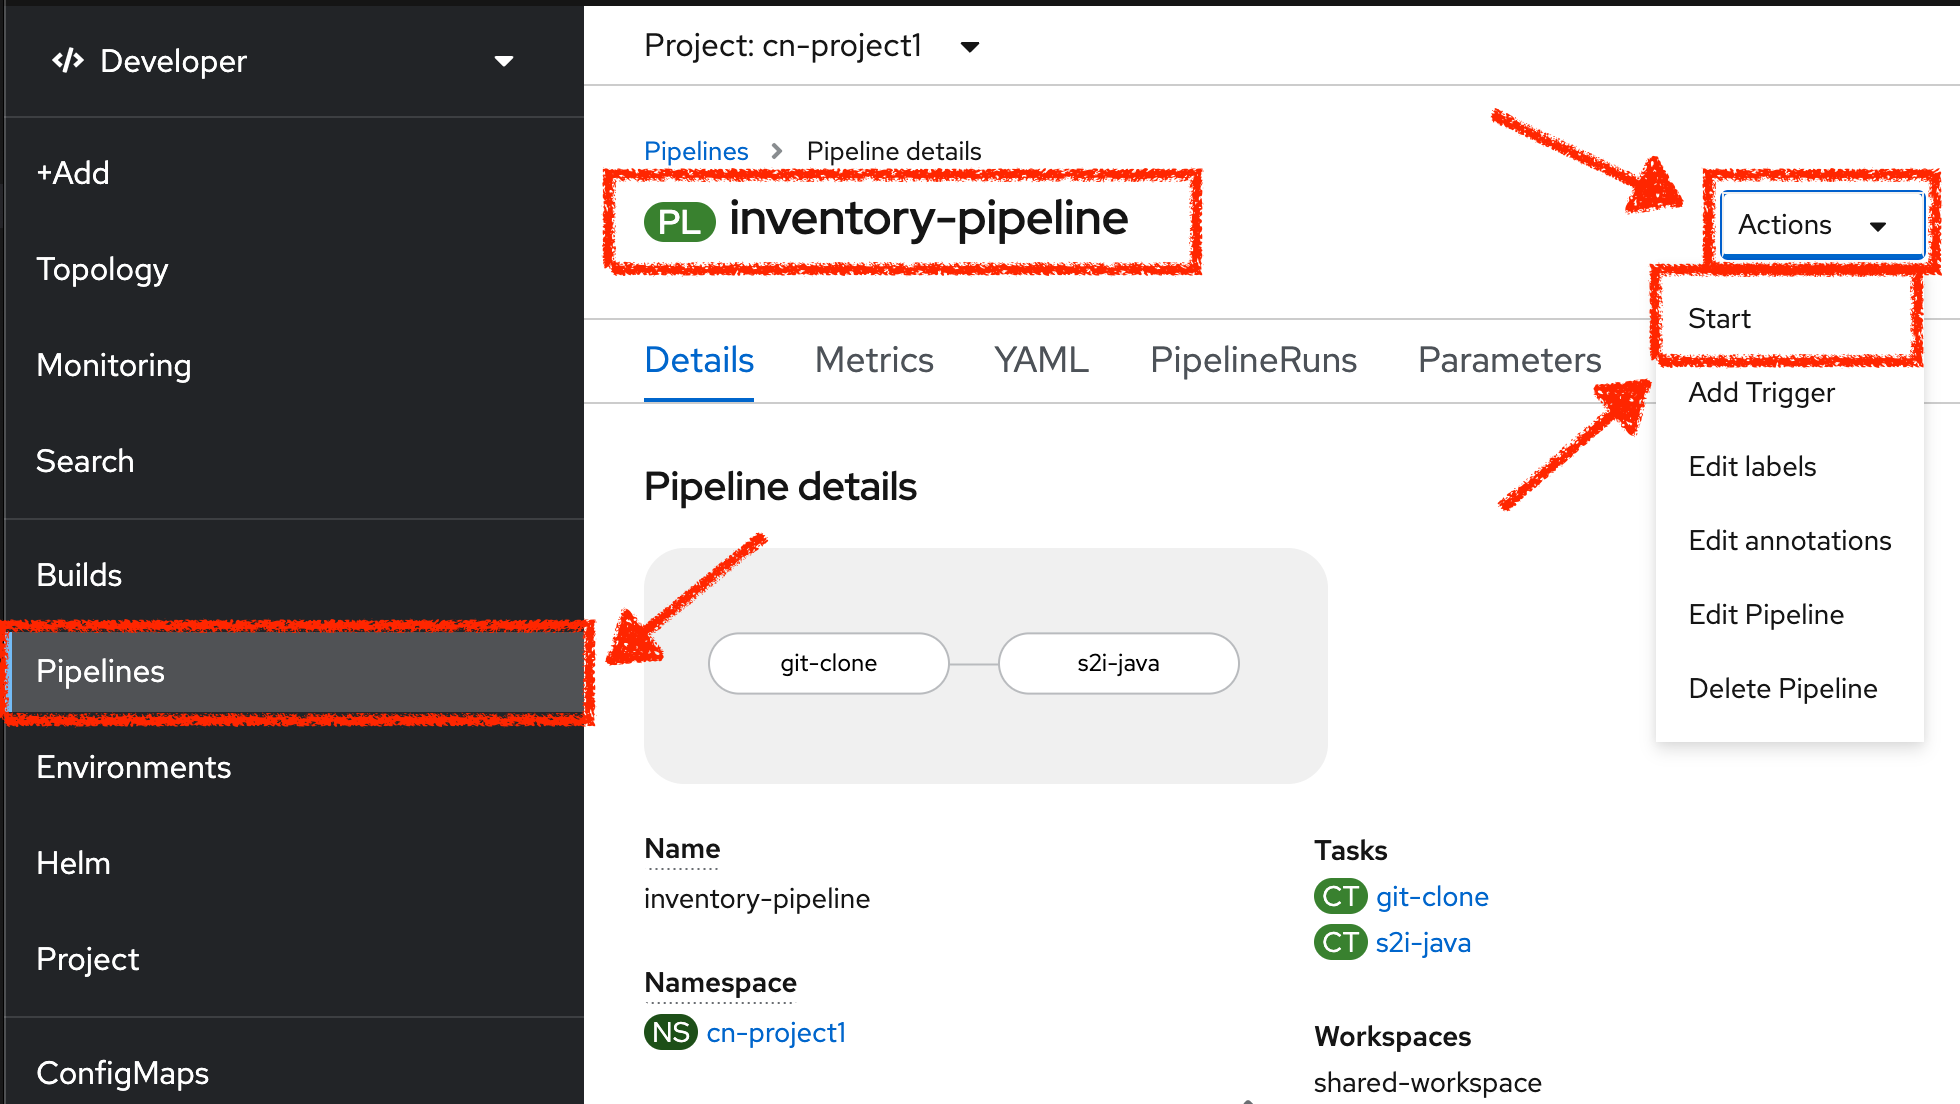
Run the Pipeline
Now that your pipeline is created and configured, let’s run it.
In the OpenShift Web Console, from the Developer view,
click on 'Pipelines' → 'PL inventory-pipeline' → 'Actions' → 'Start'
Enter the following parameters then click on 'Start'
| Name | Value |
|---|---|
shared-workspace |
VolumeClaimTemplate |
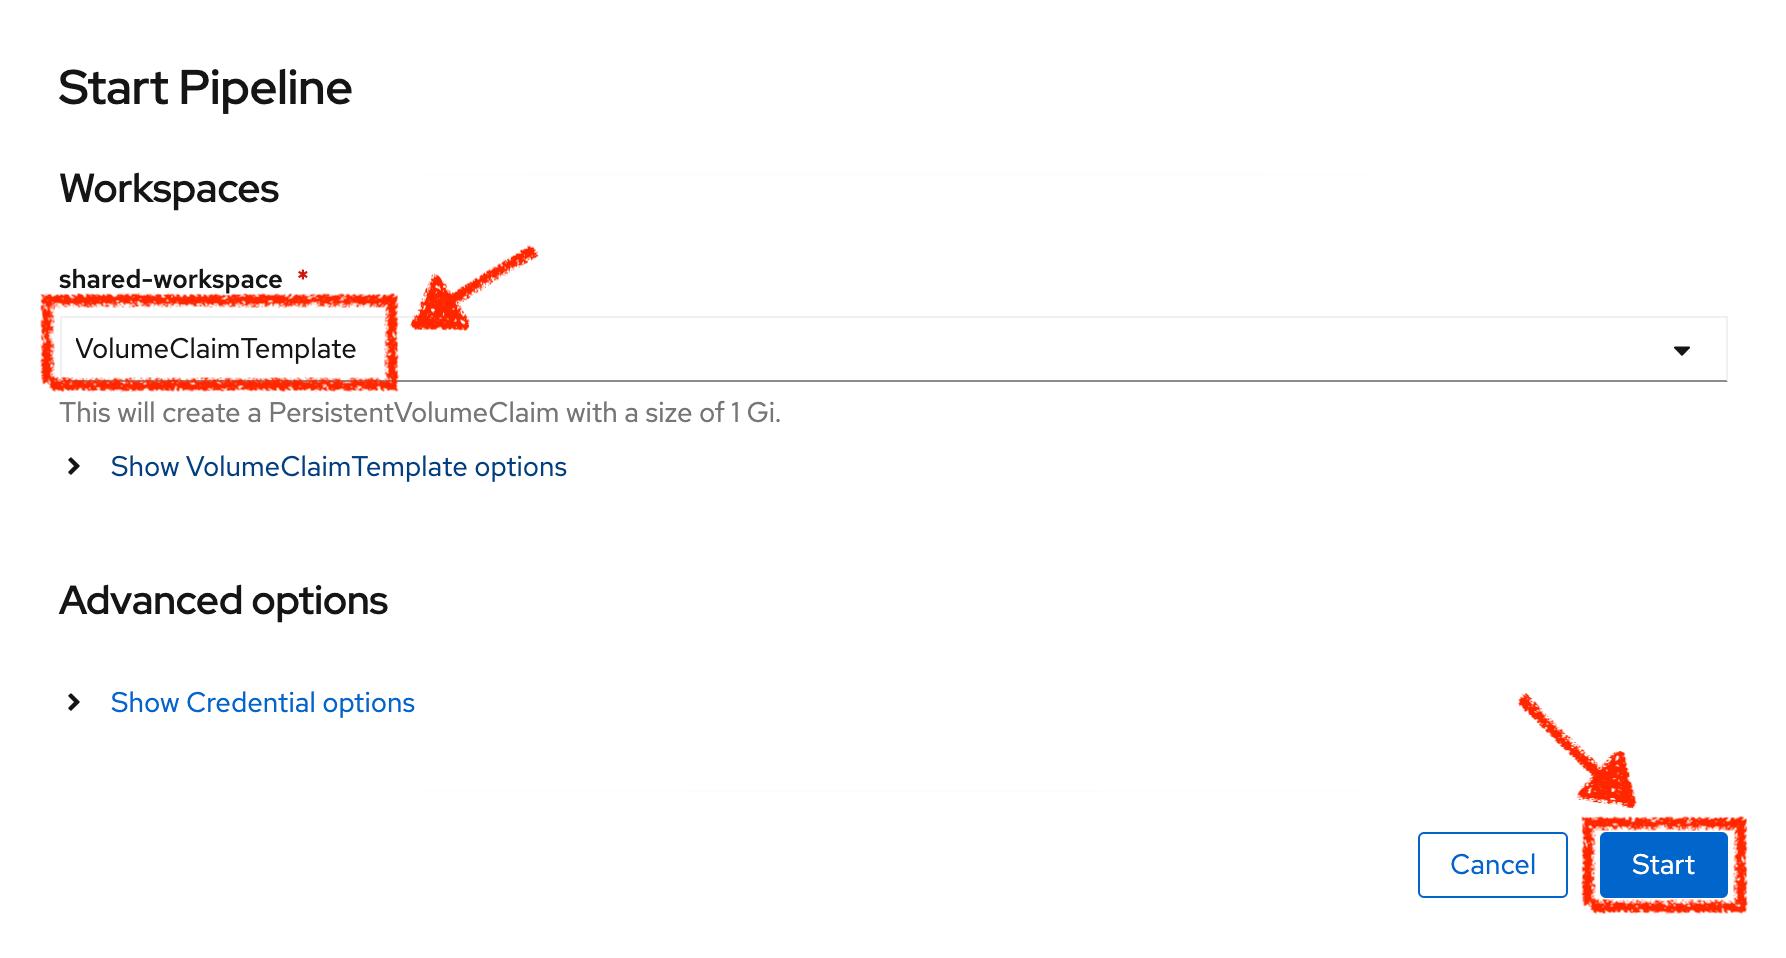
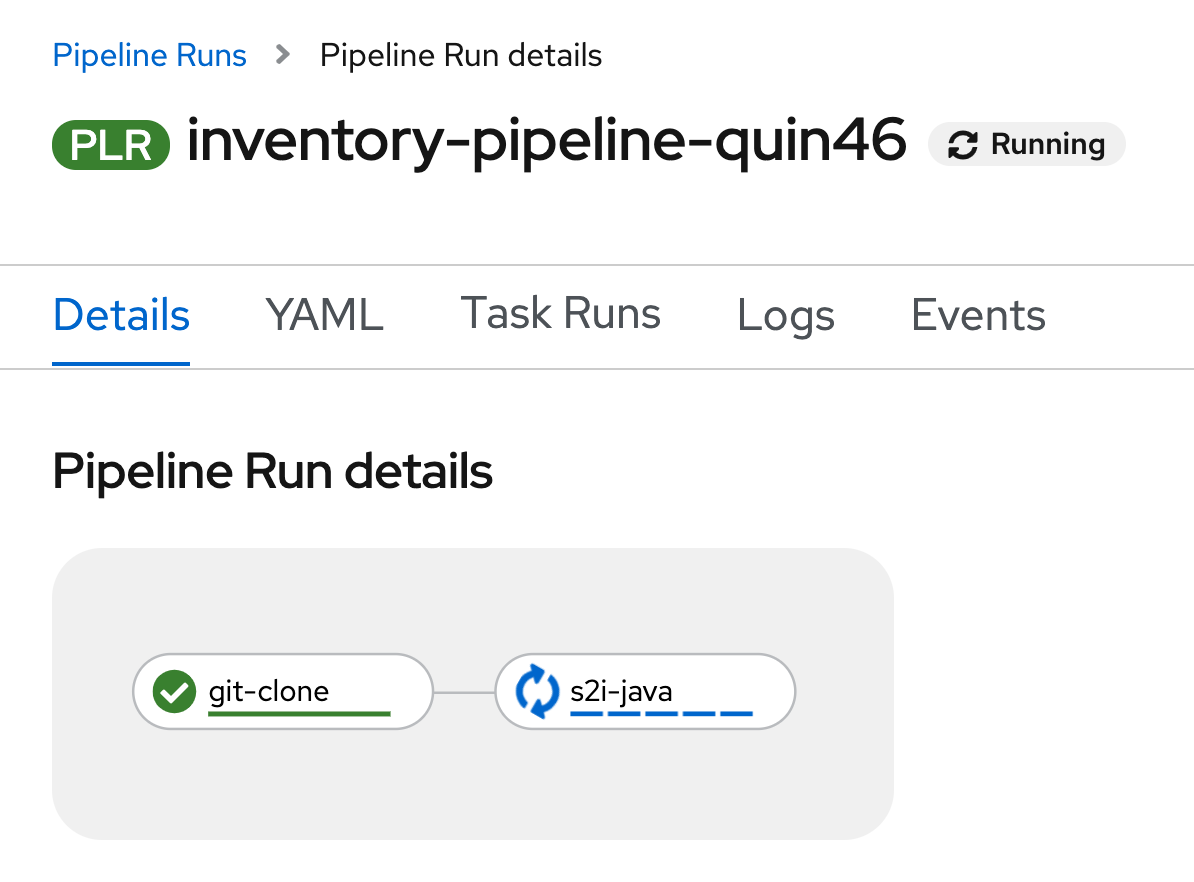
Congratulations!! You have created and run your first CI Pipeline on OpenShift!!
Well done! You are ready for the next lab.