Continuous Integration and Pipelines
In this lab you will learn about pipelines and how to configure a pipeline in OpenShift so that it will take care of the application lifecycle.
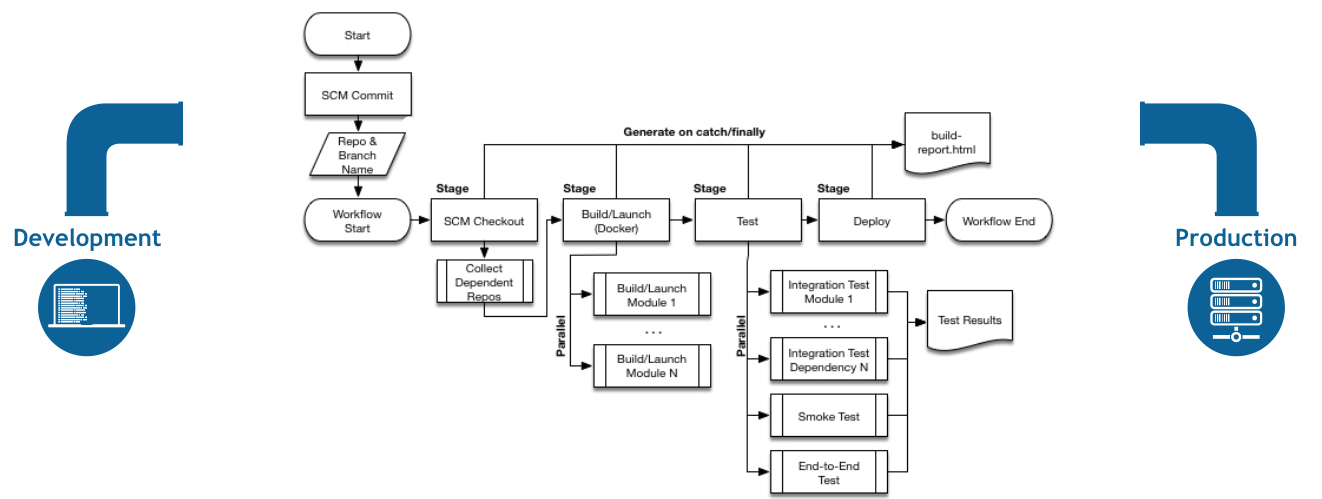
A continuous delivery (CD) pipeline is an automated expression of your process for getting software from version control right through to your users and customers. Every change to your software (committed in source control) goes through a complex process on its way to being released. This process involves building the software in a reliable and repeatable manner, as well as progressing the built software (called a "build") through multiple stages of testing and deployment.
OpenShift Pipelines is a cloud-native, continuous integration and delivery (CI/CD) solution for building pipelines using Tekton. Tekton is a flexible, Kubernetes-native, open-source CI/CD framework that enables automating deployments across multiple platforms (Kubernetes, serverless, VMs, etc) by abstracting away the underlying details.
Understanding Tekton
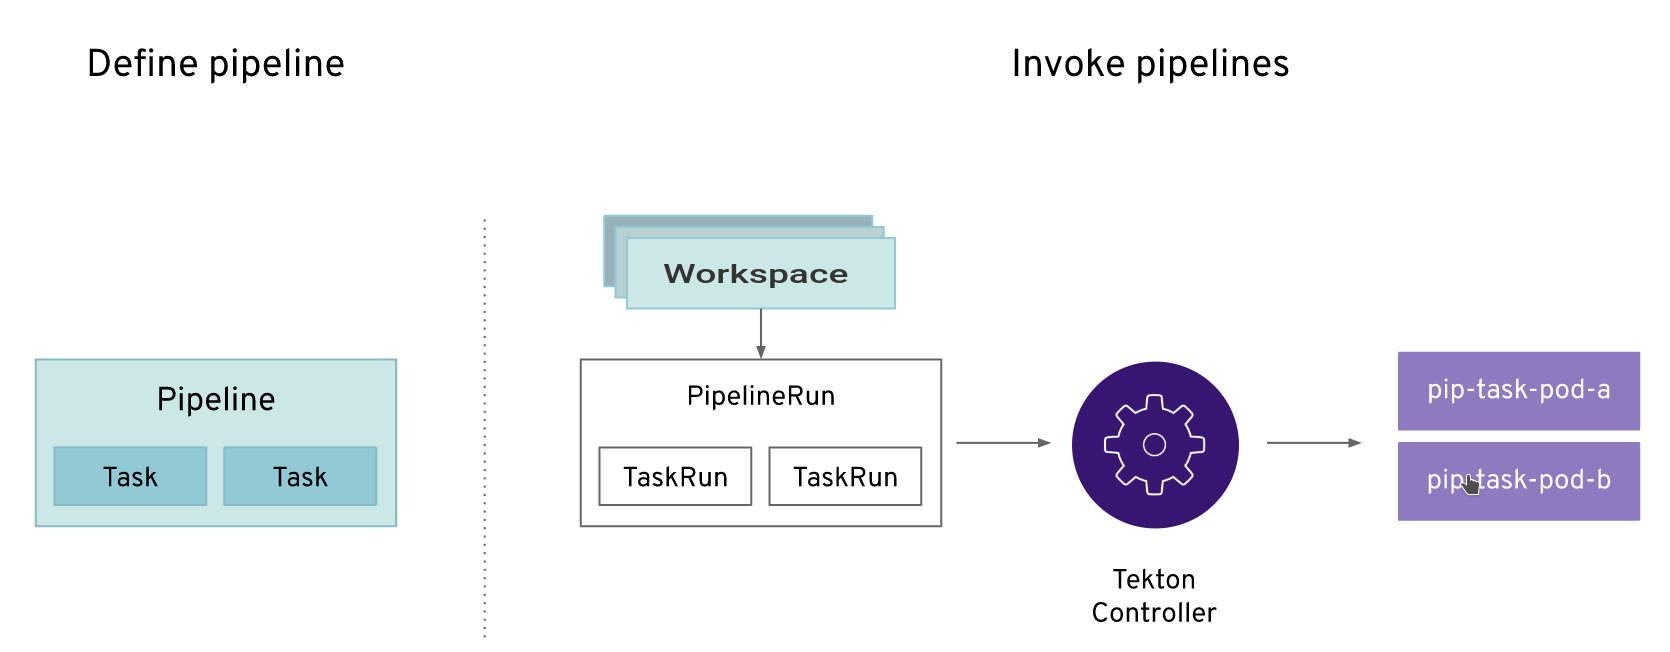
Tekton defines a number of Kubernetes custom resources as building blocks in order to standardize pipeline concepts and provide a terminology that is consistent across CI/CD solutions.
The custom resources needed to define a pipeline are listed below:
-
Task: a reusable, loosely coupled number of steps that perform a specific task (e.g. building a container image) -
Pipeline: the definition of the pipeline and theTasksthat it should perform -
TaskRun: the execution and result of running an instance of task -
PipelineRun: the execution and result of running an instance of pipeline, which includes a number ofTaskRuns
In short, in order to create a pipeline, one does the following:
-
Create custom or install existing reusable
Tasks -
Create a
PipelineandPipelineResourcesto define your application’s delivery pipeline -
Create a
PersistentVolumeClaimto provide the volume/filesystem for pipeline execution or provide aVolumeClaimTemplatewhich creates aPersistentVolumeClaim -
Create a
PipelineRunto instantiate and invoke the pipeline
For further details on pipeline concepts, refer to the Tekton documentation that provides an excellent guide for understanding various parameters and attributes available for defining pipelines.
Explore your Pipeline
As pipelines provide the ability to promote applications between different stages of the delivery cycle, Tekton, which is our Continuous Integration server that will execute our pipelines, will be deployed on a project with a Continuous Integration role. Pipelines executed in this project will have permissions to interact with all the projects modeling the different stages of our delivery cycle.
For this example, we’re going to deploy our pipeline that we created automatically from Developer Console together with nationalparks backend.
Verify Tasks already available in the OpenShift cluster (ClusterTasks):
oc get clustertasks -n {{project_namespace}}You should see something similar:
NAME                 AGE
....
s2i-nodejs-12               4h58m
s2i-nodejs-12-pr            4h58m
....
Verify the Pipeline we created:
oc get pipelines -n {{project_namespace}}You should see something like this:
NAME                     AGE
nationalparks   5m
Now let’s review our Tekton Pipeline:
---
apiVersion: tekton.dev/v1beta1
kind: Pipeline
metadata:
  name: nationalparks
spec:
  params:
    - default: nationalparks
      name: APP_NAME
      type: string
    - default: >-
        https://github.com/openshift-roadshow/nationalparks-js.git
      name: GIT_REPO
      type: string
    - default: master
      name: GIT_REVISION
      type: string
    - default: 'image-registry.openshift-image-registry.svc:5000/user1/nationalparks'
      name: IMAGE_NAME
      type: string
    - default: .
      name: PATH_CONTEXT
      type: string
    - default: '1'
      name: MINOR_VERSION
      type: string
  tasks:
    - name: fetch-repository
      params:
        - name: url
          value: $(params.GIT_REPO)
        - name: revision
          value: $(params.GIT_REVISION)
        - name: subdirectory
          value: ''
        - name: deleteExisting
          value: 'true'
      taskRef:
        kind: ClusterTask
        name: git-clone
      workspaces:
        - name: output
          workspace: workspace
    - name: build
      params:
        - name: IMAGE
          value: $(params.IMAGE_NAME)
        - name: TLSVERIFY
          value: 'false'
        - name: PATH_CONTEXT
          value: $(params.PATH_CONTEXT)
        - name: MINOR_VERSION
          value: $(params.MINOR_VERSION)
      runAfter:
        - fetch-repository
      taskRef:
        kind: ClusterTask
        name: s2i-nodejs-12
      workspaces:
        - name: source
          workspace: workspace
    - name: deploy
      params:
        - name: SCRIPT
          value: kubectl $@
        - name: ARGS
          value:
            - rollout
            - status
            - deploy/$(params.APP_NAME)
      runAfter:
        - build
      taskRef:
        kind: ClusterTask
        name: openshift-client
  workspaces:
    - name: workspace
A Pipeline is a user-defined model of a CD pipeline. A Pipeline’s code defines your entire build process, which typically includes stages for building an application, testing it and then delivering it.
A Task and a ClusterTask contain some step to be executed. ClusterTasks are available to all user within a cluster where OpenShift Pipelines has been installed, while Tasks can be custom.
This pipeline has 3 Tasks defined:
-
fetch-repository: this is a
ClusterTaskthat will clone our source repository for nationalparks and store it to aWorkspaceapp-sourcewhich will use the PVC created for itapp-source-workspace -
build: will build and test our NodeJS application, generate and push a container image automatically with compiled binaries inside OpenShift Container Registry.
-
deploy: it will deploy the created image on OpenShift using the Deployment named
nationalparkswe created in the previous lab.
From left-side menu, click on Pipeline, then click on nationalparks to see the pipeline you just created.
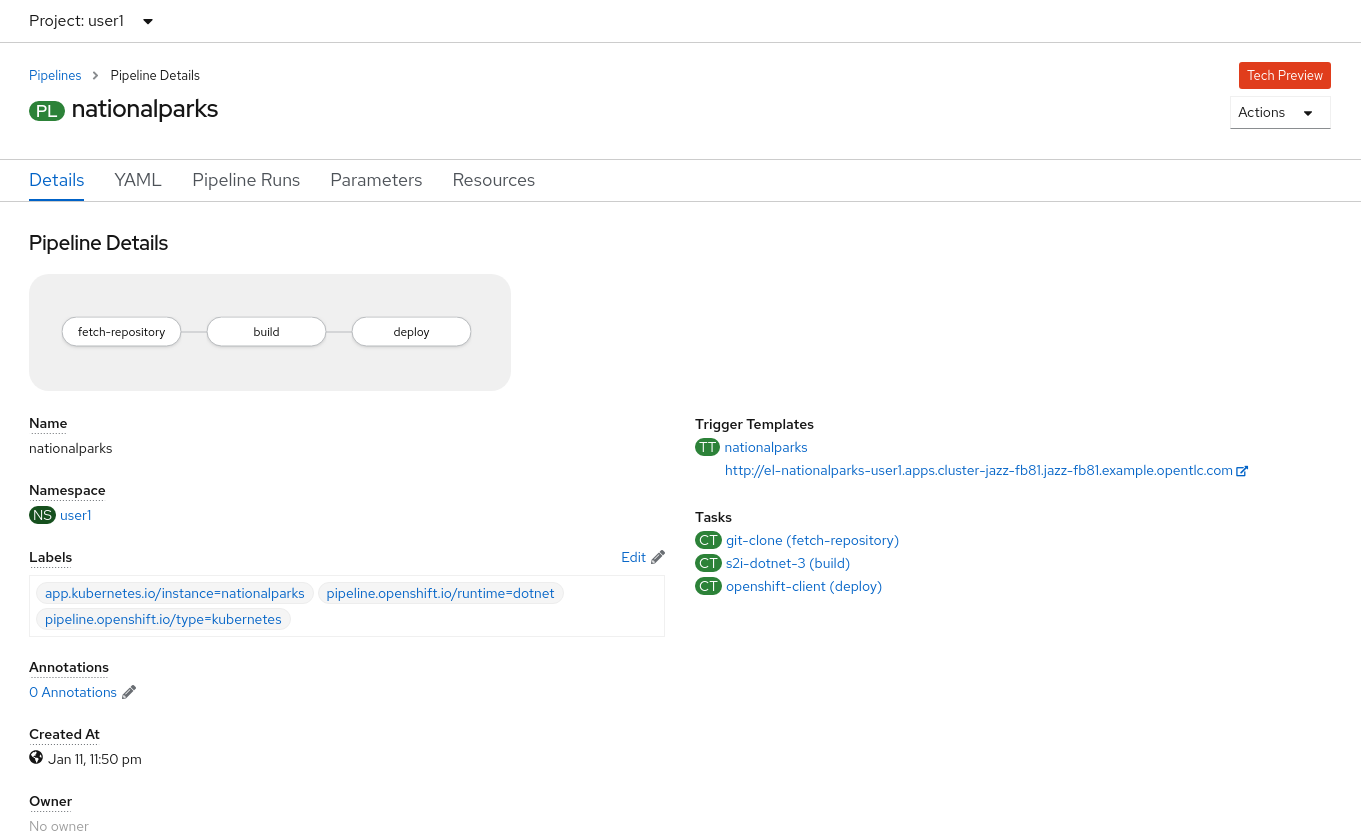
The Pipeline is parametric, with default value on the one we need to use.
It is using one Workspace:
-
app-source: this need to be linked to a PersistentVolumeClaim since will be used to store the code and the compiled binary to be used in different Tasks
Exercise: Add Storage for your Pipeline
OpenShift manages Storage with Persistent Volumes to be attached to Pods running our applications through Persistent Volume Claim requests, and it also provides the capability to manage it at ease from Web Console. From Administrator Perspective, go to Storage→ Persistent Volume Claims.
Go to top-right side and click Create Persistent Volume Claim button.
Inside Persistent Volume Claim name insert app-source-pvc.
In Size section, insert 1 as we are going to create 1 GiB Persistent Volume for our Pipeline, using RWO Single User access mode.
Leave all other default settings, and click Create.
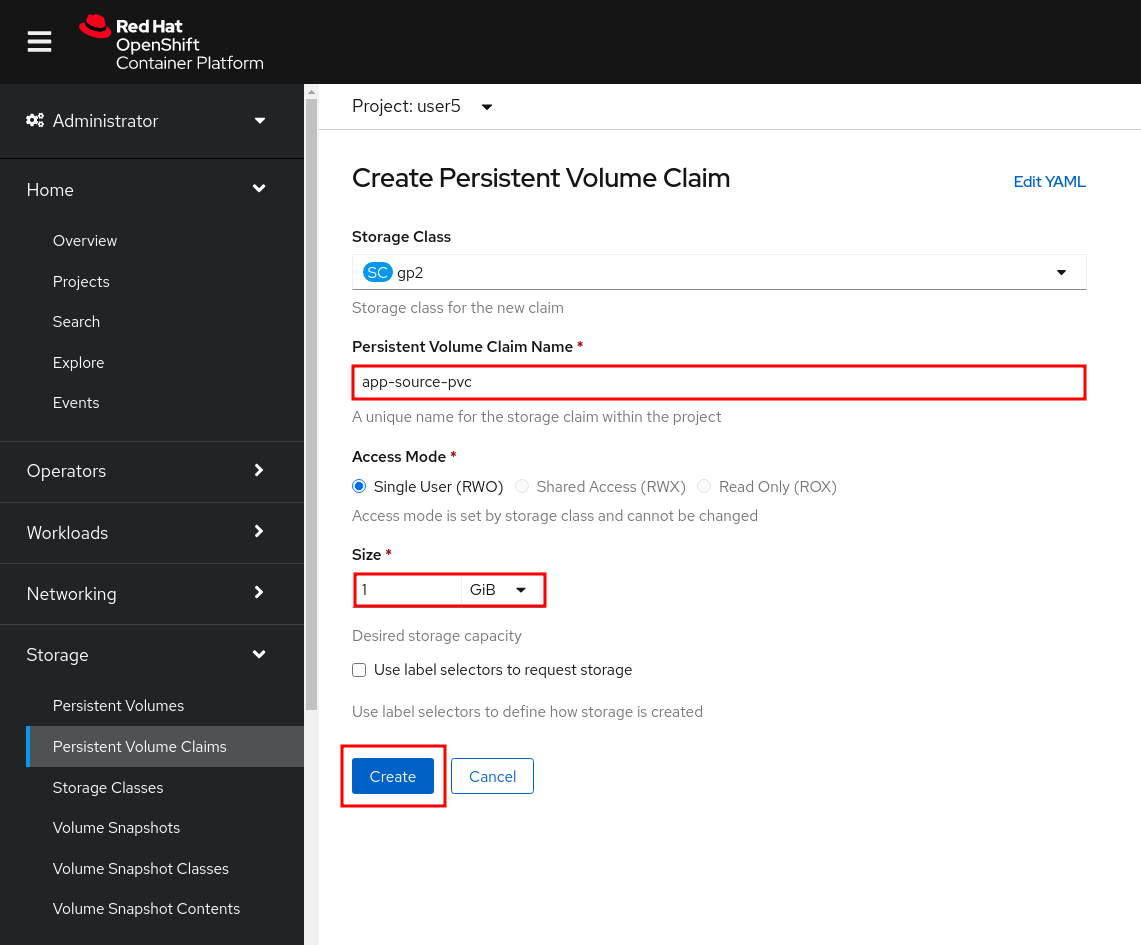
| The Storage Class is the type of storage available in the cluster. |
Run the Pipeline
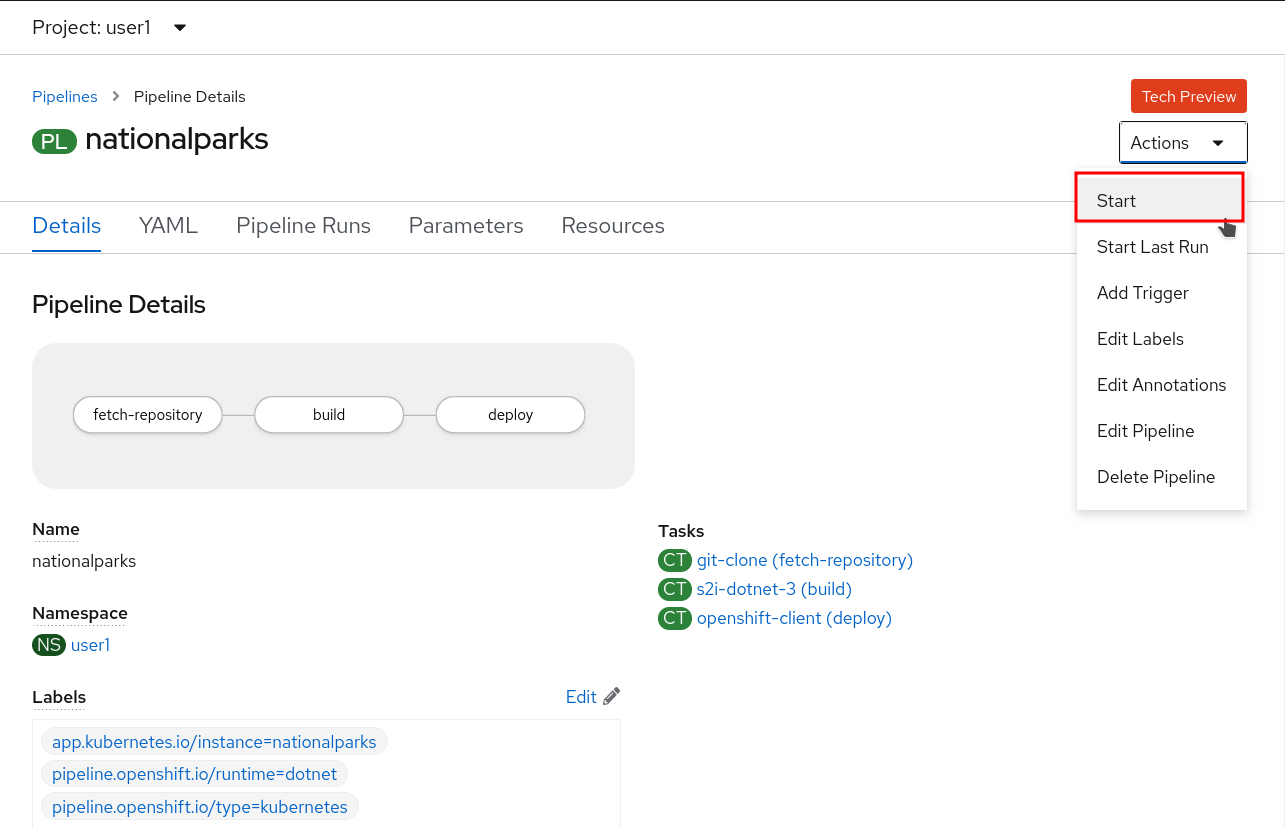
We can start now the Pipeline from the Web Console. Switch to Developer Perspective, and from left-side menu, click on Pipeline, then click on nationalparks. From top-right Actions list, click on Start.
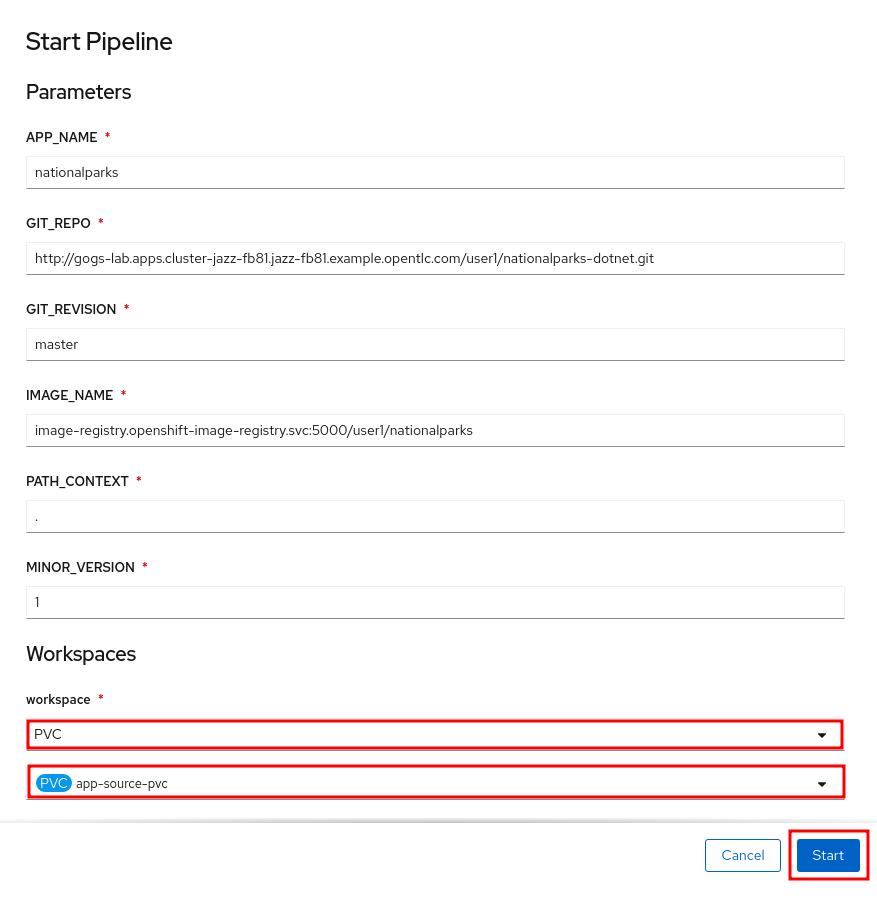
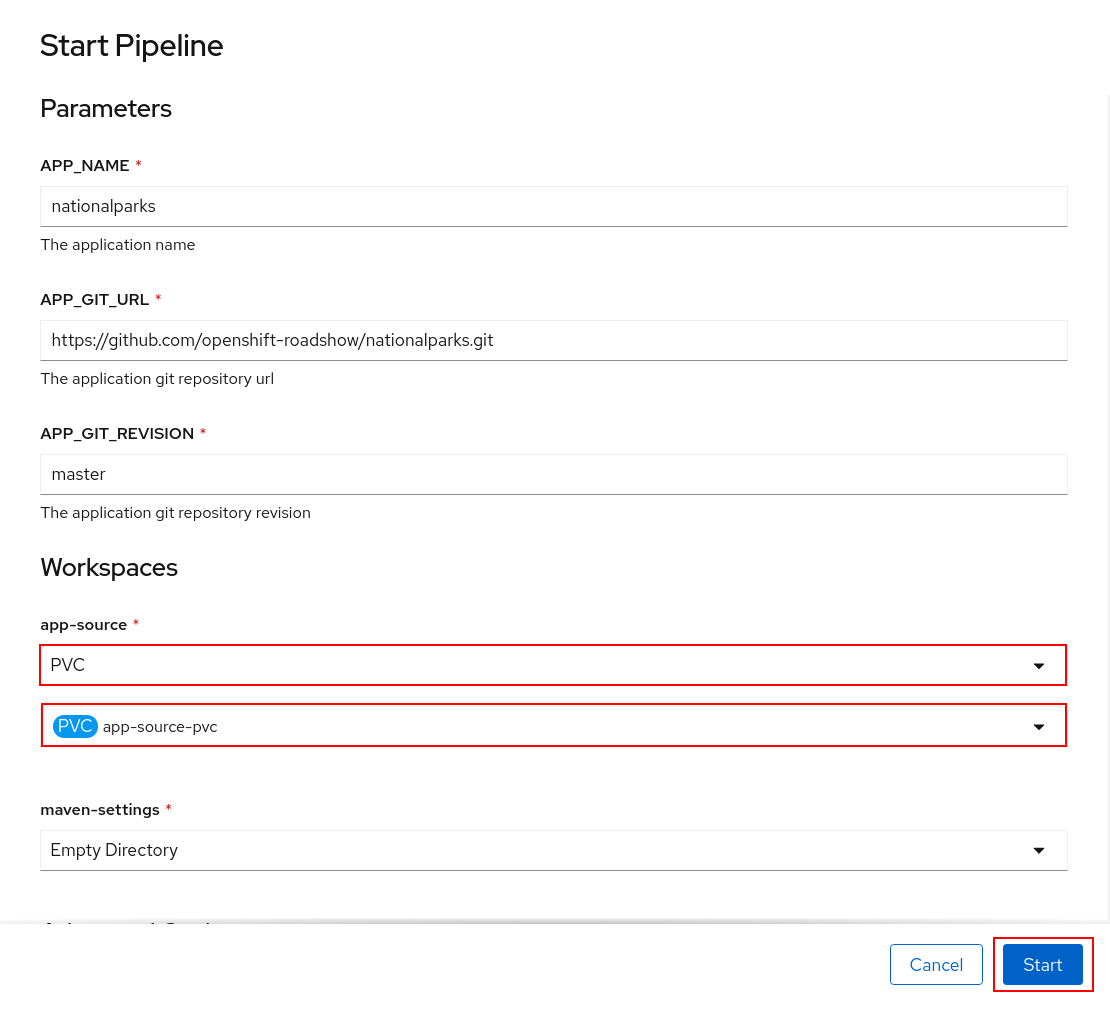
You will be prompted with parameters to add the Pipeline, showing default ones.
In Workspaces→ app-source select PVC from the list, then select app-source-pvc. This is the shared volume used by Pipeline Tasks in your Pipeline containing the source code and compiled artifacts.
Click on Start to run your Pipeline.
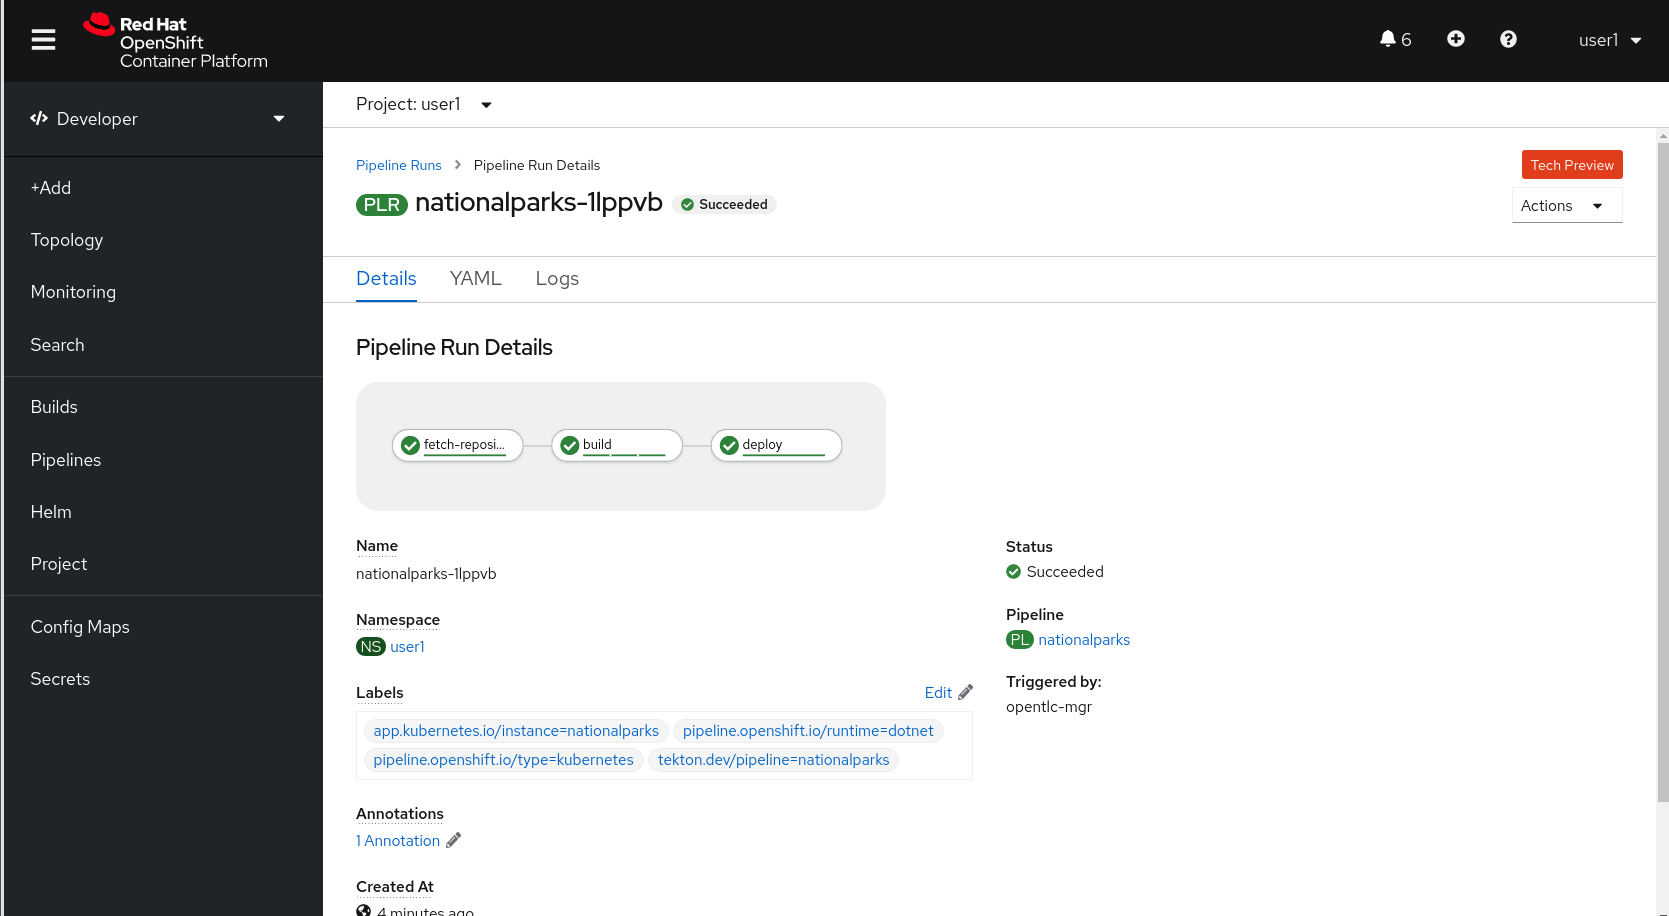
You can follow the Pipeline execution from Pipeline section, watching all the steps in rogress. Click on Pipeline Runs tab to see it running:
image::devops-pipeline-run-1.png[Pipeline runnin
In Workspaces→ app-source select PVC from the list, then select app-source-pvc. This is the share volume used by Pipeline Tasks in your Pipeline containing the source code and compiled artifacts.
Click on Start to run your Pipeline.
You can follow the Pipeline execution from Pipeline section, watching all the steps in g]
The click on the PipelineRun national-parks-deploy-run-:
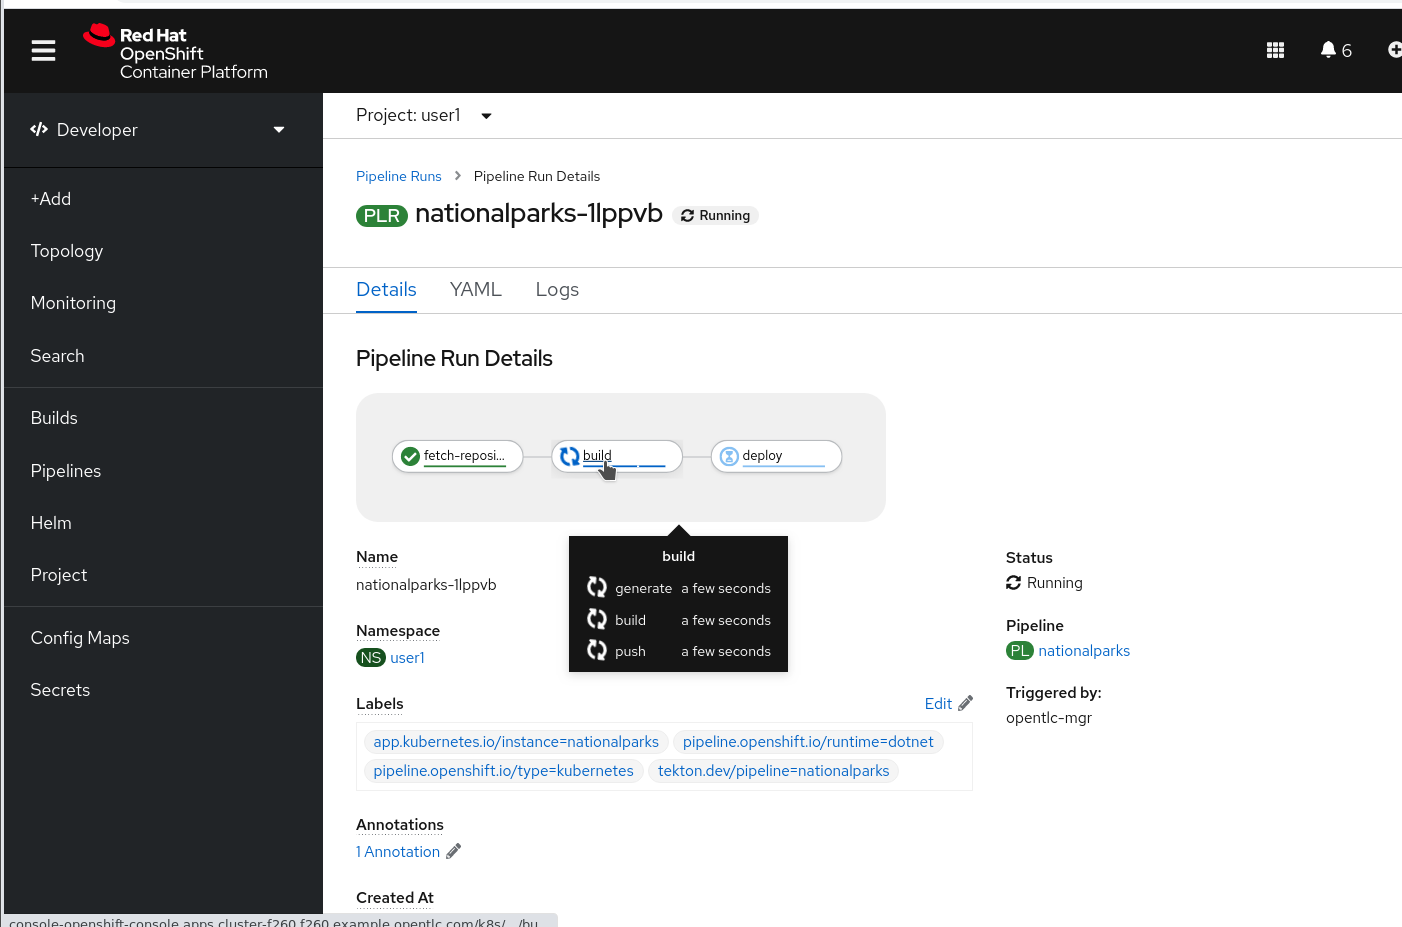
Then click on the Task running to check logs:
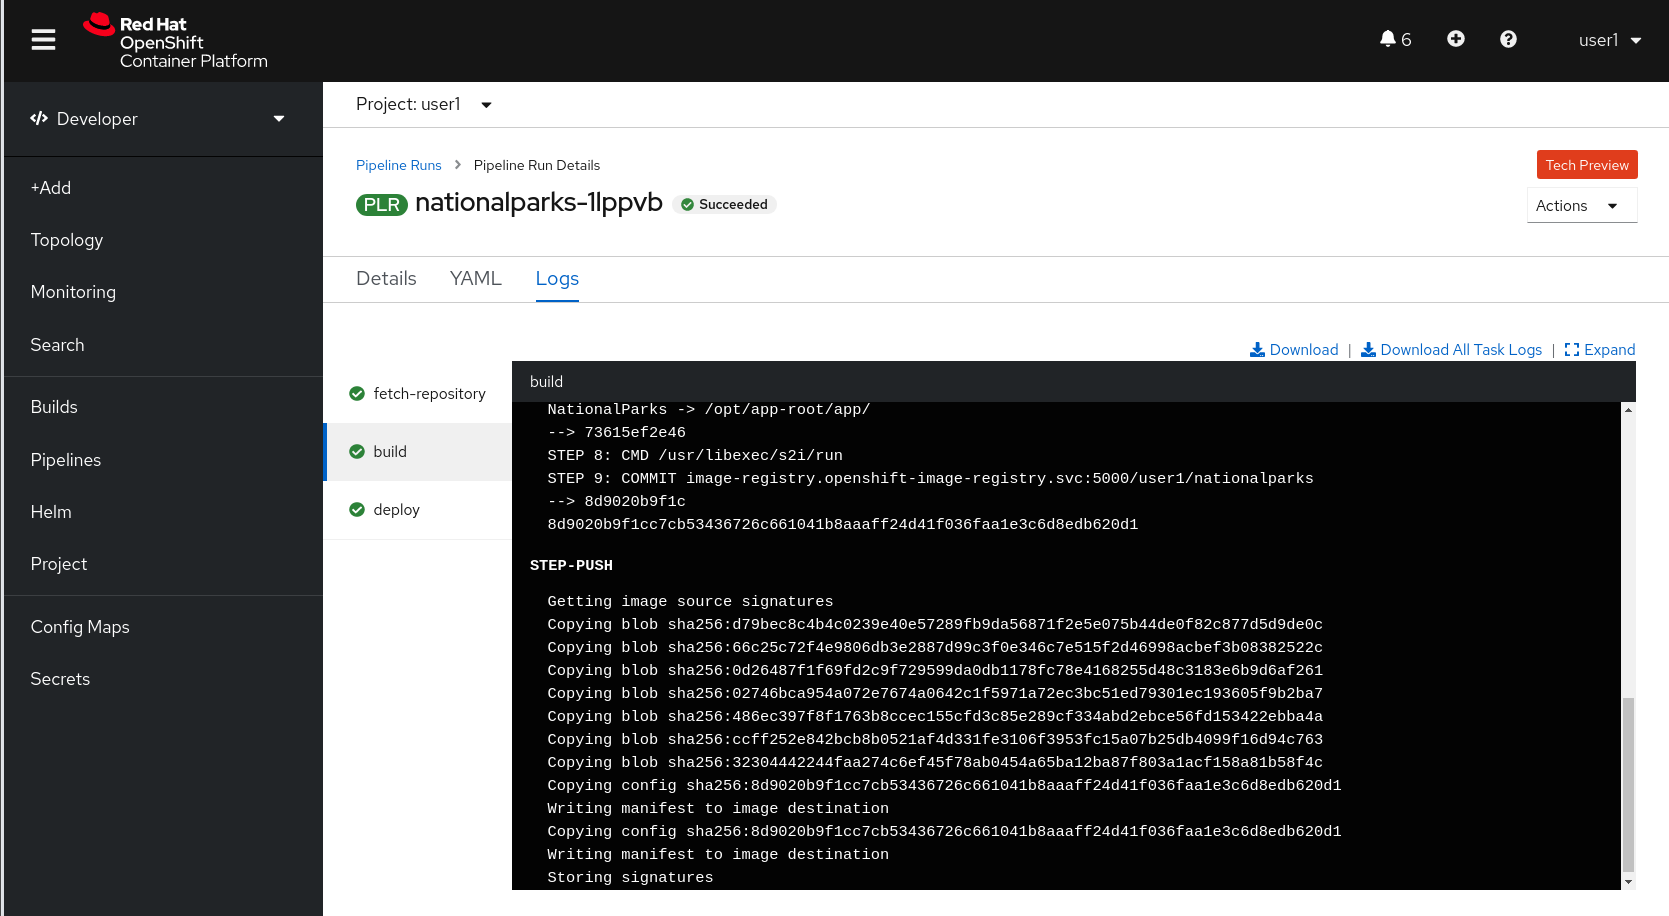
Verify PipelineRun has been completed with success: