Welcome to the Green Team Cluster
This cluster demonstrates how to:
-
Customise the tools incldued in the Web Terminal that you deployed in a prior section.
-
Use GitOps to automatically synchronise your customisations to the OpenShift cluster:
-
Console notification banners using the ConsoleNotification CRD.
-
YAML samples for CustomResources using the ConsoleYAMLSample CRD.
-
Custom links to using the ConsoleLink CRD. .
-
-
Using a ServiceMonitor CR to collect custom application metrics.
Pre-Applied Customisations
Your Green Team cluster already has a fun customisation pre-applied.
Try it out:
-
Login to your OpenShift Web Console using the credentials supplied by your workshop administrator.
-
Expand the Application Launcher* menu (the 3x3 sqaure icon) in the top-right of the OpenShift console.
|
These customizations can be applied to any cluster where you have cluster-admin access: |
Notice that there’s a Cluster Argo CD link in the launcher. This is an example of a customisation that has been pre-applied to your cluster.
To see another example of a customisation, logout of the cluster by clicking your username in the top-right corner and clicking the Log out link!
Customise the Web Terminal
Customising the Web Terminal tooling image enables you to provide your developers with specific versions of tools to use directly from the OpenShift Web Console.
The source code for the default tooling container image is available in the redhat-developer/web-terminal-tooling repository on GitHub.
In this guide you’ll customise the Web Terminal tooling container to use a pre-prepared container image.
Modify the Web Terminal Container Image
-
Login to your OpenShift cluster as a user that has the
cluster-adminrole.You posses the cluster-adminrole if you can view Projects starting with the openshift- prefix. An existing user with thecluster-adminrole can grant the same role to other users using theoc adm policy add-cluster-role-to-user cluster-admin <username>command. -
Select the Administrator view from the top left.
-
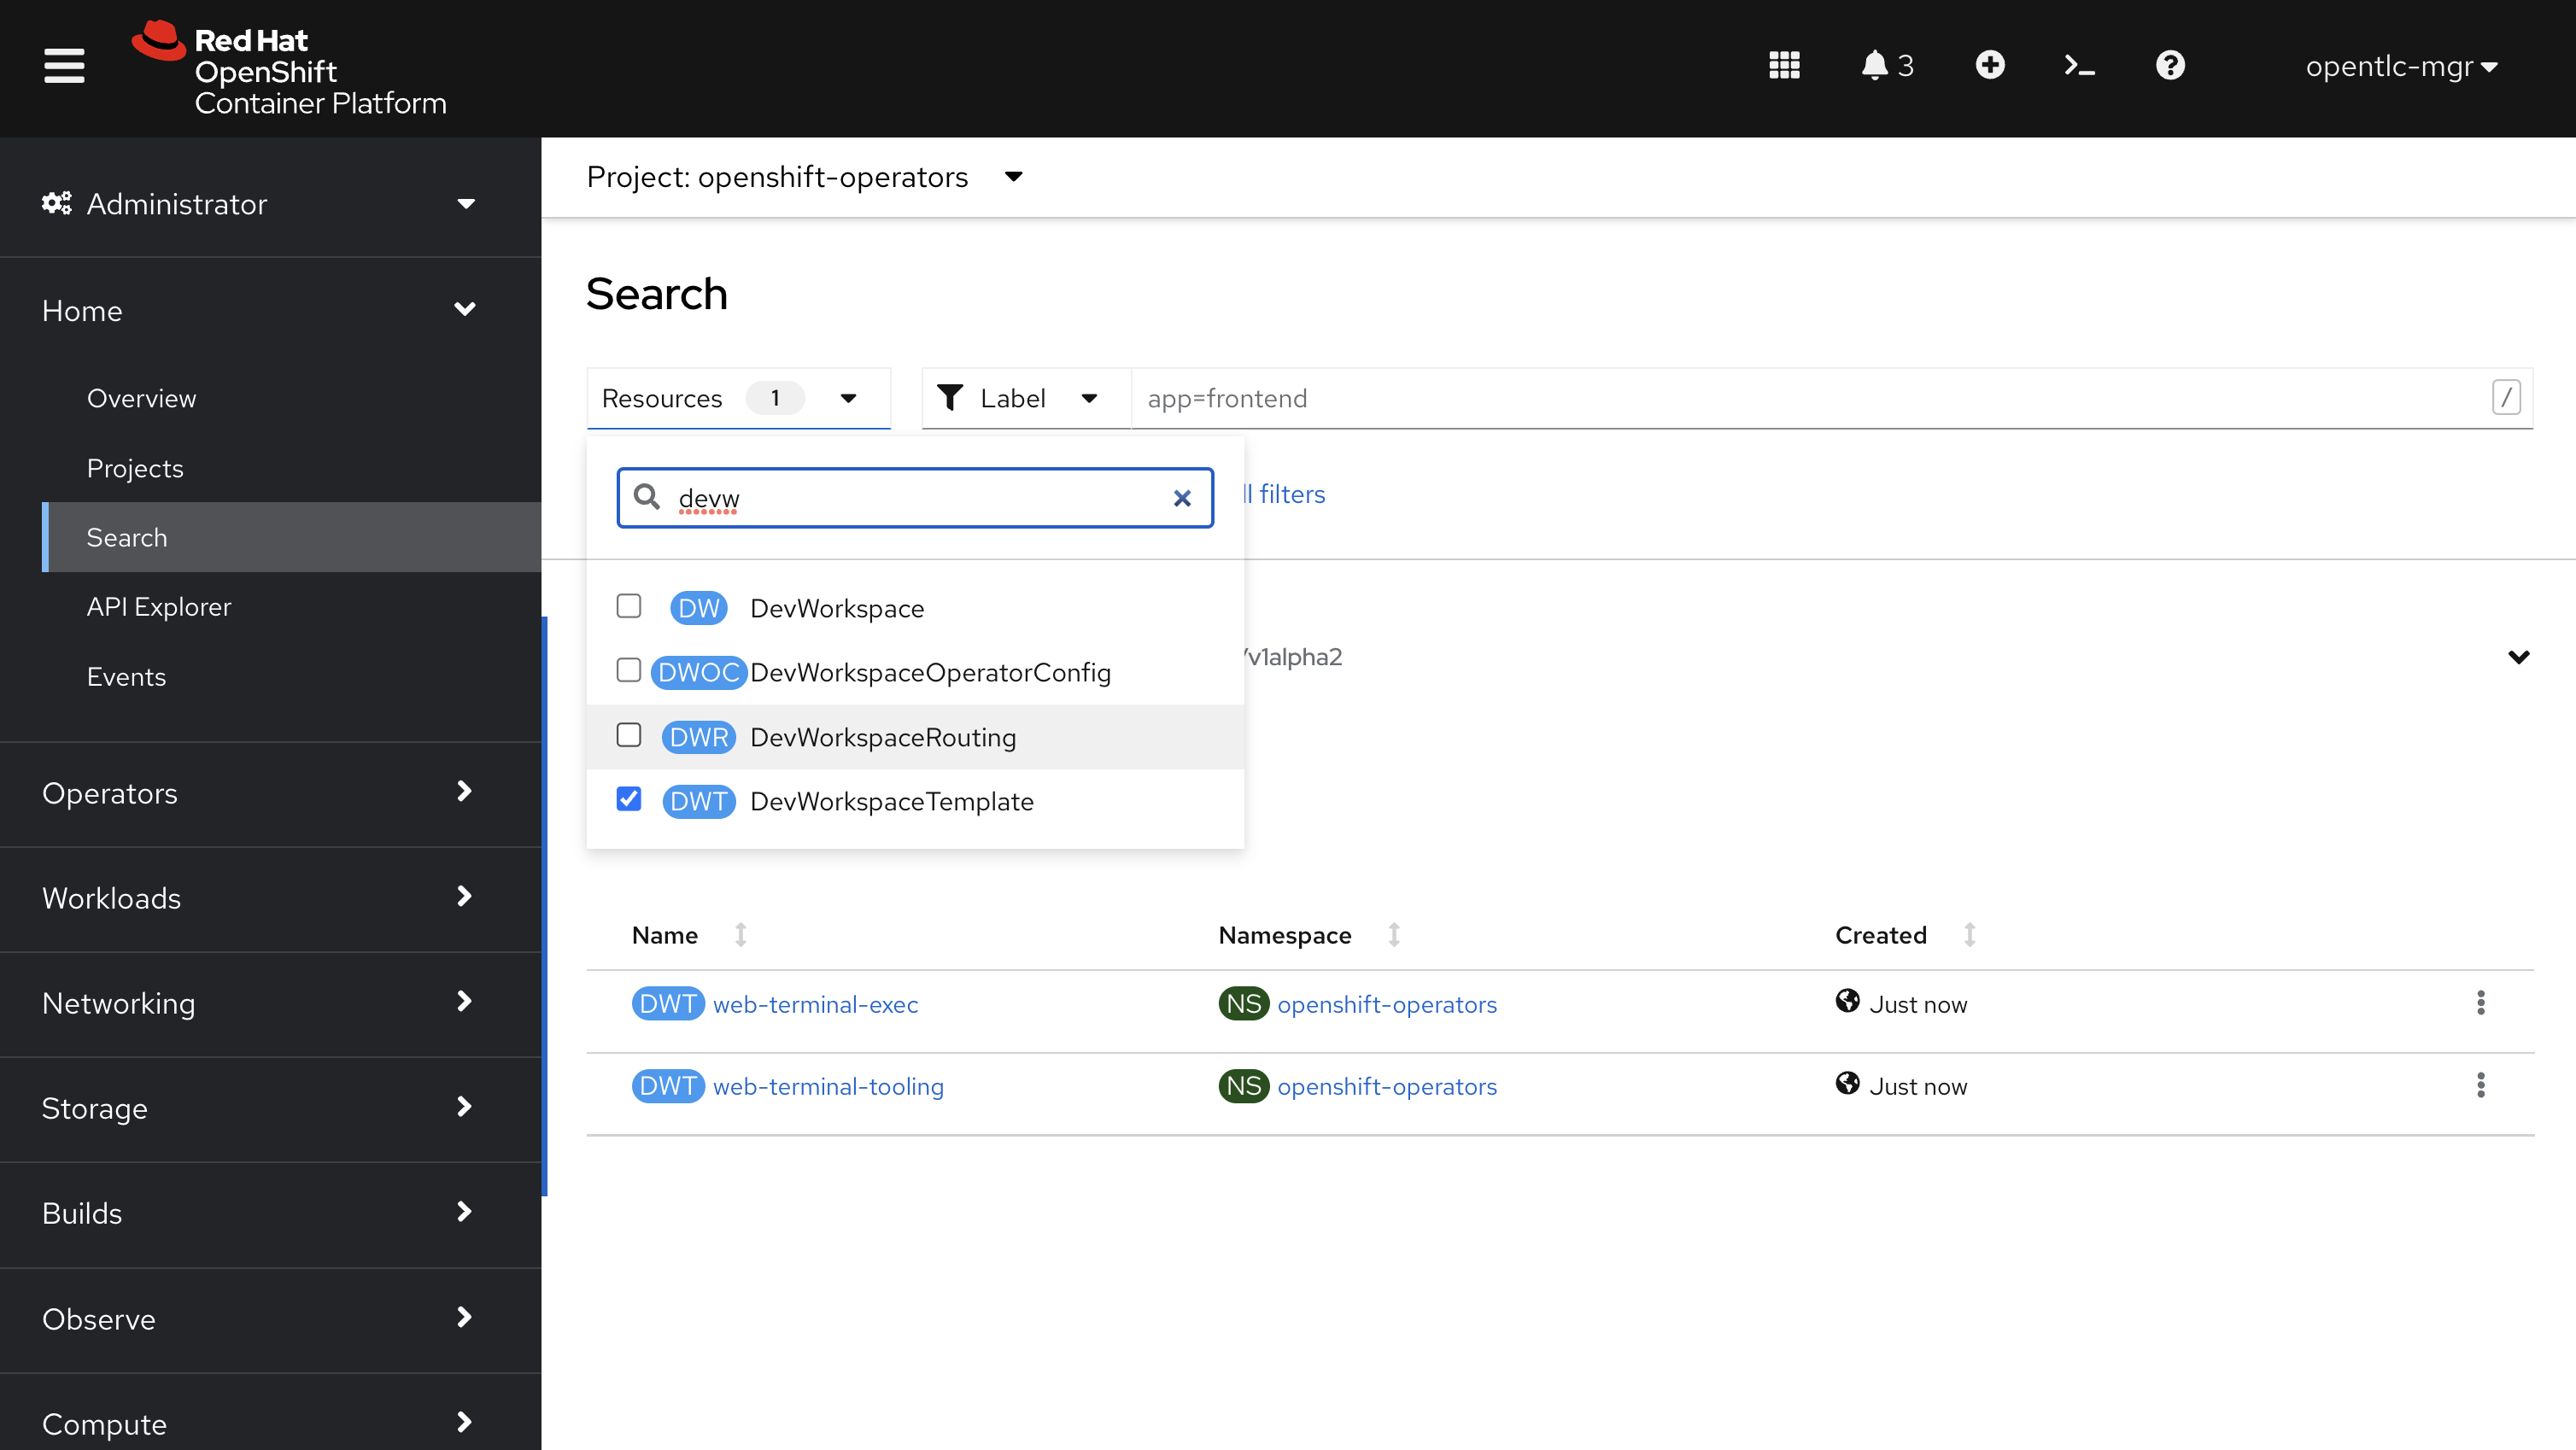
Expand the Home pane in the sidemenu and select the Search section.
-
Choose
openshift-operatorsin the Project dropdown at the top of the screen.Use the Show default projects toggle if the openshift-operatorsProject is not listed. -
Use the Resources dropdown to find the DevWorkspaceTemplate and select it.
-
Select the web-terminal-tooling item in the resulting list, and navigate to the YAML tab on the subsequent screen.
-
Add the line
web-terminal.redhat.com/unmanaged-state: 'true'to the annotations in the YAML. -
Change the image property in the listed container to use the
quay.io/evanshortiss/summit-connect-2022-web-terminal:latestcontainer image.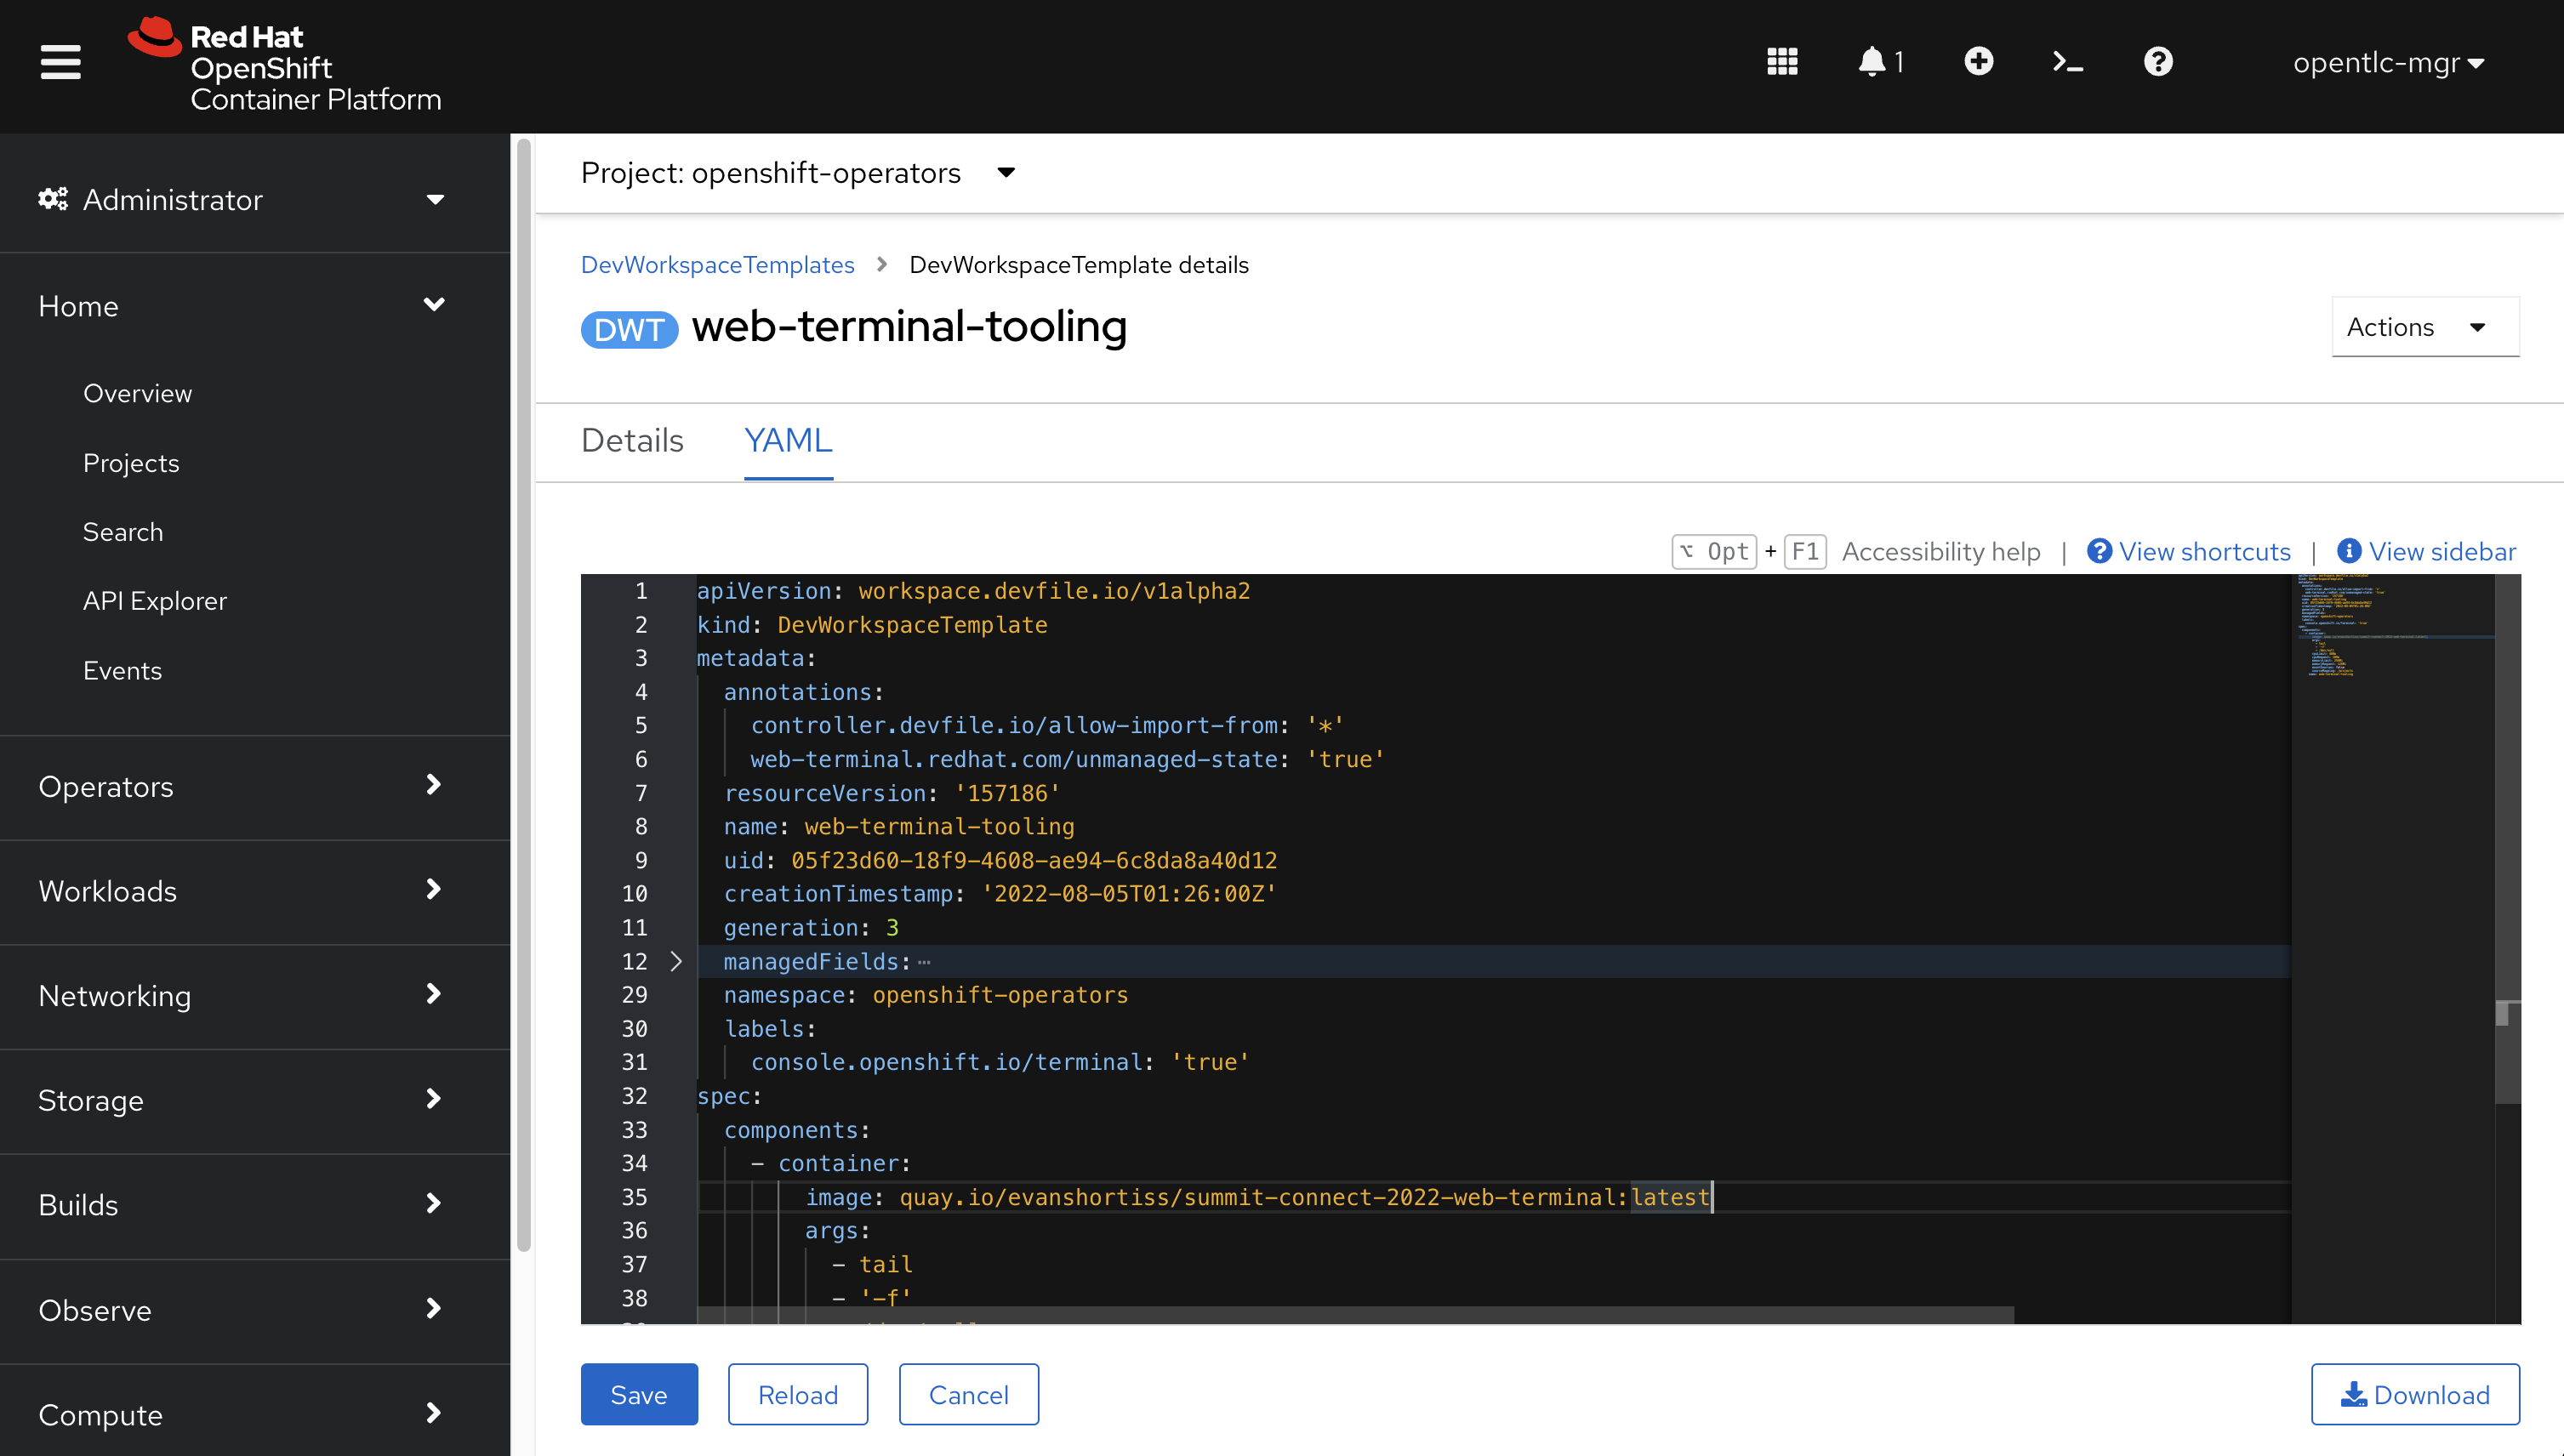
Use the Customised Web Terminal Container Image
Take your customised Web Terminal for a spin:
-
Login to the cluster as any user available to you.
-
Click the Web Terminal icon in the toolbar at the top of the screen.
-
Follow the onscreen prompts to select an existing project or create a new project that will be used to deploy the Web Terminal Pod.
-
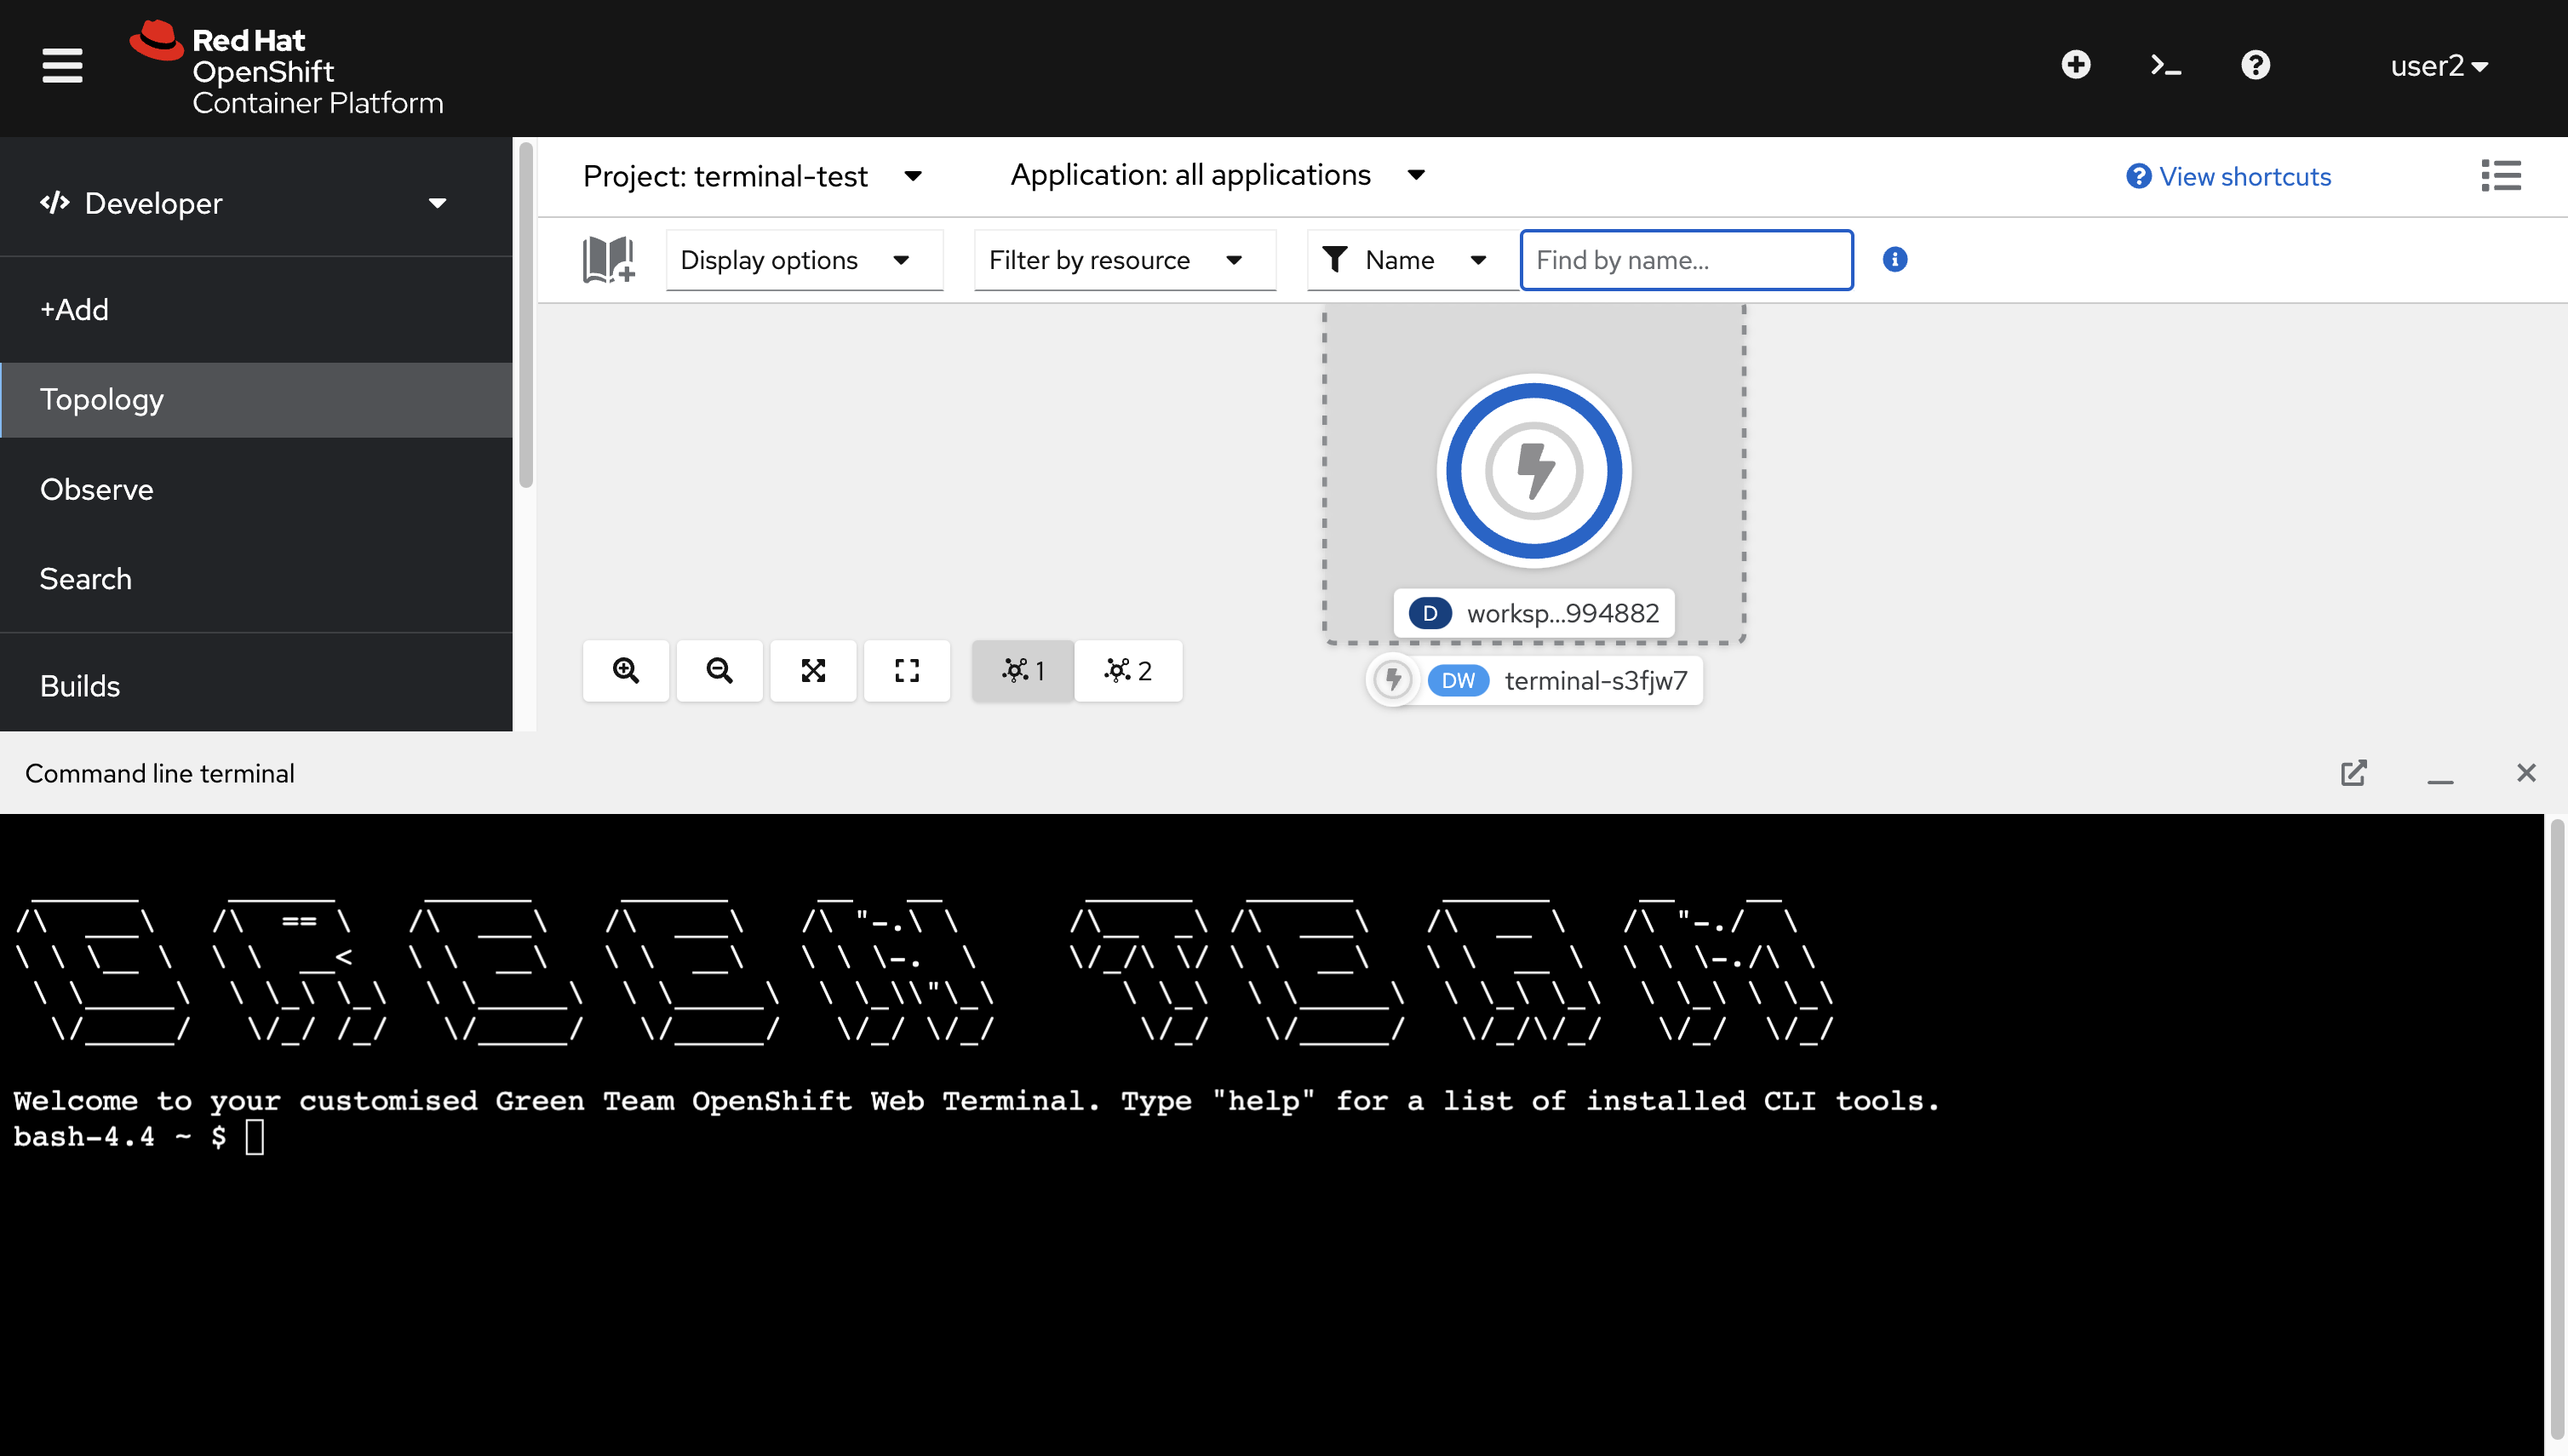
Verify that the terminal has started and you see a unqiue ASCII art welcome message.
You might not see the ASCII art if you used a Project that had an existing terminal session.
Force the new container image to be used by deleting the existing Pod(s) using the following command in your Web Terminal session:
oc delete pod -l 'controller.devfile.io/devworkspace_id'The Web Terminal will freeze for a moment while a new Pod is created. The new Pod will use the new customised container image and print the ASCII art. If a Try again error message is displayed, click the link and reopen the Web Terminal.
The ASCII art displayed by the customised Web Terminal is shown in the image below.
Customising the OpenShift Web Console
The OpenShift Web Console provides extensive customistion options. These are documented in the Customizing the Web Console section of the OpenShift documentation.
|
Customising the Web Console requires use of a user account with |
Console Notification Banners
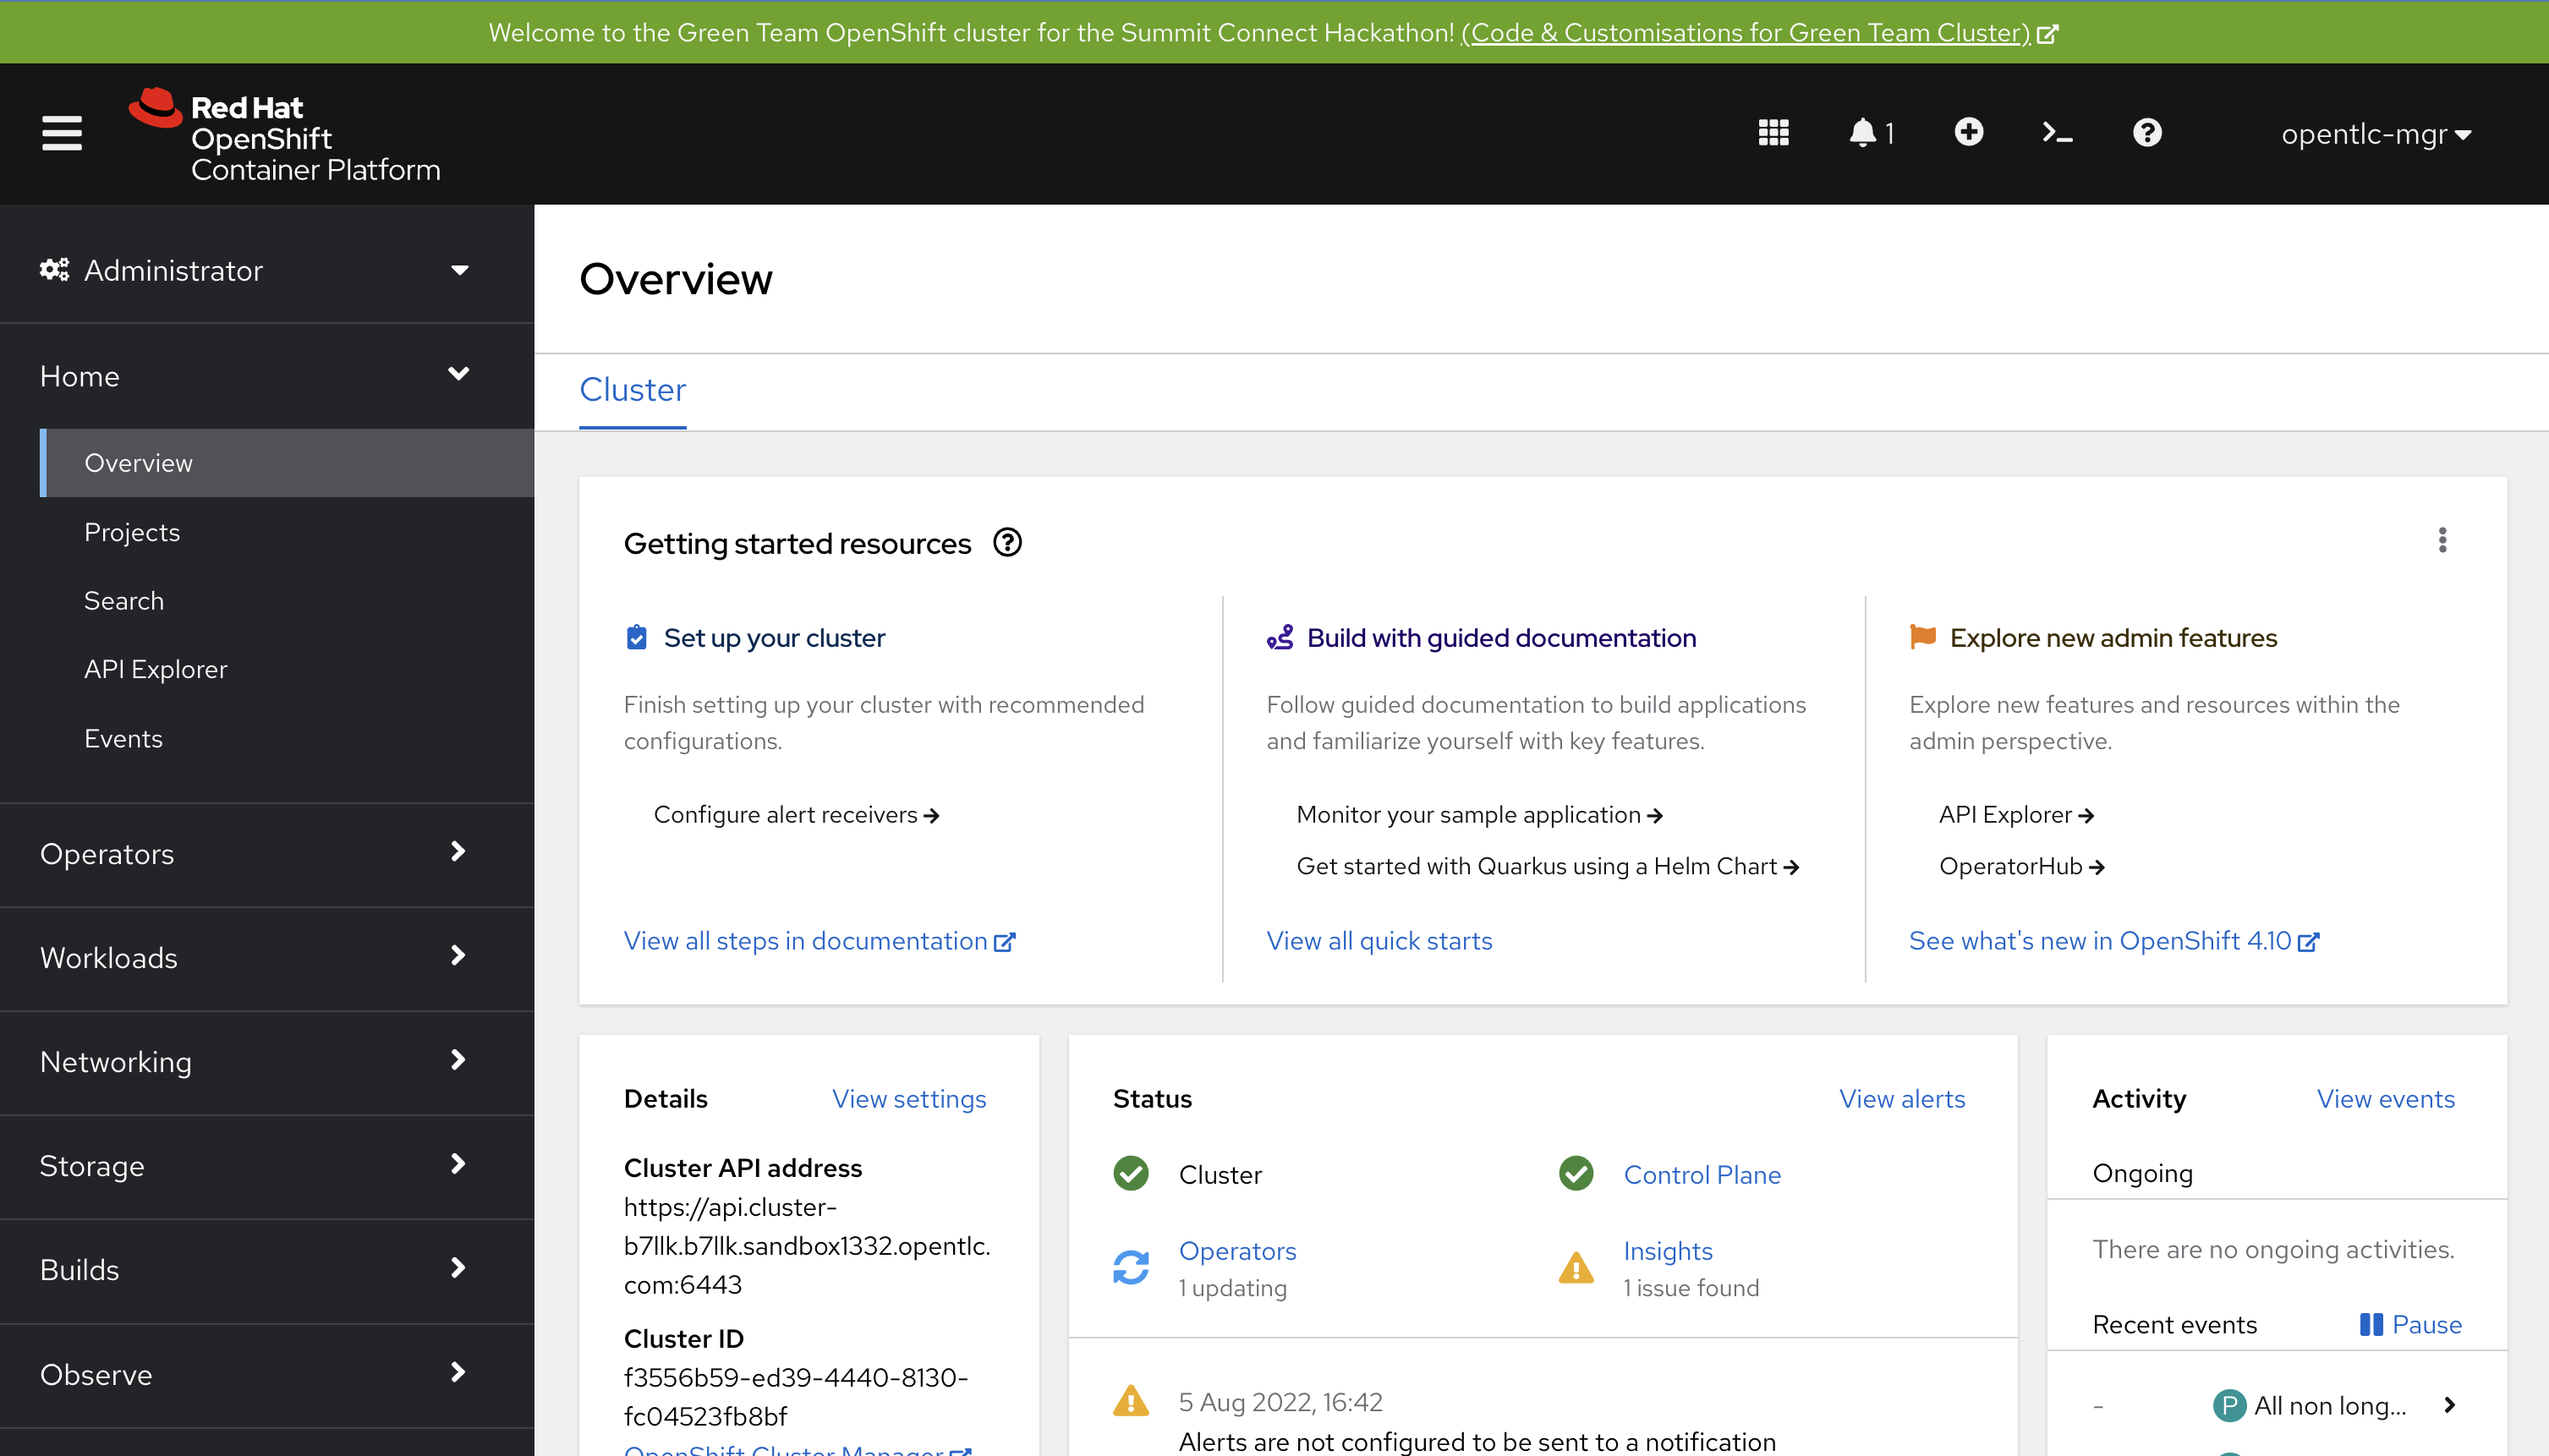
A notification banner can be added to the OpenShift Console using a ConsoleNotification CRD. An example is shown in the following screenshot.
Add this banner to your cluster:
-
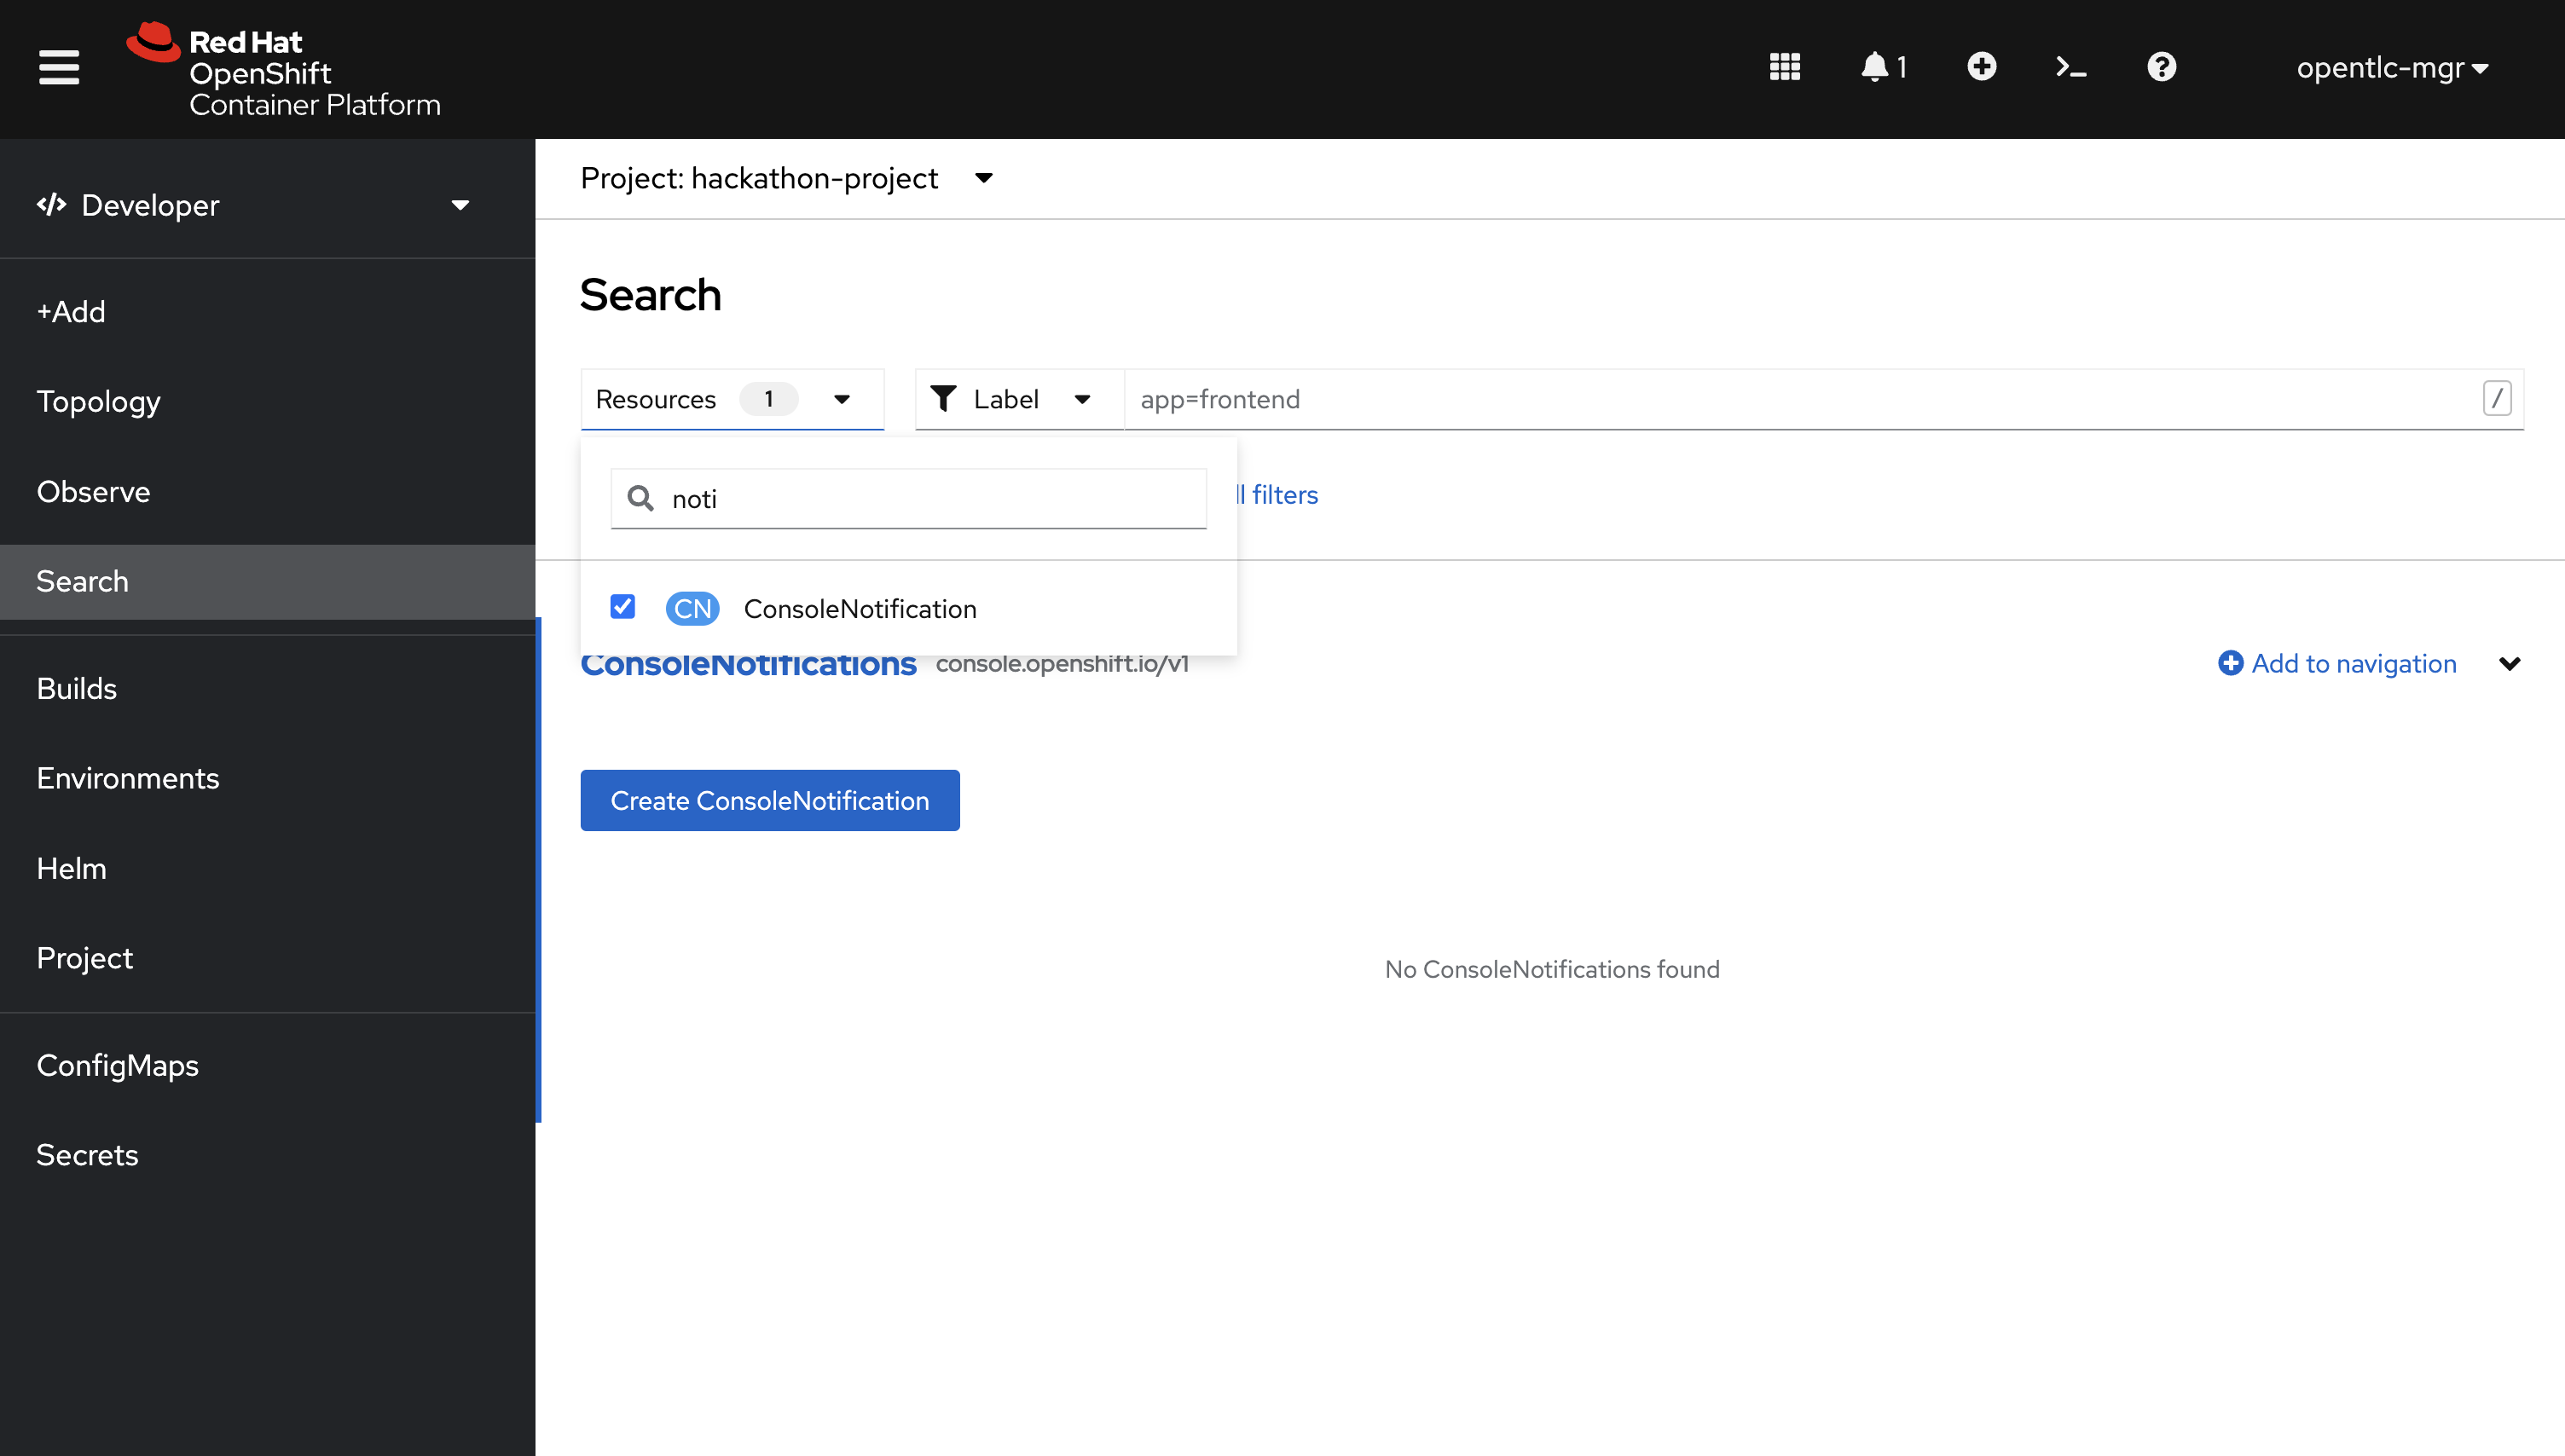
Select the Developer Perspective from the side-menu on OpenShift.
-
Click the Search link in the side-menu of the Developer Perspective.
-
Search for the ConsoleNotification using the Resources dropdown. Check the box beside it when listed.
-
Click the Create ConsoleNotification button.
-
Replace the YAML sample with the following content:
apiVersion: console.openshift.io/v1 kind: ConsoleNotification metadata: name: hackathon-banner spec: text: Welcome to the Green Team OpenShift cluster for the Summit Connect Hackathon! location: BannerTop link: href: 'https://github.com/redhat-scholars/quickstart-workshop/tree/master/apps/green' text: (View Code for the Green Team Cluster) color: '#fafafa' backgroundColor: '#65a30d' -
Click the Create button.
|
If you are unable to create the ConsoleNotification, make sure to log in as a user with cluster-admin permissions and try again. |
Take note of the link to a GitHub repository in the ConsoleNotification. You’ll be using that code shortly!
Customise the Cluster Branding
A custom logo and/or custom product name can be applied by modifying the Console CR.
Follow these instructions to set a custom logo on your cluster:
-
Login to your OpenShift Web Console as a user with
cluster-adminpermissions. -
Open the Web Terminal.
-
Download a logo file using cURL inside the Web Terminal:
curl https://raw.githubusercontent.com/redhat-scholars/quickstart-workshop/master/apps/green/green-team.png -o /tmp/green-team.png -
Use the Web Terminal to create a ConfigMap in the openshift-config namespace on your OpenShift cluster to store the logo binary data:
oc create configmap console-custom-logo \
--from-file /tmp/green-team.png -n openshift-config
The last step in this process is to instruct the OpenShift Web Console to display your logo instead of the default logo. This requires modifying the existing Console CR. This can be accomplished using the either the oc edit or oc patch commands. Use the oc patch command to apply the Console configuration change:
-
Create the patch YAML by running the following command in the Web Terminal:
cat <<EOF > /tmp/patch.yaml spec: customization: customLogoFile: key: green-team.png name: console-custom-logo EOF -
Run the patch command, applying the change to the Console item named cluster:
oc patch consoles.operator.openshift.io cluster \ --type merge --patch-file /tmp/patch.yaml -
Wait a minute, and refresh your web browser. The custom logo should be displayed in the top-left of the OpenShift Web Console.
Using GitOps to Manage Cluster Resources
In this section you’ll add further customisations known as QuickStarts to the OpenShift cluster, but there’s a twist! You’ll be using link: OpenShift GitOps to synchronise the QuickStart YAML definitions from a Git repository to the OpenShift cluster. The QuickStarts will guide users through the steps required to manage a resource using OpenShift GitOps.
If you’re not familiar with it, GitOps is a set of practices to manage infrastructure and application configurations using Git repositories as a single source of truth for declarative infrastructure. Red Hat OpenShift GitOps uses Argo CD to maintain cluster resources. Argo CD is an open-source declarative tool for the continuous integration and continuous deployment (CI/CD) of applications.

|
It’s possible to run OpenShift GitOps on the same cluster that you want to sync resources to, or on a separate cluster and sync resources to one or more distinct clusters. In this workshop we’re running everything on a single cluster to remove the need for managing multiple clusters. |
Access the Cluster Argo CD Instance
To get started, you’ll need to access the Argo CD UI:
-
Login to your OpenShift cluster as a “cluster-admin” user.
-
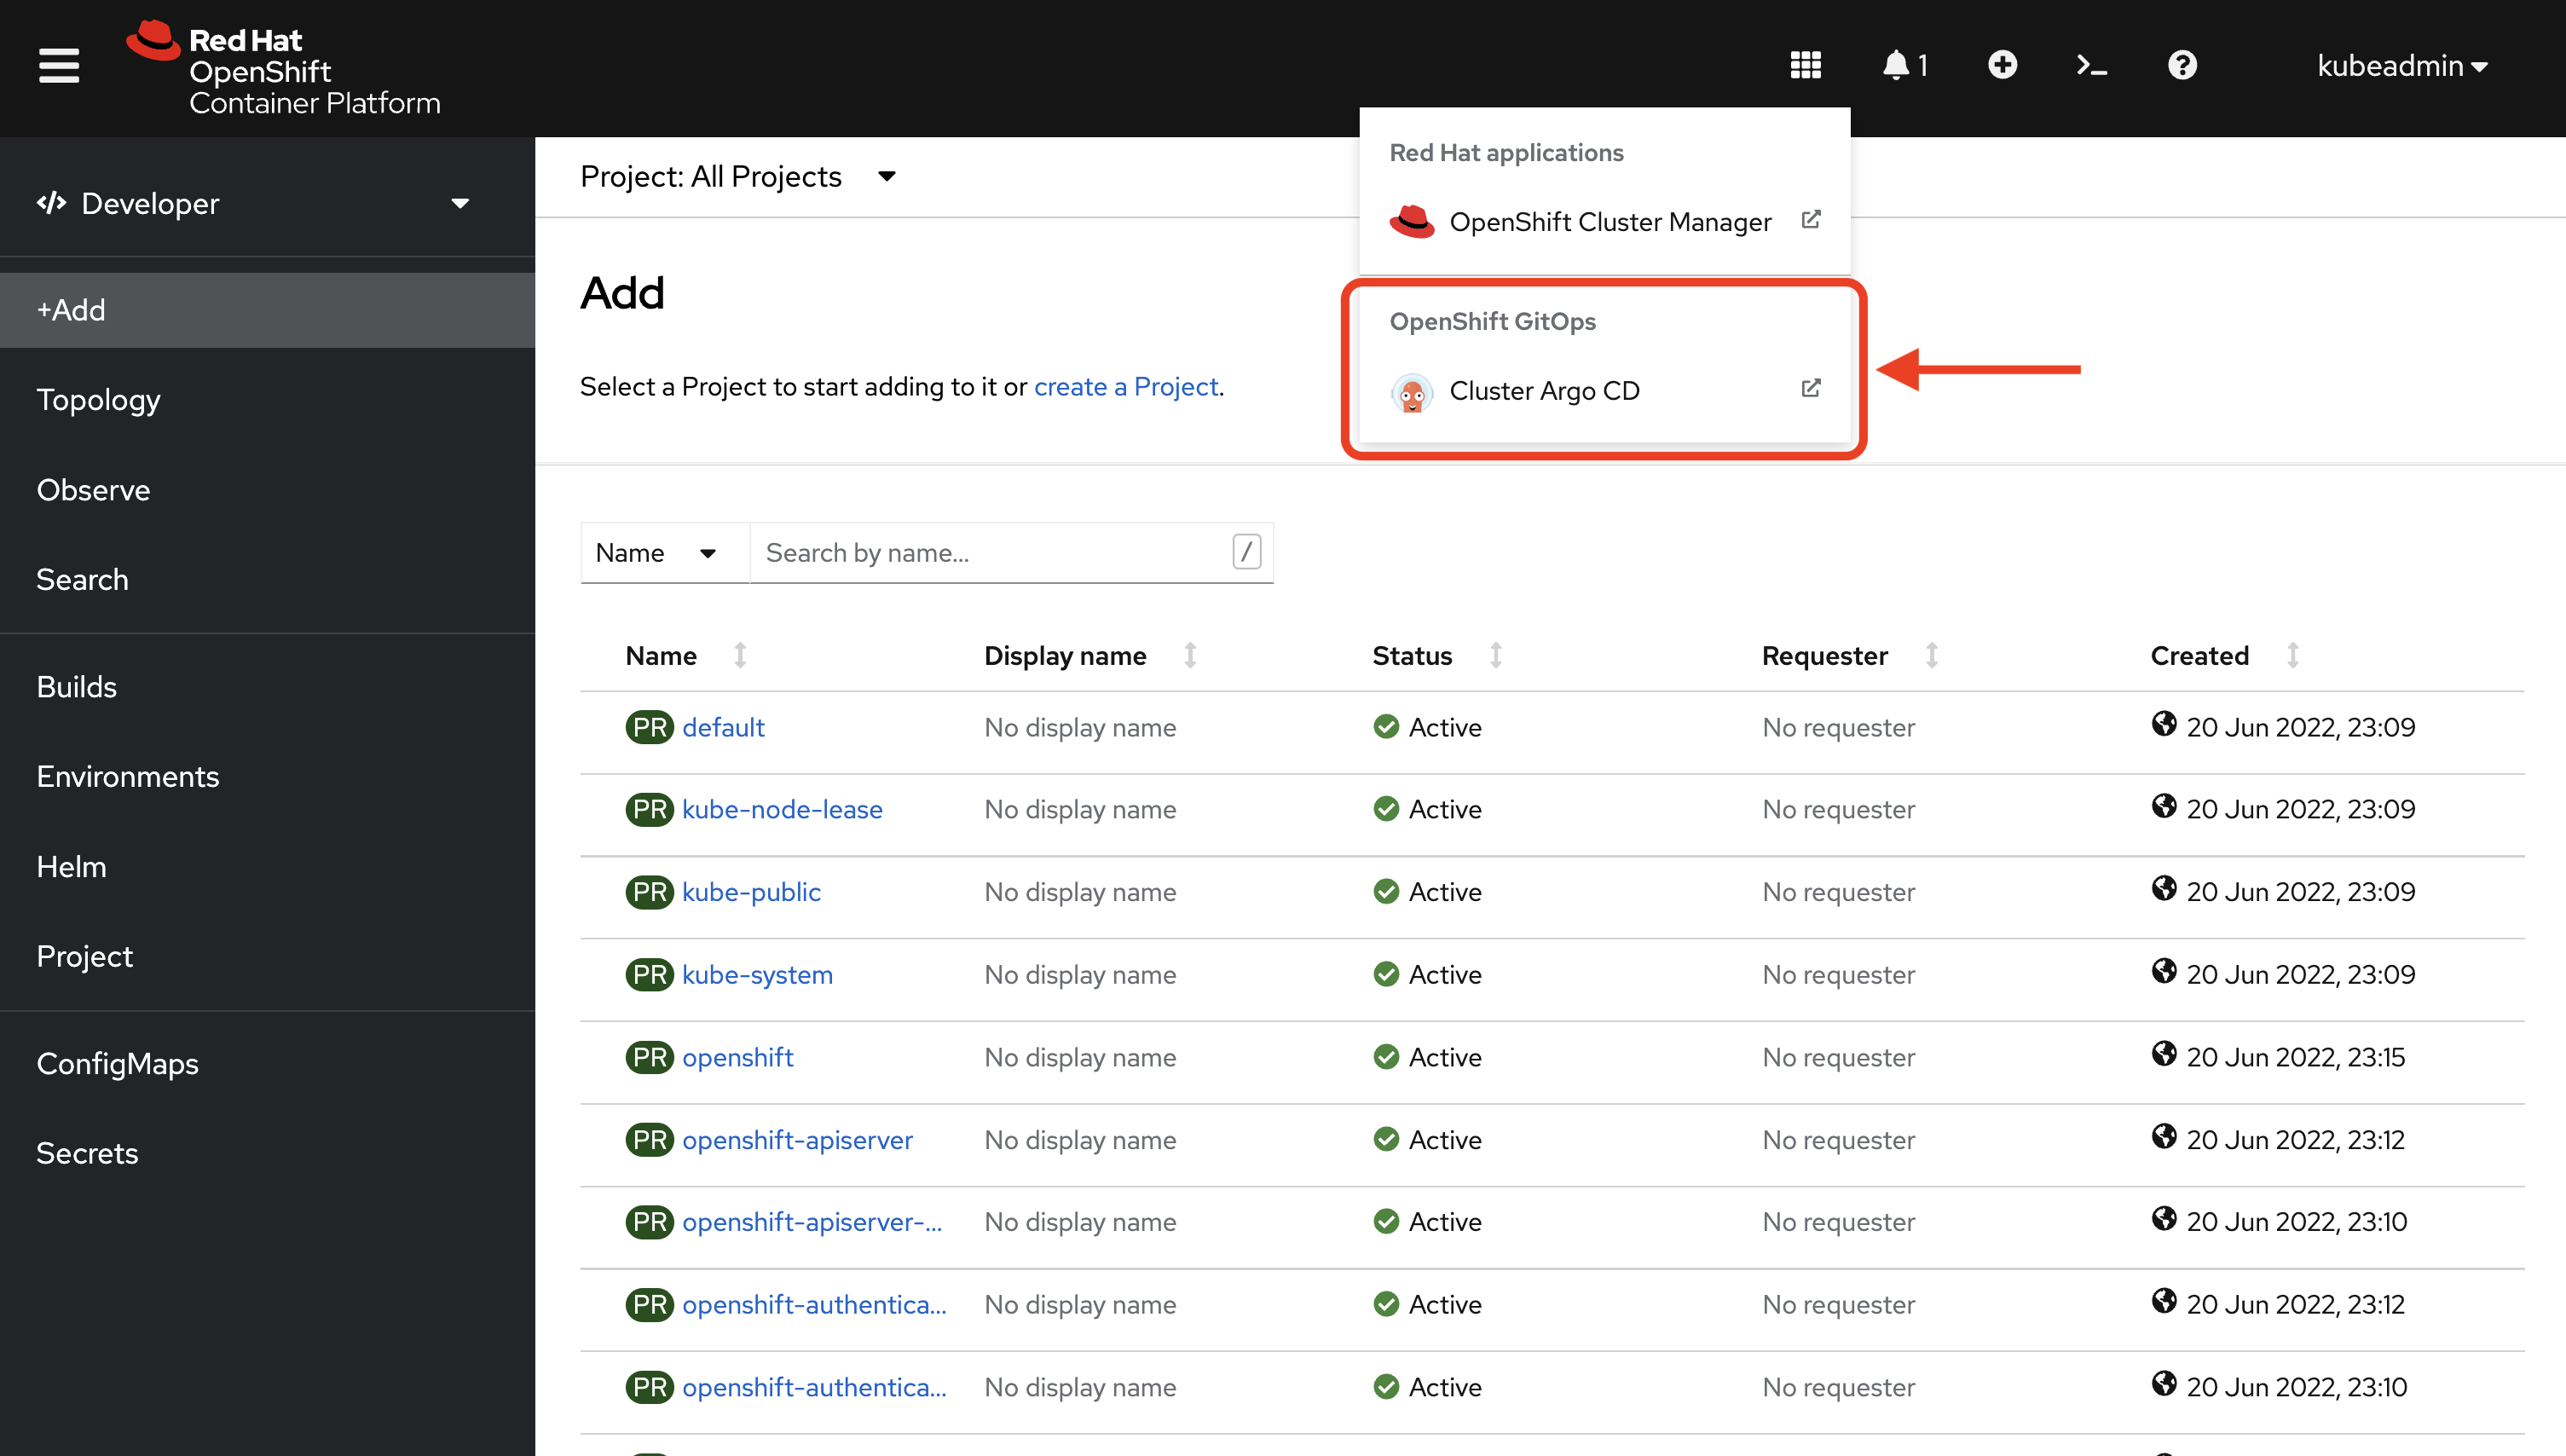
Expand the Application Launcher menu (the 3x3 sqaure icon) in the top-right of the OpenShift console.
-
Click the Cluster Argo CD link to load the Argo CD UI.
-
Use the Log in via OpenShift button to initiate an OpenShift SSO login flow. Enter your password and accept the permissions request when prompted.
This Argo CD instance has been pre-configured to support integration with OpenShift SSO. All users on the cluster can login, but only users in
cluster-adminsgroup have write access.
You will be redirected to the Argo CD applications dashboard upon successful login.

Applications and Argo CD
Argo CD uses an Application CRD to represent deployed application resources. The Application definition specifies the source state, represented using YAML files in a Git repository, and a destination cluster and namespace in which to deploy the resources.
An example Application CR is shown below.
apiVersion: argoproj.io/v1alpha1
kind: Application
metadata:
  name: guestbook
  namespace: guestbook
spec:
  project: default
  source:
    repoURL: https://github.com/argoproj/argo cd-example-apps.git
    targetRevision: HEAD
    path: guestbook
  destination:
    server: https://kubernetes.default.svc
    namespace: guestbook
You will create an Argo CD Application that uses source files defined in the redhat-scholars/quickstart-workshop repository. Take a look at these files and you might notice that some, such as the consolenotifiction.hackathon-banner.yaml look familiar.
Create an Application in Argo CD
Applications can be created using the Argo CD UI, or by directly by applying Application CRs to your OpenShift cluster using the OpenShift CLI or the OpenShift Web Console.
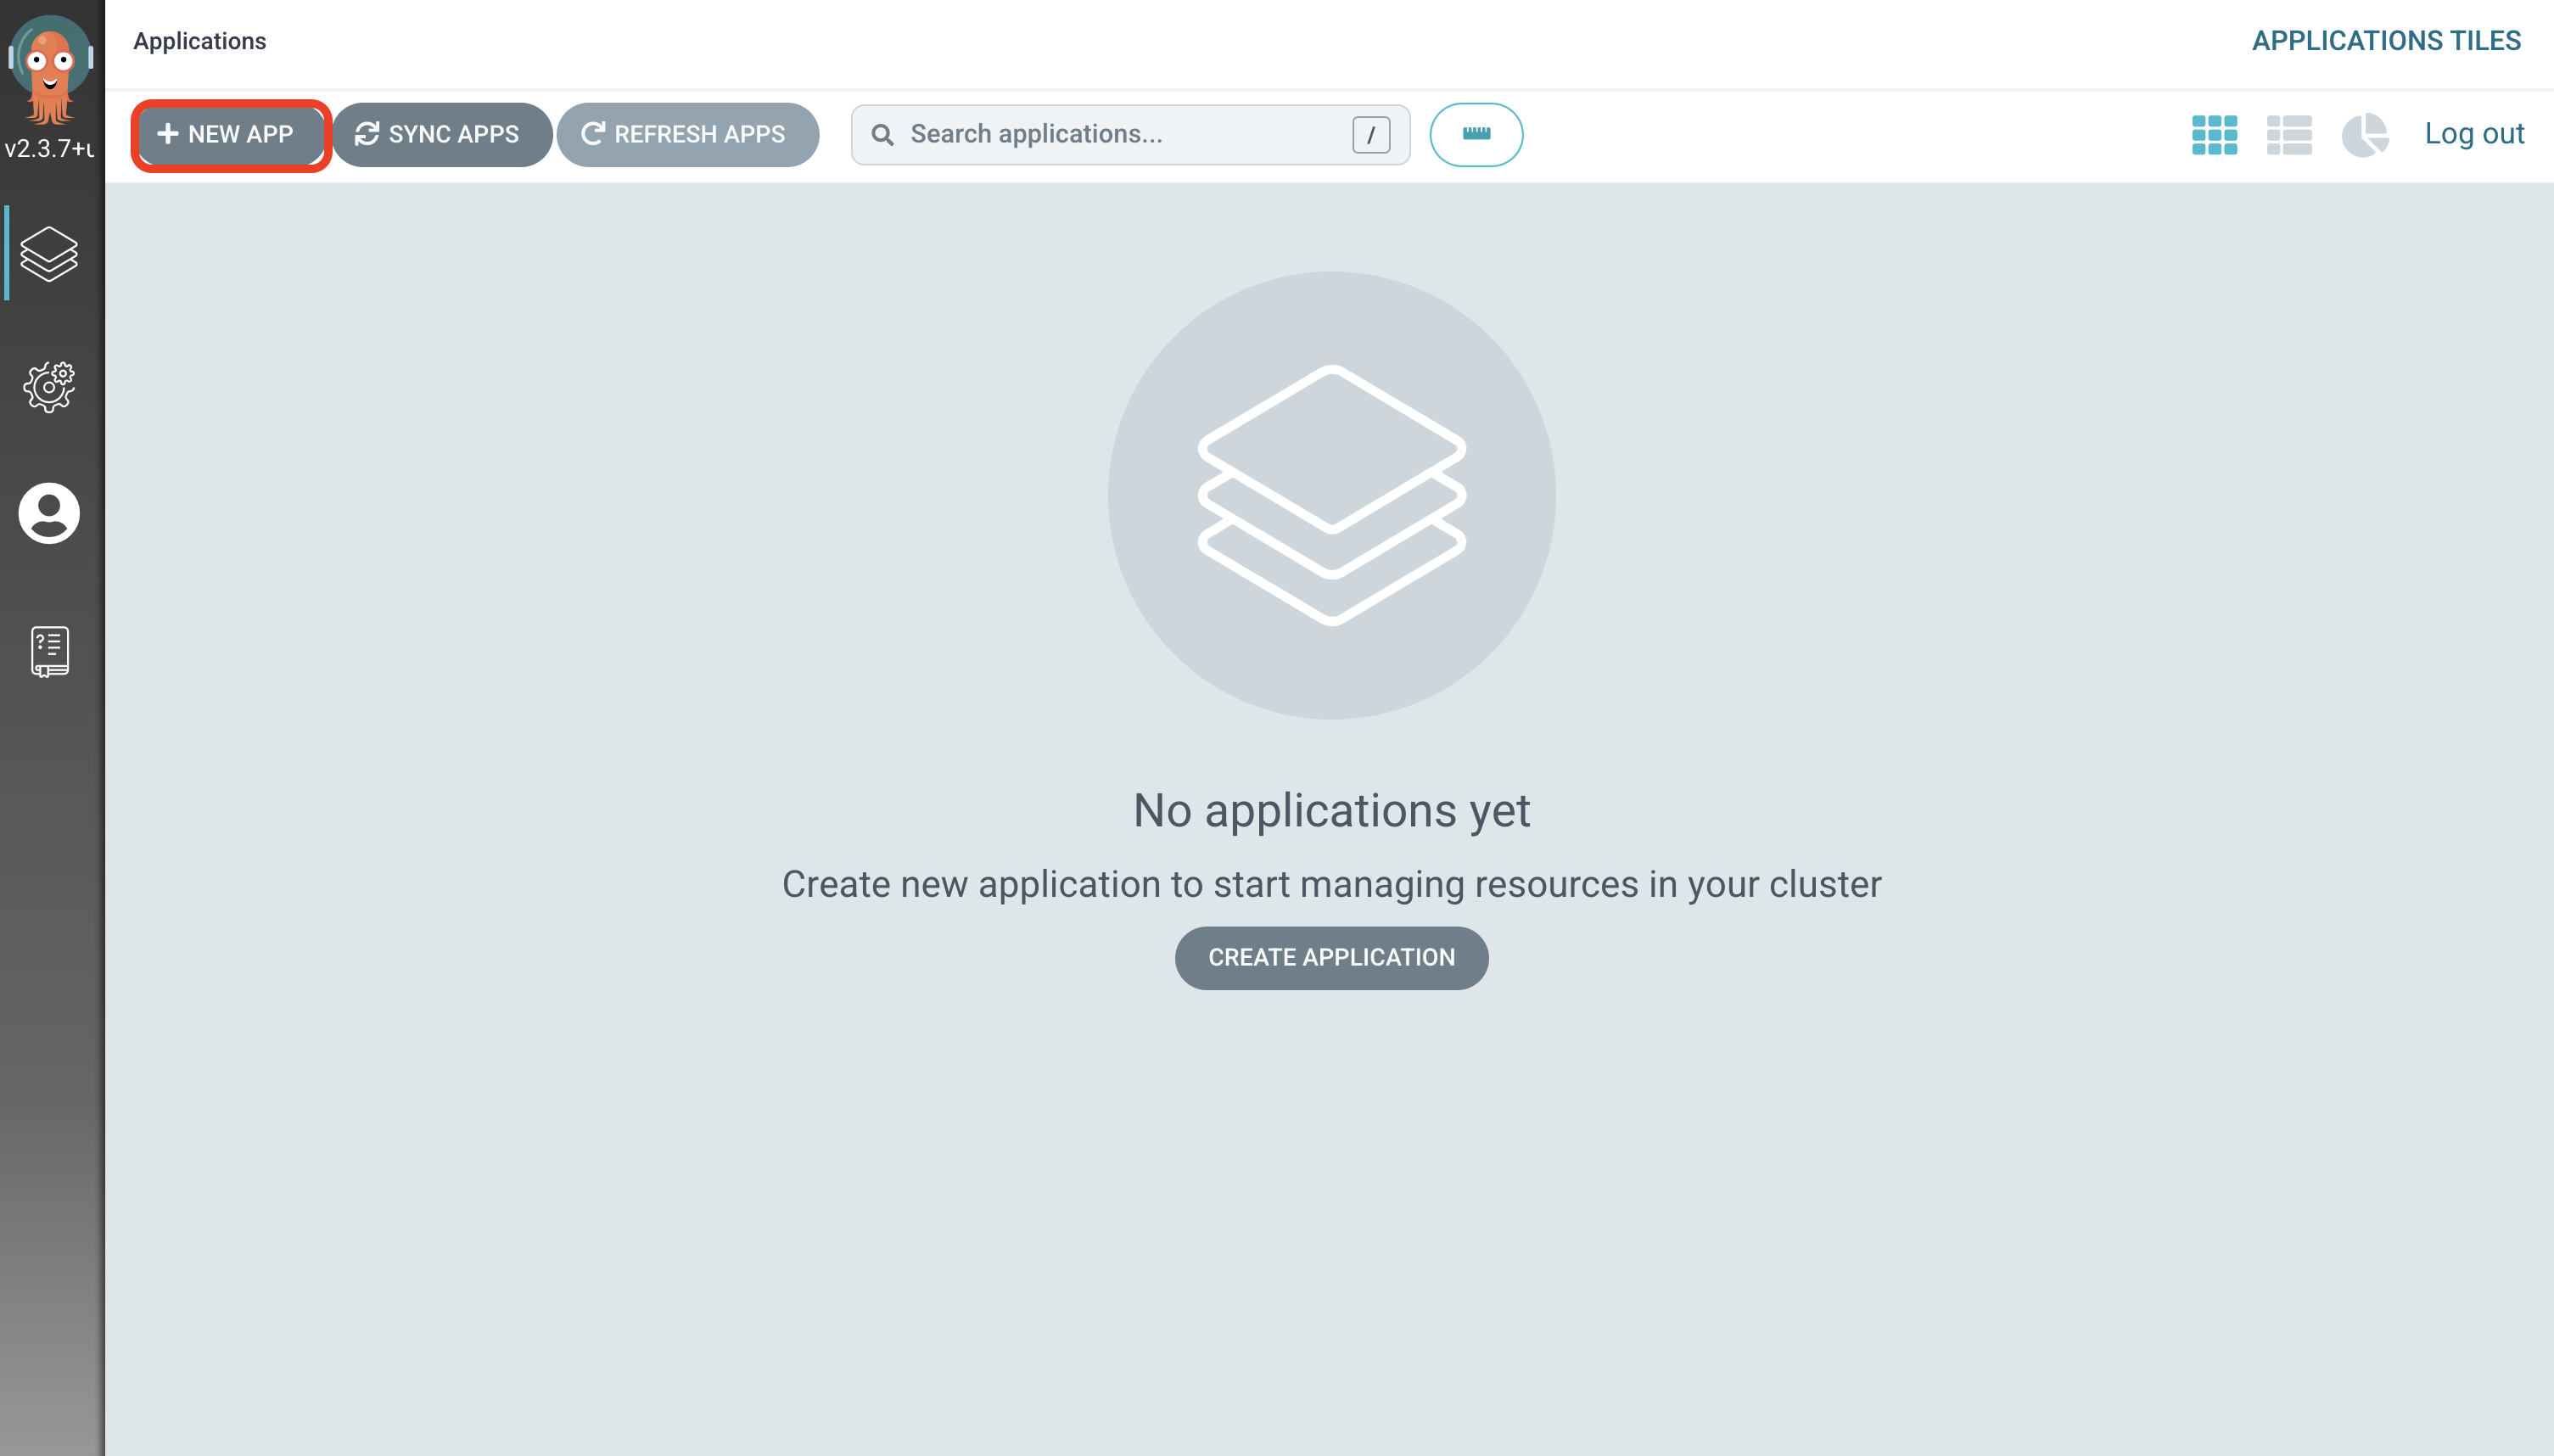
Create an Application using the Argo CD UI:
-
Login to the Argo CD applications dashboard.
-
Click the Create Application button on the Argo CD applications dashboard. An overlay will appear.
-
Set the following paramaters in General section of the overlay:
-
Application Name:
console-customisations -
Project:
default -
Sync Policy:
automatic -
Self Heal:
Enabled
-
-
Set the following paramaters in Source section of the overlay:
-
Repository URL:
https://github.com/redhat-scholars/quickstart-workshop/ -
Revision:
HEAD -
Path:
apps/green/console-customisations
-
-
Set the following paramaters in Destination section of the overlay:
-
Cluster URL:
https://kubernetes.default.svc -
Namespace:
default
-
-
Set the following paramaters in Directory section of the overlay:
-
Directory Recurse:
Enabled
-
-
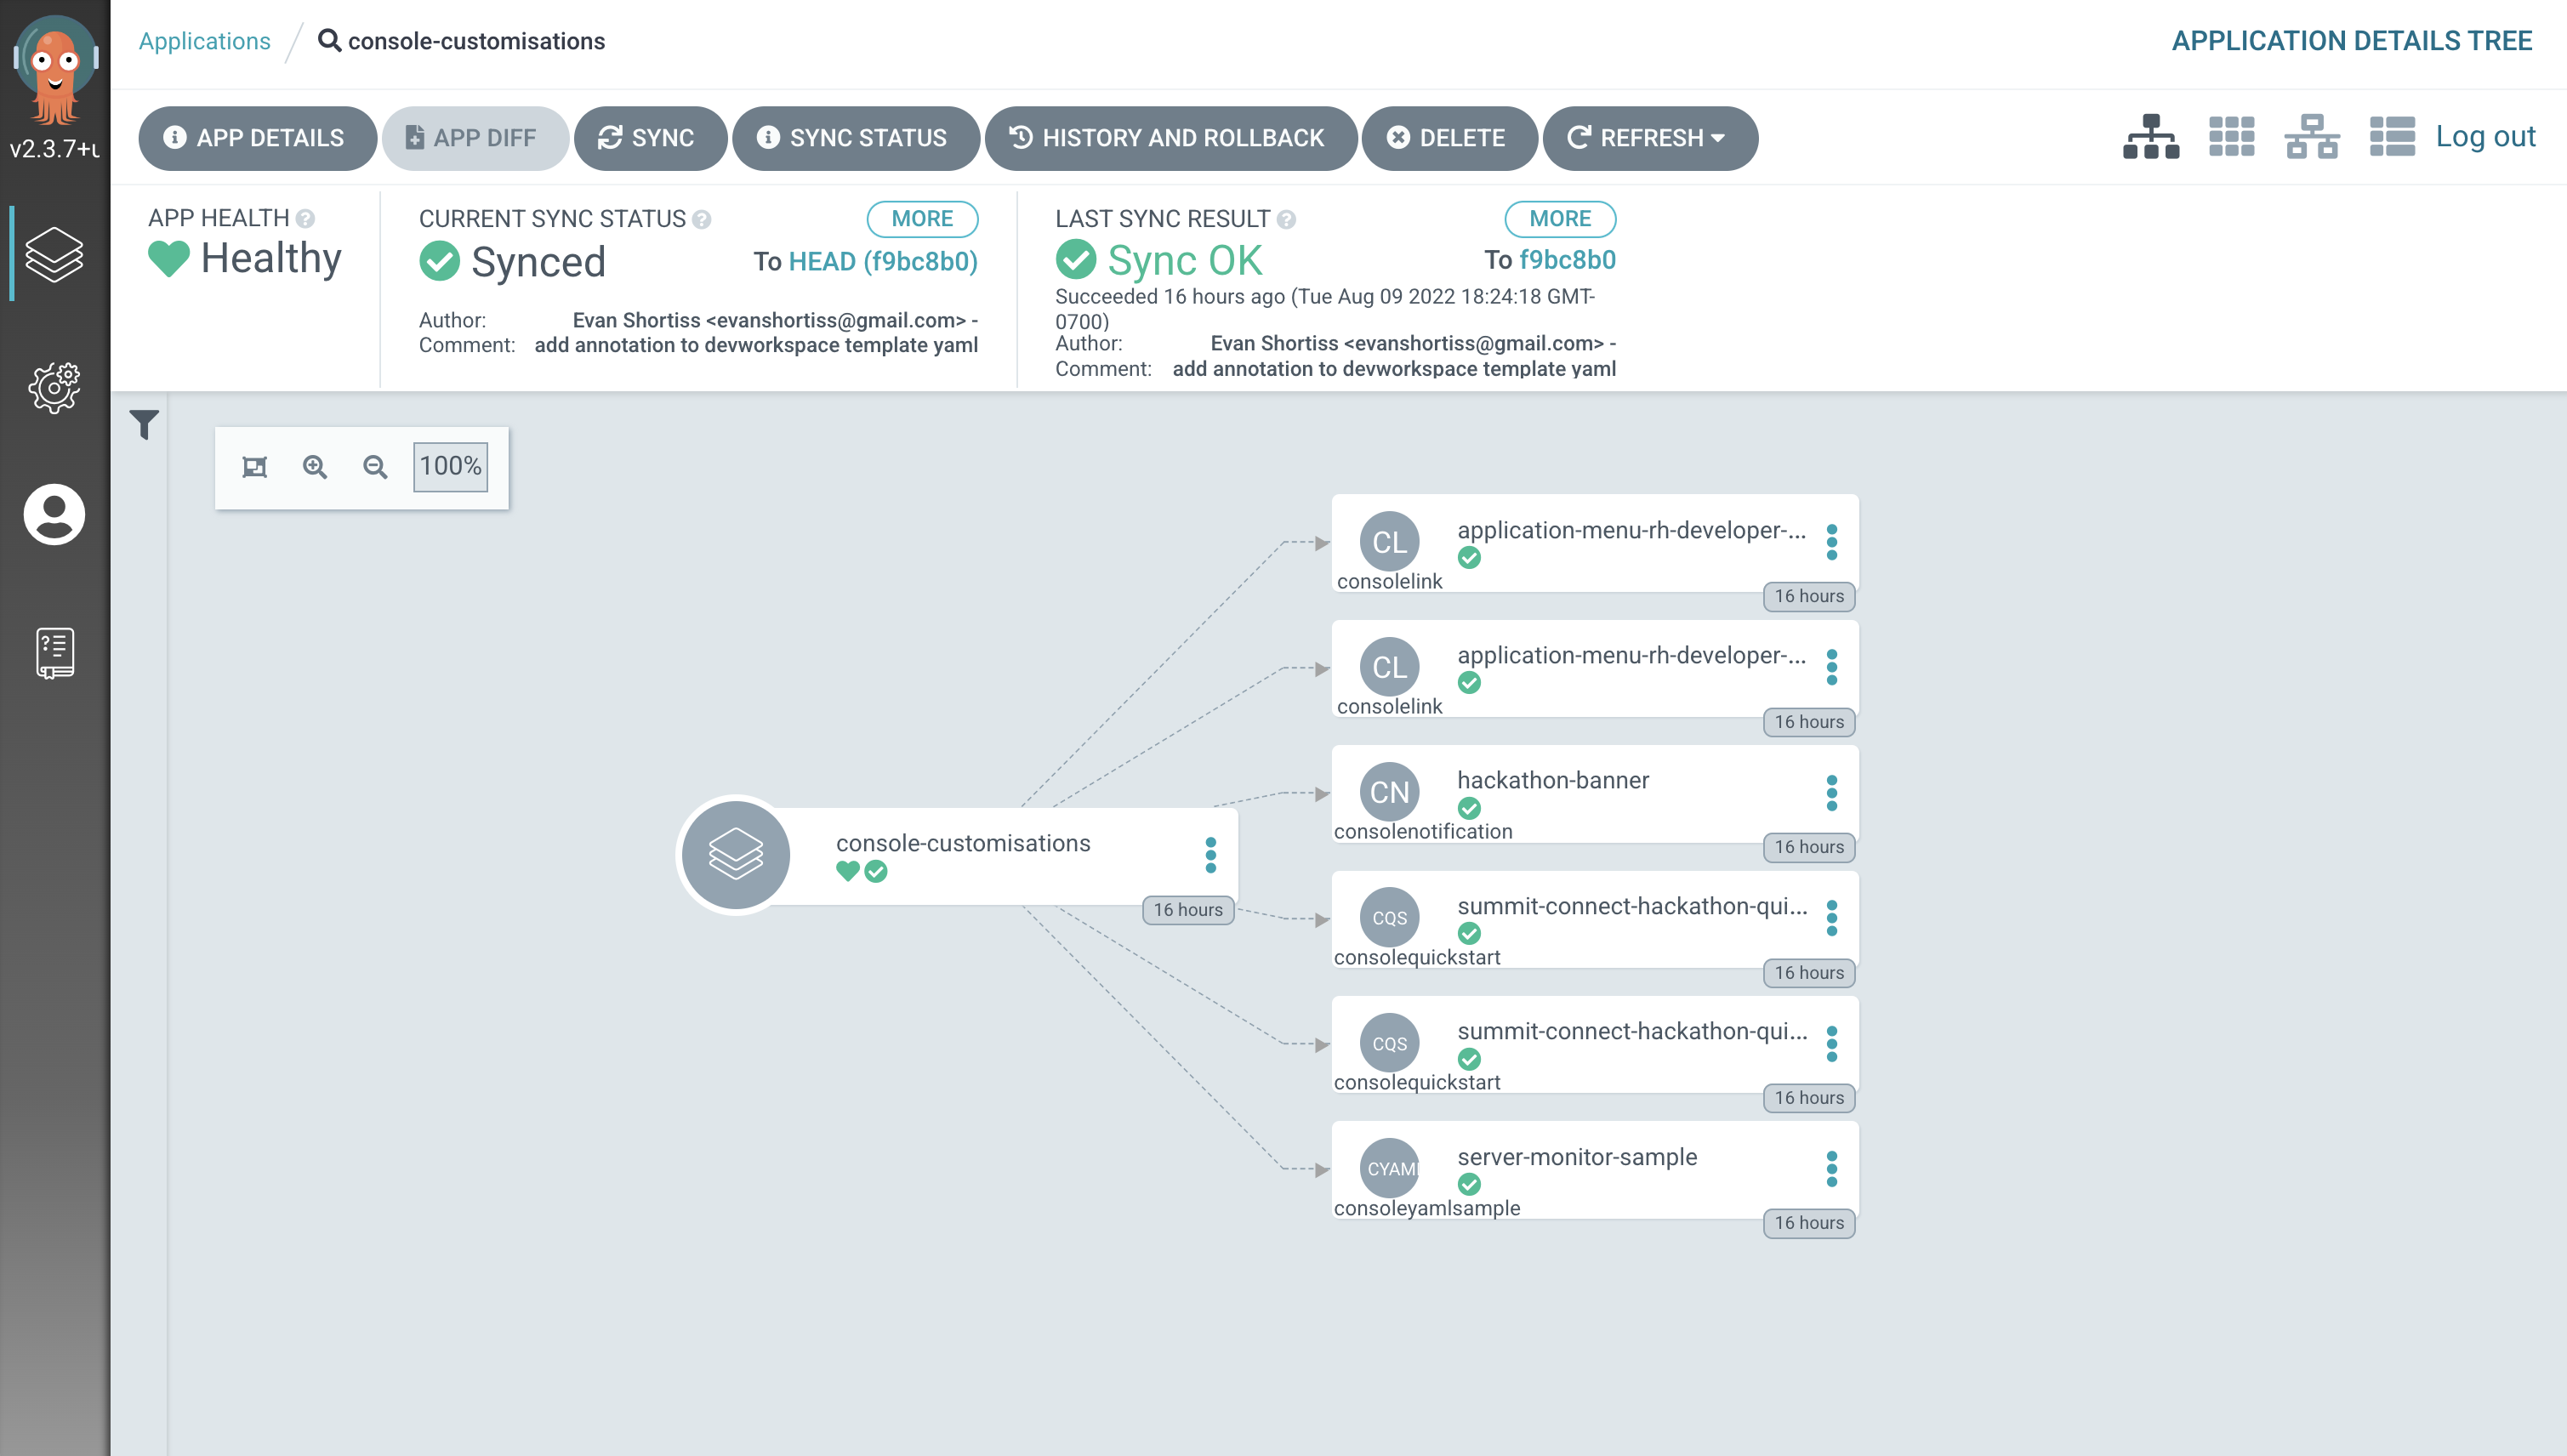
Click the Create button at the top of the overlay.
The console-customisations Application will be created, and the status of the Application will be shown in the Argo CD UI.
All of the listed resources will be synced to the OpenShift cluster. Changes made in to resources in the Git repository will automatically be detected and synchronised to the OpenShift cluster by Argo CD.
Return to the OpenShift Console, refresh the page, and verify that:
-
The previously added ConsoleNotification banner message has been modified.
-
The Application Launcher menu (the 3x3 sqaure icon) contains a Hackathon Resources section.
-
Selecting Quick Starts from the Help Menu (question mark icon) in the top-right of the OpenShift Web Console lists new Quick Starts named Customise, Deploy and Observe.

Follow the Quick Starts
Congratulations on making it this far! You’re now ready to start your own cluster customisation journey.
To get started visit the Quick Starts, and complete the Quick Start named Summit Connect Hackathon (Customise). Remember, you can find the Quick Starts by selecting Quick Starts from the Help Menu (question mark icon) in the top-right of the OpenShift Web Console.
After completing this Quick Start you’ll have a Git repository that contains your unique customisations, and you can synchronise them with your cluster using Argo CD.